Love this? Save it for later!
Share the inspiration with your friends
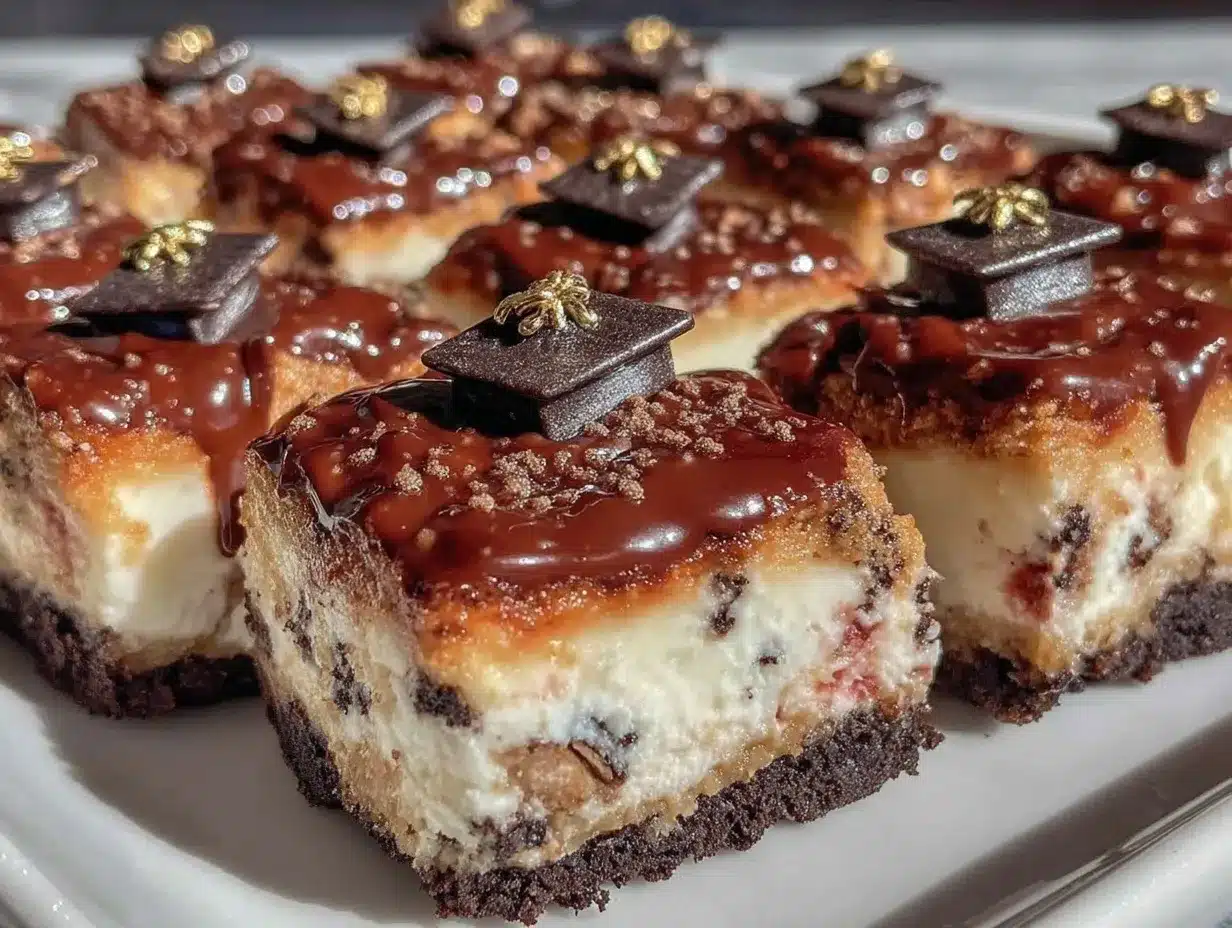
“You know that feeling when the graduation party is set to start in less than an hour, and you realize you forgot the dessert?” That happened to me last spring. I was at my friend Jamie’s house, helping set up for her daughter’s graduation celebration. The kitchen was buzzing with last-minute preparations, and the stress was real—especially when I remembered the dessert was still unwritten on the menu. Honestly, that’s when these Perfect No-Bake Graduation Cap Chocolate Oreo Cheesecake Bars were born.
Jamie’s daughter, Mia, loves chocolate and Oreos, and I had a sneaky suspicion that a cheesecake bar with a fun graduation cap design would be a hit. I scrambled through the pantry, grabbed what I could find, and improvised on the spot. The bars ended up being a delicious hit, with the chocolatey Oreo crust and creamy cheesecake filling paired perfectly with the playful cap decoration. The best part? No oven required, which meant less heat in the kitchen and way less stress.
Maybe you’ve been there—facing a party deadline with no dessert in sight. This recipe isn’t just for graduation, though. It’s a crowd-pleasing, quick, and delicious treat that feels festive and special without the fuss. Let me tell you, every time I make these bars, I remember that hectic but joyful afternoon, and how a little creativity saved the day (and taste buds!).
Why You’ll Love This Recipe
After testing this recipe countless times, tweaking the balance of Oreo crust to creamy cheesecake, and perfecting the graduation cap look, I can say it’s one of my favorites to pull out for celebrations. Here’s why this no-bake cheesecake bar stands apart:
- Quick & Easy: Comes together in under 30 minutes — perfect for last-minute party prep or when you just want dessert without the oven hassle.
- Simple Ingredients: You likely have most of these pantry staples on hand, including classic Oreos, cream cheese, and chocolate chips.
- Perfect for Graduation Parties: The fun cap decoration adds a personal touch that makes it feel festive and memorable.
- Crowd-Pleaser: Kids and adults alike rave about the combination of rich chocolate and creamy cheesecake.
- Unbelievably Delicious: The Oreo crust is crisp yet crumbly, the cheesecake filling is silky smooth, and the chocolate ganache cap seals the deal.
What makes this recipe different? It’s the attention to detail in the cheesecake texture—smoothing the cream cheese just right—and the creative but simple decoration that anyone can do. It’s not just another cheesecake bar; it’s a statement dessert that brings smiles and compliments every time. Honestly, I keep making it because it brings that perfect mix of nostalgia and celebration, and I know it will do the same for you.
What Ingredients You Will Need
This recipe uses simple, wholesome ingredients to deliver bold flavor and a satisfying texture without the fuss. Most are pantry staples, and you can easily swap a few to fit your preferences or dietary needs.
- For the Oreo Crust:
- 24 Oreo cookies (about 1 ½ cups crushed) – I recommend Nabisco for the classic taste
- 6 tablespoons unsalted butter, melted (adds richness and helps bind the crust)
- For the Cheesecake Filling:
- 16 ounces (450g) cream cheese, softened (room temperature for best texture)
- ½ cup granulated sugar
- 1 teaspoon vanilla extract (pure vanilla makes a difference here)
- 1 cup heavy whipping cream, cold (for fluffy stability)
- For the Chocolate Ganache “Cap”:
- 6 ounces (170g) semisweet chocolate chips
- ½ cup heavy cream
- 1 teaspoon coconut oil or unsalted butter (optional, for shine)
- For Decorating:
- Black licorice strings or thin black candy ropes (for the tassel)
- Mini marshmallows or white chocolate chips (for the button on top)
Substitution tips: Use dairy-free cream cheese and coconut cream for a vegan version. Almond flour can replace Oreo crumbs for a gluten-free crust, though it won’t have the classic Oreo flavor. Also, if you want a more intense chocolate flavor, swap semisweet chips for dark chocolate.
Equipment Needed
- 8×8 inch (20×20 cm) square baking pan – glass or metal works fine
- Mixing bowls – one large for the cheesecake filling, another for melting chocolate
- Hand mixer or stand mixer – for whipping cream and beating cream cheese smooth
- Food processor or zip-top bag and rolling pin – to crush Oreo cookies finely
- Spatula – for scraping and smoothing layers
- Small saucepan or microwave-safe bowl – for melting chocolate and cream
If you don’t have a food processor, crushing Oreos in a sealed bag with a rolling pin works perfectly fine (though I admit it’s a bit messier). A hand mixer is my go-to because it’s quick and easy to clean. For the ganache, I find the stovetop method more reliable than the microwave, but either works as long as you stir well. Budget-wise, none of these tools are pricey, and you might already have most in your kitchen!
Preparation Method
- Prepare the Oreo Crust:
- Crush 24 Oreo cookies into fine crumbs using a food processor or by placing them in a zip-top bag and rolling with a rolling pin.
- Mix the crumbs with 6 tablespoons melted unsalted butter until evenly combined and looks like wet sand.
- Press the mixture firmly into the bottom of your 8×8 inch pan, creating an even layer. Use the bottom of a glass to pack the crust tightly.
- Place the crust in the refrigerator to chill while you prepare the filling (about 15 minutes).
- Make the Cheesecake Filling:
- In a large bowl, beat 16 ounces softened cream cheese until smooth and creamy (about 2 minutes).
- Add ½ cup sugar and 1 teaspoon vanilla extract; continue beating until combined and smooth.
- In a separate chilled bowl, whip 1 cup cold heavy cream to stiff peaks using a hand or stand mixer (take about 3-4 minutes).
- Gently fold the whipped cream into the cream cheese mixture in three additions to keep the filling light and airy.
- Spread the cheesecake filling evenly over the chilled Oreo crust. Smooth the top with a spatula.
- Return the pan to the refrigerator to set while you prepare the ganache (at least 1 hour, preferably longer for best texture).
- Prepare the Chocolate Ganache “Cap”:
- Heat ½ cup heavy cream in a small saucepan over medium heat until it just begins to simmer (don’t boil).
- Place 6 ounces semisweet chocolate chips and 1 teaspoon coconut oil or butter in a heatproof bowl.
- Pour hot cream over the chocolate and let sit for 2 minutes, then stir gently until smooth and glossy.
- Allow the ganache to cool slightly until it thickens but is still pourable (about 5-7 minutes).
- Pour the ganache over the cheesecake layer, spreading evenly to form a smooth top.
- Return to the fridge for at least 2 hours, or until the ganache is firm.
- Decorate the Graduation Caps:
- Once the ganache is firm, cut bars into squares (about 2×2 inches).
- Create the cap by placing a square of Oreo cookie or a small piece of chocolate on top of each bar.
- Use a small marshmallow or white chocolate chip as the button in the center.
- Attach a black licorice string as the tassel, gently pressing it into the ganache so it sticks.
- Store the bars in the fridge until ready to serve.
Pro tip: If you find the ganache too runny, pop it in the fridge for a few extra minutes before pouring. Also, use a sharp knife warmed in hot water to cut neat bars without cracking the ganache.
Cooking Tips & Techniques
Making no-bake cheesecake bars might seem straightforward, but a few tips make a huge difference in texture and presentation.
- Softened Cream Cheese is Key: Cold cream cheese lumps up and makes mixing difficult. I usually take it out 30 minutes before starting.
- Whip the Cream Properly: Don’t under or over-whip the heavy cream. Stiff peaks hold the filling light and stable but avoid turning it into butter!
- Crush Oreos Finely: Large chunks can make the crust crumbly and uneven. Fine crumbs pack better and give a firmer crust.
- Chill Between Steps: Refrigerating the crust and filling helps the bars hold their shape, especially without baking.
- Ganache Temperature: Pour ganache when slightly cooled for a smooth finish. Hot ganache might melt the cheesecake layer or run too thin.
- Cut with Care: Use a serrated knife or warm a regular knife under hot water before slicing to get clean edges.
One time, I rushed the ganache pouring and ended up with streaks in the chocolate layer. Patience really pays off here. Also, don’t skip the chilling steps—even if you’re in a hurry, it’s worth the wait for that perfect slice.
Variations & Adaptations
This recipe is super flexible, so you can tweak it to suit different tastes or dietary needs.
- Fruit Twist: Add a layer of fresh raspberries or strawberries between the crust and cheesecake for a fruity surprise.
- Peanut Butter Swirl: Swirl in ½ cup smooth peanut butter into the cheesecake filling for a rich, nutty flavor.
- Vegan Version: Use dairy-free cream cheese, coconut cream instead of heavy cream, and vegan chocolate chips for a plant-based treat.
- Gluten-Free Crust: Replace Oreo cookies with gluten-free chocolate sandwich cookies or almond flour mixed with cocoa powder.
- Mini Cheesecake Bites: Prepare the recipe in a mini muffin tin lined with cupcake wrappers for bite-sized party snacks.
I once added espresso powder to the ganache for a mocha kick—it was a hit with the coffee lovers in the family! Feel free to experiment with your favorite flavors to make these bars your own.
Serving & Storage Suggestions
These bars are best served chilled, straight from the fridge. The cool temperature keeps the cheesecake firm and the ganache glossy.
- Serve on a festive platter decorated with fresh mint leaves or edible gold sprinkles for a fancy touch.
- Pair with a glass of cold milk, coffee, or even a sparkling rosé for adult celebrations.
- Store leftovers in an airtight container in the refrigerator for up to 4 days.
- To freeze, wrap individual bars in plastic wrap and place in a freezer bag for up to 1 month. Thaw overnight in the fridge before serving.
- Reheat is not recommended; these are best enjoyed cold.
Over time, the flavors meld beautifully, so making these a day ahead can actually improve the taste. Just don’t forget to add the tassels and buttons right before serving, so they stay fresh and pretty.
Nutritional Information & Benefits
Each serving of these cheesecake bars (about 2×2 inch square) contains approximately:
| Calories | 320 kcal |
|---|---|
| Fat | 24g |
| Carbohydrates | 24g |
| Protein | 5g |
| Sugar | 18g |
The cream cheese provides a good source of calcium and protein, while the heavy cream adds richness. Using Oreos means gluten is present, so consider gluten-free options if needed. This dessert is definitely an indulgence but feels special and homemade, perfect for marking milestones with a sweet treat. Personally, I appreciate that it’s made mostly from real ingredients without complicated additives.
Conclusion
If you’re looking for a fun, easy, and impressive dessert for graduation or any celebration, the Perfect No-Bake Graduation Cap Chocolate Oreo Cheesecake Bars should be your go-to. They combine creamy cheesecake with a chocolatey Oreo crunch and a festive touch that everyone will remember.
Feel free to make this recipe your own with different flavors or decorations, and don’t be shy about sharing your versions—I love hearing how readers put their spin on it. Honestly, these bars have become a staple in my party repertoire, and I’m confident they’ll bring joy and smiles to your table too.
So grab your mixing bowls, and let’s make some magic happen. If you try the recipe, leave a comment or share your photos—I’m always excited to see your creations!
FAQs
- Can I make these bars ahead of time?
Absolutely! In fact, chilling them overnight helps the flavors meld and makes slicing easier.
- Can I use a different cookie for the crust?
Yes, chocolate wafer cookies or gluten-free sandwich cookies work well as alternatives.
- What if I don’t have heavy cream?
You can substitute with whipping cream or full-fat coconut cream for a dairy-free version.
- How do I prevent the ganache from cracking?
Make sure the ganache cools gently and avoid rapid temperature changes when chilling.
- Is there a way to make these bars lower in sugar?
Use reduced-sugar cookies or substitute sugar in the filling with a natural sweetener like stevia, adjusting to taste.
Pin This Recipe!

Perfect No-Bake Graduation Cap Chocolate Oreo Cheesecake Bars
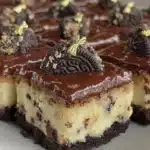
A quick and easy no-bake cheesecake bar featuring a chocolatey Oreo crust, creamy cheesecake filling, and a festive chocolate ganache graduation cap decoration. Perfect for graduation parties or any celebration.
- Prep Time: 20 minutes
- Cook Time: 0 minutes
- Total Time: 3 hours 30 minutes
- Yield: 16 servings 1x
- Category: Dessert
- Cuisine: American
Ingredients
- 24 Oreo cookies (about 1 ½ cups crushed)
- 6 tablespoons unsalted butter, melted
- 16 ounces (450g) cream cheese, softened
- ½ cup granulated sugar
- 1 teaspoon vanilla extract
- 1 cup heavy whipping cream, cold
- 6 ounces (170g) semisweet chocolate chips
- ½ cup heavy cream
- 1 teaspoon coconut oil or unsalted butter (optional)
- Black licorice strings or thin black candy ropes (for the tassel)
- Mini marshmallows or white chocolate chips (for the button on top)
Instructions
- Crush 24 Oreo cookies into fine crumbs using a food processor or by placing them in a zip-top bag and rolling with a rolling pin.
- Mix the crumbs with 6 tablespoons melted unsalted butter until evenly combined and looks like wet sand.
- Press the mixture firmly into the bottom of your 8×8 inch pan, creating an even layer. Use the bottom of a glass to pack the crust tightly.
- Place the crust in the refrigerator to chill while you prepare the filling (about 15 minutes).
- In a large bowl, beat 16 ounces softened cream cheese until smooth and creamy (about 2 minutes).
- Add ½ cup sugar and 1 teaspoon vanilla extract; continue beating until combined and smooth.
- In a separate chilled bowl, whip 1 cup cold heavy cream to stiff peaks using a hand or stand mixer (take about 3-4 minutes).
- Gently fold the whipped cream into the cream cheese mixture in three additions to keep the filling light and airy.
- Spread the cheesecake filling evenly over the chilled Oreo crust. Smooth the top with a spatula.
- Return the pan to the refrigerator to set while you prepare the ganache (at least 1 hour, preferably longer for best texture).
- Heat ½ cup heavy cream in a small saucepan over medium heat until it just begins to simmer (don’t boil).
- Place 6 ounces semisweet chocolate chips and 1 teaspoon coconut oil or butter in a heatproof bowl.
- Pour hot cream over the chocolate and let sit for 2 minutes, then stir gently until smooth and glossy.
- Allow the ganache to cool slightly until it thickens but is still pourable (about 5-7 minutes).
- Pour the ganache over the cheesecake layer, spreading evenly to form a smooth top.
- Return to the fridge for at least 2 hours, or until the ganache is firm.
- Once the ganache is firm, cut bars into squares (about 2×2 inches).
- Create the cap by placing a square of Oreo cookie or a small piece of chocolate on top of each bar.
- Use a small marshmallow or white chocolate chip as the button in the center.
- Attach a black licorice string as the tassel, gently pressing it into the ganache so it sticks.
- Store the bars in the fridge until ready to serve.
Notes
Use softened cream cheese for smooth mixing. Chill crust and filling between steps for best texture. Pour ganache when slightly cooled to avoid melting cheesecake layer. Warm knife before slicing for clean cuts. For vegan version, substitute dairy-free cream cheese, coconut cream, and vegan chocolate chips. Gluten-free crust can be made with almond flour or gluten-free cookies.
Nutrition
- Serving Size: 1 bar (about 2x2 inc
- Calories: 320
- Sugar: 18
- Fat: 24
- Carbohydrates: 24
- Protein: 5
Keywords: no-bake cheesecake, Oreo cheesecake bars, graduation dessert, chocolate ganache, party dessert, easy cheesecake bars