Love this? Save it for later!
Share the inspiration with your friends
Cozy Sausage and Herb Stuffing Balls: Easy Bite-Size Appetizer Recipe
Anna wasn’t trying to impress anyone. I’d stopped by to borrow a cookie sheet—mine had mysteriously vanished after Thanksgiving—and the smell of sage and sausage hit me before I even made it past her mudroom. She was standing at the stove in sweatpants and an old flannel, casually flipping these little golden-brown spheres in a cast iron skillet like it was the most ordinary Tuesday night activity in the world.
“What are those?” I asked, honestly a little offended that she hadn’t mentioned them before.
“Oh, just something I threw together for the freezer,” she said, shrugging. “They’re good for when the kids come home hungry.”
She tossed one to me—literally tossed it, across the kitchen—and I caught it, burned my fingers, and didn’t care. The outside was perfectly crispy, the inside tender and savory, with little pops of fennel from the sausage and that unmistakable warmth of fresh herbs. I stood there in her kitchen, juggling a hot stuffing ball between my hands, and demanded the recipe on the spot. She laughed and told me there wasn’t really a recipe—she just kind of did it. You know that feeling when someone makes something extraordinary look like no big deal? That was the moment.
So I watched. I took notes on my phone while she talked about her mother making something similar for holiday parties, about how she started making them smaller so they’d cook faster and work as appetizers. And honestly, I’ve been making them ever since. Maybe you’ve been there—standing in someone else’s kitchen, realizing that the best recipes don’t come from fancy blogs or cookbooks. They come from people who don’t even realize they’re doing something special.
These cozy sausage and herb stuffing balls are exactly that. They’re the kind of thing you make for a party and everyone asks for the recipe, but they’re also the kind of thing you keep in your freezer for those nights when you just need something warm and satisfying. They’re comfort food in bite-size form, and I’m so glad Anna was wearing sweatpants that day.
Why You’ll Love This Recipe
Let me tell you why these little guys have become my go-to for everything from holiday gatherings to lazy Sunday snacks. I’ve tested this recipe at least a dozen times—tweaking the herb ratios, trying different sausages, experimenting with cooking methods—and this version is the one that always wins.
- Quick & Easy: From start to finish, you’re looking at about 30 minutes. That’s mixing, shaping, and cooking. Perfect for when guests show up unexpectedly or when you just want something good without a whole production.
- Simple Ingredients: You probably have most of these in your pantry right now. Bread cubes, onions, celery, eggs, chicken broth—the usual suspects. The only thing you might need to grab is good sausage, and honestly, that’s the fun part.
- Perfect for Any Occasion: Holiday appetizer? Check. Game day snack? Absolutely. Something to bring to a potluck? They travel beautifully. I’ve even packed them in lunchboxes, and let me tell you, cold stuffing balls are surprisingly delicious.
- Crowd-Pleaser: I’ve served these to picky eaters, foodie friends, and everyone in between. They disappear fast. There’s something about the bite-size format that makes people keep reaching for “just one more.”
- Unbelievably Delicious: The texture is what gets me every time. Crispy on the outside, tender and moist on the inside, with that savory-sage aroma that just screams comfort. It’s like the best part of Thanksgiving dinner, but you can eat it with your fingers while standing in the kitchen.
What makes this recipe different from all the other stuffing ball recipes out there? It’s the technique. Most recipes have you bake them, which is fine, but you miss that gorgeous golden crust. I start them in a skillet for a quick sear, then finish them in the oven. That little extra step makes all the difference. Plus, I’ve dialed in the herb ratio so the sage doesn’t overpower everything—it’s balanced, warm, and inviting without being aggressively herbal.
This is the kind of recipe that makes you close your eyes after the first bite. It’s comfort food, pure and simple, but somehow better than you remember. And the best part? You can make a big batch and freeze half, which means future you gets a gift of warm, savory happiness whenever you need it.
What Ingredients You Will Need
This recipe uses simple, wholesome ingredients that come together to create something genuinely special. Most of these are pantry staples, which means you’re probably closer to making these than you think.
For the Stuffing Balls
- 1 pound ground pork sausage – I recommend using a good-quality breakfast or Italian sausage. My personal favorite is Johnsonville for consistent flavor, but any brand you trust will work. If you can find it, bulk sausage (not in casings) saves you a step.
- 3 cups day-old bread cubes – About half a loaf of French bread or sourdough, cut into small cubes and left out overnight. Stale bread absorbs the liquid better and gives you a better texture. In a pinch, you can toast fresh cubes in a 300°F oven for 10 minutes.
- 1 medium yellow onion, finely diced – About 1 cup. Yellow onions have the right balance of sweetness and sharpness for this recipe. Don’t skip the dicing—big chunks of onion throw off the texture.
- 2 celery stalks, finely diced – About 1/2 cup. Celery adds that classic stuffing crunch and freshness. Make sure to dice it small so it incorporates evenly.
- 3 cloves garlic, minced – Fresh garlic is non-negotiable here. The jarred stuff just doesn’t have the same punch.
- 2 large eggs, lightly beaten – Eggs are the binder that holds everything together. Make sure they’re at room temperature for easier mixing.
- 1/2 cup chicken broth – Low-sodium is best so you can control the salt level. Vegetable broth works too if that’s what you have.
- 2 tablespoons unsalted butter – For sautéing the aromatics. It adds richness that oil just can’t replicate.
- 1 tablespoon fresh sage, finely chopped – This is the star herb. Fresh sage is miles ahead of dried for this recipe. If you absolutely must use dried, use 1 teaspoon.
- 1 tablespoon fresh thyme leaves – About 4-5 sprigs. The earthy, lemony notes complement the sausage beautifully.
- 1 tablespoon fresh parsley, chopped – For brightness and color. Flat-leaf or curly both work.
- 1/2 teaspoon salt – Go easy here since the sausage and broth already have salt.
- 1/4 teaspoon black pepper – Freshly ground is always better.
- 1/4 teaspoon poultry seasoning – This is optional but adds that nostalgic stuffing flavor. Bell’s seasoning is my go-to.
For the Optional Glaze (Makes Them Extra Pretty)
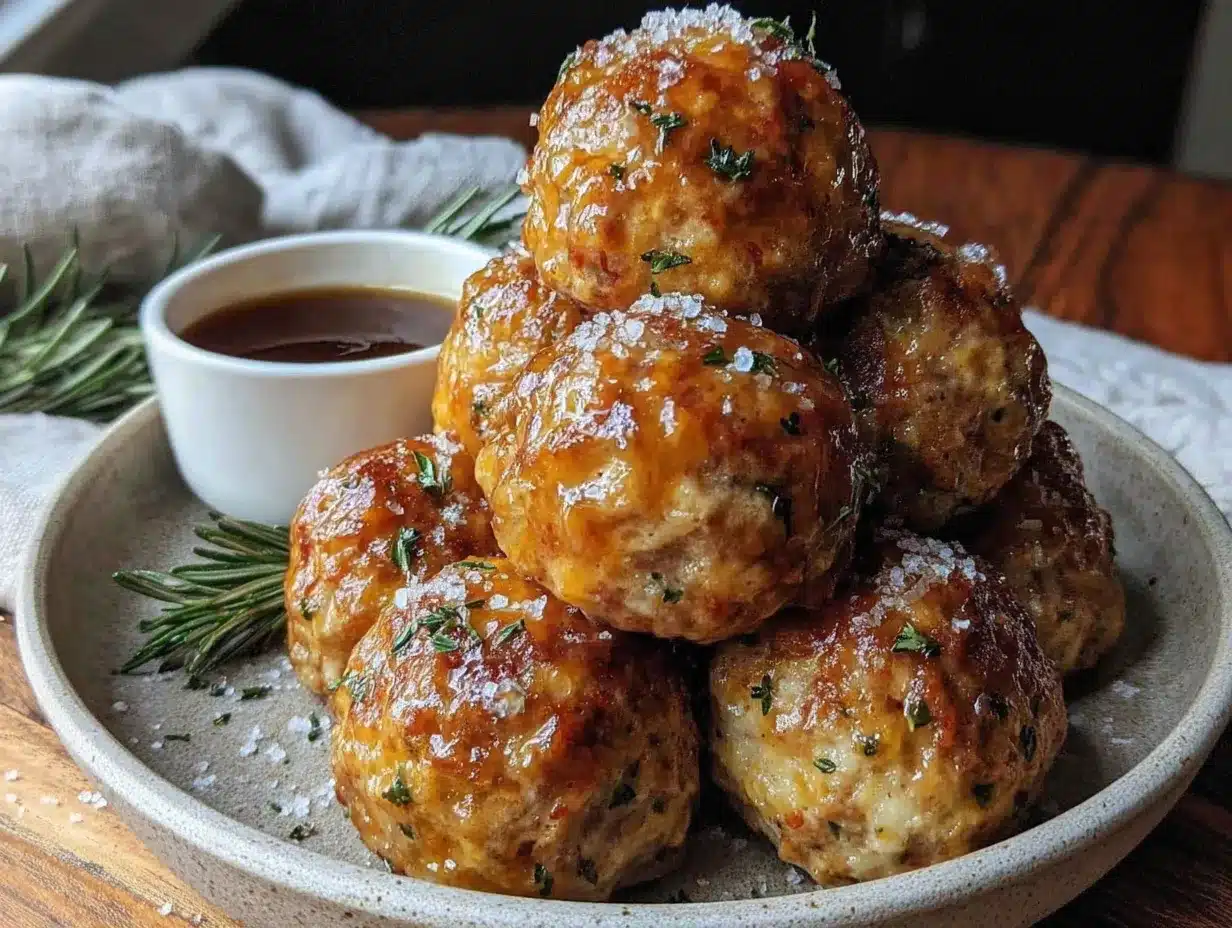
- 2 tablespoons melted butter – Brushed on before baking for a shiny, golden finish.
- 1 teaspoon fresh thyme leaves – For garnish. Makes them look fancy with zero effort.
Ingredient Selection Tips: When choosing your sausage, look for one with visible herbs in it—that’s a sign of quality. If you’re feeling adventurous, try using chicken or turkey sausage for a lighter version. For the bread, I’ve had great results with everything from ciabatta to whole wheat. Just avoid anything too dense or too airy. A good French bread or sourdough hits the sweet spot.
Substitution Guidance: Need this gluten-free? Use gluten-free bread cubes and make sure your sausage is GF-certified. Dairy-free? Substitute the butter with olive oil or a plant-based butter. The texture will be slightly different, but still delicious. And if you’re watching your sodium, use low-sodium broth and skip the added salt entirely—the sausage provides plenty.
Equipment Needed
You don’t need a fancy kitchen to make these stuffing balls. Here’s what you’ll need:
- Large mixing bowl – For combining all the ingredients. Any big bowl works; I use a ceramic one my grandmother gave me.
- Sharp chef’s knife and cutting board – For dicing the onion and celery. A dull knife makes this job miserable, so sharpen up.
- Large skillet – Cast iron is ideal for that perfect sear, but any heavy-bottomed skillet works. You’ll use this for sautéing the aromatics and browning the balls.
- Baking sheet – Line it with parchment paper or a silicone baking mat for easy cleanup.
- Cookie scoop or small ice cream scoop – This is my secret weapon for uniform-sized balls. A 1.5-tablespoon scoop gives you perfect bite-size portions every time. If you don’t have one, use two spoons to shape them.
- Pastry brush – For the butter glaze. A silicone brush is easiest to clean.
- Cooling rack – Optional, but placing the baked balls on a rack keeps them from getting soggy on the bottom.
If you don’t have a cast iron skillet, don’t worry. A non-stick skillet works fine for the initial sear—just be careful not to crowd the pan. And if you’re scooping by hand, lightly wet your fingers to prevent sticking. It’s a small trick that makes a big difference.
Preparation Method
Okay, let’s get cooking. I’ve broken this down into clear steps so you can follow along without any confusion. Trust me, once you make these once, you’ll have them memorized.
Step 1: Prep Your Ingredients (10 minutes)
Start by getting everything ready. Dice your onion and celery into small, even pieces—about 1/4-inch dice. Mince the garlic. Chop your fresh herbs. Cube your bread if you haven’t already. Having everything prepped before you start cooking makes the process so much smoother. I learned this the hard way after burning garlic while scrambling for the thyme.
Step 2: Sauté the Aromatics (8 minutes)
Melt the 2 tablespoons of butter in your large skillet over medium heat. Add the diced onion and celery, and cook for about 5 minutes, stirring occasionally, until they’re soft and translucent. You should see them start to sweat but not brown. Add the minced garlic and cook for another minute until fragrant—your kitchen should smell amazing at this point. Remove from heat and let it cool slightly. This step is crucial because hot aromatics can partially cook the eggs when you mix everything together.
Step 3: Combine the Base (5 minutes)
In your large mixing bowl, combine the bread cubes, sautéed vegetables, fresh sage, thyme, parsley, salt, pepper, and poultry seasoning if using. Toss everything together with your hands—get in there, it’s the best way. The bread should be evenly coated with the herb mixture.
Step 4: Add the Sausage and Binder (5 minutes)
Crumble the ground sausage into the bowl, breaking it up with your fingers. Add the beaten eggs and chicken broth. Now comes the fun part: mix everything together with your hands until just combined. Don’t overmix or you’ll end up with dense, tough balls. You want the mixture to hold together when pressed but still have some texture. It should feel moist but not soggy. If it seems too dry, add another tablespoon of broth. Too wet? Add a few more bread cubes.
Step 5: Shape the Balls (10 minutes)
Preheat your oven to 375°F (190°C). Line your baking sheet with parchment paper. Using your cookie scoop or two spoons, portion the mixture into 1.5-tablespoon-sized balls. Roll them gently between your palms to smooth them out. You should get about 24-28 balls, depending on how generous you are with your scoops. Place them on the prepared baking sheet, spacing them about an inch apart.
Step 6: Sear the Balls (8 minutes)
Heat your large skillet over medium-high heat with a drizzle of olive oil. Working in batches to avoid crowding, add the stuffing balls and cook for about 2 minutes per side, turning carefully with tongs. You’re looking for a deep golden-brown crust on at least two sides. Don’t rush this step—that crust is where the magic happens. Transfer the seared balls back to the baking sheet as you go.
Step 7: Finish in the Oven (12-15 minutes)
If you’re using the butter glaze, brush each ball with melted butter now. Pop the baking sheet into your preheated oven and bake for 12-15 minutes, until the balls are cooked through and golden brown all over. The internal temperature should reach 165°F (74°C) if you want to be precise. Let them rest on the baking sheet for 5 minutes before serving—this helps them set and makes them easier to handle.
Cooking Tips & Techniques
After making these dozens of times, I’ve picked up a few tricks that make a real difference. Let me share what I’ve learned.
Don’t Skip the Sear. I know it’s tempting to just bake them and save a step, but that skillet sear is what gives these balls their incredible texture. The contrast between the crispy exterior and the tender interior is what makes them so addictive. I learned this the hard way when I tried baking them without searing and ended up with pale, sad little spheres.
Watch Your Moisture Levels. The amount of liquid you need depends on your bread. Stale, dry bread absorbs more liquid than fresh bread. If your mixture seems dry, add broth a tablespoon at a time. If it’s too wet, add more bread cubes. The mixture should hold together when you squeeze a handful but not be mushy.
Chill the Mixture if Needed. If your kitchen is warm or the mixture feels too soft to shape, pop it in the fridge for 15-20 minutes. Cold mixture is much easier to handle and holds its shape better during searing.
Use a Thermometer for Perfect Doneness. The biggest mistake people make is overcooking these, which dries them out. A instant-read thermometer is your friend here. Pull them out of the oven when they hit 165°F (74°C) and let carryover cooking do the rest.
Batch Cooking Strategy. Make a double batch and freeze half. Shape the balls, place them on a baking sheet, and freeze until solid. Transfer to a freezer bag, and you’ve got ready-to-cook stuffing balls whenever you need them. Cook from frozen, adding about 5 minutes to the oven time.
Variations & Adaptations
One of the best things about this recipe is how adaptable it is. Here are some variations I’ve tried and loved.
Turkey and Cranberry Version
Swap the pork sausage for ground turkey and add 1/4 cup dried cranberries to the mixture. The tartness of the cranberries cuts through the richness beautifully. This is my go-to for Thanksgiving leftovers, and honestly, it might be even better than the original.
Spicy Chorizo Twist
Use Mexican chorizo instead of breakfast sausage and replace the sage with cilantro and a pinch of cumin. These are incredible with a dollop of sour cream or crema. They’re a little messy to shape because chorizo is softer, but the flavor payoff is worth it.
Vegetarian Option
Replace the sausage with 1 cup of finely chopped mushrooms and 1 cup of cooked lentils. Sauté the mushrooms with the aromatics until they release their liquid and start to brown. Add 1/4 cup of nutritional yeast for that savory, umami flavor. This version is surprisingly satisfying and holds together well.
Gluten-Free Adaptation
Use gluten-free bread cubes and make sure your sausage is certified gluten-free. I’ve tried this with several GF breads, and Udi’s works best. The texture is slightly more delicate, so handle the balls gently during searing.
Herb Variations
Don’t be afraid to experiment with herbs. Rosemary and sage are a classic combination. Tarragon adds an unexpected anise note that pairs beautifully with pork. And if you’re a fan of heat, add a pinch of red pepper flakes to the mixture.
Serving & Storage Suggestions
These stuffing balls are incredibly versatile when it comes to serving. Here’s how I like to enjoy them.
Serving Temperature: They’re best served warm, right out of the oven. But honestly, they’re pretty amazing at room temperature too, which makes them perfect for parties and buffets. I’ve even eaten them cold straight from the fridge, and I’m not ashamed to admit it.
Presentation Ideas: Arrange them on a platter with fresh herb sprigs and a small bowl of dipping sauce. Cranberry sauce is the classic pairing, but I also love them with honey mustard or a simple sour cream and chive dip. For a holiday spread, nestle them among roasted vegetables or pile them on a bed of arugula.
Complementary Dishes: These are fantastic alongside roasted chicken or turkey, but they’re also great with a simple green salad for a lighter meal. For game day, serve them with other finger foods like wings or sliders. And if you’re feeling indulgent, pile them on a plate with mashed potatoes and gravy—yes, it’s carb overload, and yes, it’s amazing.
Storage Instructions: Store leftover stuffing balls in an airtight container in the refrigerator for up to 4 days. They also freeze beautifully for up to 3 months. To freeze, place the cooled balls on a baking sheet and freeze until solid, then transfer to a freezer bag. This prevents them from sticking together.
Reheating Tips: The best way to reheat is in a 350°F (175°C) oven for about 10 minutes, which restores the crispy exterior. The microwave works in a pinch, but the texture won’t be as good. If reheating from frozen, add 5-7 minutes to the oven time. I’ve also had success reheating them in an air fryer at 350°F for 5 minutes—they come out perfectly crispy.
Flavor Development: Here’s a secret: these are actually better the next day. The flavors meld together overnight, and the texture becomes even more cohesive. So if you’re making them for a party, don’t stress about making them day-of. They’re fantastic make-ahead.
Nutritional Information & Benefits
Let’s talk numbers. These are estimates based on a serving of 4 stuffing balls using the standard recipe.
| Nutrient | Amount Per Serving (4 balls) |
|---|---|
| Calories | 285 |
| Total Fat | 18g |
| Saturated Fat | 7g |
| Cholesterol | 85mg |
| Sodium | 620mg |
| Total Carbohydrates | 18g |
| Dietary Fiber | 2g |
| Sugars | 3g |
| Protein | 14g |
Health Benefits: These aren’t health food, but they’re not junk either. The pork sausage provides a good amount of protein and B vitamins, especially B12. The celery and onion add fiber and antioxidants. And the fresh herbs bring anti-inflammatory properties—sage is particularly known for its cognitive benefits. If you’re watching your sodium, use low-sodium broth and choose a lower-sodium sausage.
Dietary Considerations: This recipe can be adapted to be gluten-free and dairy-free (see variations above). It’s naturally nut-free and egg-free if you use a flax egg substitute (1 tablespoon ground flaxseed mixed with 3 tablespoons water per egg). It’s not low-carb by nature, but you could experiment with almond flour bread cubes for a keto-friendly version.
Potential Allergens: This recipe contains wheat (bread), eggs, and dairy (butter). The sausage may also contain allergens depending on the brand, so always check labels.
Conclusion
These cozy sausage and herb stuffing balls have become a staple in my kitchen, and I honestly can’t imagine going through a holiday season without them. They’re the recipe I turn to when I want something that feels special but doesn’t require hours of effort. They’re the appetizer that disappears before the main course even hits the table. And they’re the comfort food that makes even a Tuesday night feel like a celebration.
What I love most about this recipe is how forgiving it is. You can tweak the herbs, swap the meat, change up the bread—and it still works. It’s the kind of recipe that invites experimentation, that gets better every time you make it. So don’t be afraid to make it your own. Add a little more sage if you love it. Throw in some dried cranberries if you’re feeling festive. Use whatever sausage your butcher recommends. This is your kitchen, and these are your stuffing balls now.
I’d love to hear how yours turn out. Did you try a variation? Discover a new favorite herb combination? Serve them at a party and watch them disappear? Drop a comment below and let me know. And if you’re feeling generous, share a photo—I always love seeing your creations. Until next time, happy cooking, and may your kitchen always smell like sage and butter.
Frequently Asked Questions
Can I make these ahead of time for a party?
Absolutely. You can prepare the mixture up to 24 hours in advance and keep it covered in the refrigerator. Shape and cook them just before serving. Or, cook them completely, let them cool, and reheat in a 350°F oven for 10 minutes right before your guests arrive.
Why did my stuffing balls fall apart?
This usually happens when the mixture is too dry or too wet. Make sure your bread is properly stale—fresh bread doesn’t absorb liquid well. Also, don’t skip the eggs; they’re the primary binder. If your mixture won’t hold together when pressed, add another tablespoon of broth or an extra egg.
Can I use dried herbs instead of fresh?
You can, but the flavor won’t be as bright. The general rule is to use one-third the amount of dried herbs compared to fresh. So for 1 tablespoon of fresh sage, use 1 teaspoon of dried. Keep in mind that dried herbs are more concentrated, so add them gradually and taste as you go.
How do I prevent the stuffing balls from being greasy?
Use a leaner sausage if possible, and don’t overcrowd the pan when searing. Overcrowding traps steam, which prevents proper browning and can make the balls greasy. Work in batches and give each ball room to develop that golden crust.
Can I air fry these instead of pan-searing and baking?
Yes! Air frying works beautifully. Preheat your air fryer to 375°F (190°C). Place the shaped balls in a single layer in the basket, leaving space between them. Cook for 10-12 minutes, shaking the basket halfway through, until golden brown and cooked through. No need to sear first—the air fryer creates that crispy exterior on its own.
Pin This Recipe!

Cozy Sausage and Herb Stuffing Balls: Easy Bite-Size Appetizer Recipe

These cozy sausage and herb stuffing balls are bite-size comfort food with a crispy exterior and tender, savory interior. Perfect for holiday gatherings, game day snacks, or freezer-friendly meals.
- Prep Time: 20 minutes
- Cook Time: 25 minutes
- Total Time: 45 minutes
- Yield: 6 servings (24-28 balls, 4 balls per serving) 1x
- Category: Appetizer
- Cuisine: American
Ingredients
- 1 pound ground pork sausage
- 3 cups day-old bread cubes (about half a loaf of French bread or sourdough)
- 1 medium yellow onion, finely diced (about 1 cup)
- 2 celery stalks, finely diced (about 1/2 cup)
- 3 cloves garlic, minced
- 2 large eggs, lightly beaten
- 1/2 cup low-sodium chicken broth
- 2 tablespoons unsalted butter
- 1 tablespoon fresh sage, finely chopped
- 1 tablespoon fresh thyme leaves
- 1 tablespoon fresh parsley, chopped
- 1/2 teaspoon salt
- 1/4 teaspoon black pepper, freshly ground
- 1/4 teaspoon poultry seasoning (optional)
- 2 tablespoons melted butter (for glaze, optional)
- 1 teaspoon fresh thyme leaves (for garnish, optional)
Instructions
- Prep your ingredients: Dice onion and celery into small, even pieces (about 1/4-inch dice). Mince garlic. Chop fresh herbs. Cube bread if not already done.
- Sauté the aromatics: Melt 2 tablespoons butter in a large skillet over medium heat. Add diced onion and celery, cook for about 5 minutes until soft and translucent. Add minced garlic and cook for 1 minute until fragrant. Remove from heat and let cool slightly.
- Combine the base: In a large mixing bowl, combine bread cubes, sautéed vegetables, fresh sage, thyme, parsley, salt, pepper, and poultry seasoning (if using). Toss with your hands until evenly coated.
- Add the sausage and binder: Crumble ground sausage into the bowl. Add beaten eggs and chicken broth. Mix with your hands until just combined. Mixture should hold together when pressed but still have texture. If too dry, add another tablespoon of broth; if too wet, add more bread cubes.
- Shape the balls: Preheat oven to 375°F (190°C). Line a baking sheet with parchment paper. Using a cookie scoop or two spoons, portion mixture into 1.5-tablespoon-sized balls (about 24-28 balls). Roll gently between palms to smooth. Place on prepared baking sheet, spacing about 1 inch apart.
- Sear the balls: Heat the large skillet over medium-high heat with a drizzle of olive oil. Working in batches, add stuffing balls and cook for about 2 minutes per side until deep golden-brown crust forms. Transfer seared balls back to baking sheet.
- Finish in the oven: If using butter glaze, brush each ball with melted butter. Bake for 12-15 minutes until cooked through and golden brown (internal temperature should reach 165°F/74°C). Let rest on baking sheet for 5 minutes before serving.
Notes
Don’t skip the sear—it creates the crispy exterior. For best texture, use day-old bread. If mixture feels too soft, chill for 15-20 minutes before shaping. These freeze beautifully: shape, freeze on baking sheet, transfer to freezer bag, and cook from frozen adding 5 minutes to oven time. Reheat in 350°F oven for 10 minutes or air fryer at 350°F for 5 minutes.
Nutrition
- Serving Size: 4 stuffing balls
- Calories: 285
- Sugar: 3
- Sodium: 620
- Fat: 18
- Saturated Fat: 7
- Carbohydrates: 18
- Fiber: 2
- Protein: 14
Keywords: stuffing balls, sausage appetizer, holiday appetizer, bite-size stuffing, freezer-friendly appetizer, game day snack