Love this? Save it for later!
Share the inspiration with your friends
My niece asked why I couldn’t just dip the Oreo balls in black candy melts and call them cats. I started to explain why that wouldn’t work — then stopped. Honestly, I had a whole speech ready about how Halloween treats need to be elaborate, with multiple steps and fancy piping techniques. But she was eight, holding a bag of candy eyes, and looking at me like I was overcomplicating everything. I was, of course. I told her we’d try it her way, fully expecting a lopsided mess that would end up in my trash can.
The black cat Oreo truffles that came out of that kitchen experiment were genuinely the cutest things I’d made all season. I mean, they had these slightly crooked ears and googly eyes that gave them actual personality. My niece was triumphant. She kept saying “I told you so” while arranging them on a plate, and I couldn’t argue because she was completely right. The simplicity was the whole point. These cozy black cat Oreo truffles looked like little cartoon characters ready to sneak around your Halloween party.
Maybe you’ve been there — you spend hours on a complicated dessert and nobody eats it, but the simple thing you threw together disappears in minutes. That’s exactly what happened here. The adults grabbed them, the kids grabbed them, and my brother-in-law ate four before I could even get a photo. There’s something about a dessert that doesn’t take itself too seriously. These truffles are playful, they’re easy, and they have that homemade charm that store-bought candy just can’t match.
I keep making these every October because they remind me that sometimes the best ideas come from letting someone else take the lead. That night, I learned more from an eight-year-old than she learned from me. And honestly, that’s the kind of kitchen story worth repeating.
Why You’ll Love This Recipe
These cozy black cat Oreo truffles are the Halloween dessert you didn’t know you needed. They’re ridiculously easy to make, require just a handful of ingredients, and they turn out absolutely adorable every single time. Here’s why this recipe works so well:
- Quick & Easy: These come together in about 30 minutes of active time. The hardest part is waiting for the chocolate to set. Perfect for busy Halloween weeknights or last-minute party prep.
- Simple Ingredients: You need Oreos, cream cheese, black candy melts, and a few decorations. No fancy baking supplies or specialty stores required.
- Perfect for Halloween Parties: These truffles are the star of any Halloween spread. Kids love the cat shape, and adults love the rich, creamy texture. Everyone wins.
- Crowd-Pleaser: I’ve brought these to potlucks, class parties, and family gatherings. They disappear fast. People can’t resist something this cute and delicious.
- Unbelievably Delicious: The combination of crushed Oreos and cream cheese creates this fudgy, melt-in-your-mouth texture. It’s like eating an Oreo cheesecake in bite-sized form. Total comfort food.
What makes these different from other Halloween truffles is the shape. Most recipes just make round balls and call it a day. These actually look like little black cats, which adds that extra bit of Halloween magic. Plus, they’re no-bake, so you don’t have to worry about oven space or baking times. You just mix, shape, dip, and decorate. It’s the kind of recipe that makes you look like a kitchen genius with minimal effort.
This is comfort food reimagined for Halloween — rich, chocolatey, and completely satisfying. It’s the dessert that makes you close your eyes after the first bite, even while you’re surrounded by spooky decorations and costume chaos.
What Ingredients You Will Need
This recipe uses simple, pantry-friendly ingredients to create something truly special. Most of these items you probably already have in your kitchen, which makes these truffles perfect for spontaneous baking sessions.
- Oreo cookies (1 standard package, about 36 cookies): You’ll use the whole cookie, cream filling and all. I recommend the classic Oreo for the best flavor and texture. Don’t use Double Stuf — the extra cream throws off the balance and makes the truffles too soft.
- Cream cheese (8 ounces, softened): Full-fat cream cheese gives the best texture. Let it sit on the counter for about 20 minutes before mixing so it blends smoothly. Low-fat cream cheese works in a pinch, but the truffles won’t be as rich.
- Black candy melts (12 ounces): These are available at most craft stores or online. I prefer the Wilton brand for smooth melting and consistent color. You can also use black almond bark if you find it.
- Candy eyes (small, about 24-30 pieces): These are the googly eyes you see on all the cute Halloween treats. Look for them in the baking aisle near the candy melts. They come in various sizes — get the smaller ones for proportion.
- Black licorice strings (or black decorating icing): These make the whiskers. I prefer licorice strings for a cleaner look, but decorating icing works great if you want something easier. You’ll need about 2-inch pieces for each truffle.
- Coconut oil (1 teaspoon, optional): Adding a tiny bit of coconut oil to your candy melts helps them thin out for smoother dipping. It’s not strictly necessary, but it makes the process much easier.
- Orange decorating icing (optional): For little pumpkin details or Halloween accents. Not required, but adds a nice pop of color if you’re feeling creative.
Ingredient Substitution Guidance: If you need a dairy-free version, use dairy-free cream cheese and dairy-free chocolate melts. For a gluten-free option, use gluten-free chocolate sandwich cookies (like Glutino brand). The texture will be slightly different, but the overall concept works just as well.
Equipment Needed
You don’t need much for these truffles, which is part of their charm. Here’s what you’ll want to have on hand:
- Food processor: This makes crushing the Oreos into fine crumbs effortless. If you don’t have one, place the cookies in a zip-top bag and crush them with a rolling pin. It takes a bit more elbow grease, but it works.
- Mixing bowl: A medium-sized bowl for combining the Oreo crumbs and cream cheese.
- Baking sheet: Line it with parchment paper or a silicone mat for placing the dipped truffles. This makes cleanup so much easier.
- Microwave-safe bowl: For melting the candy melts. Glass or ceramic works best.
- Fork or dipping tool: A regular fork works fine for dipping the truffles. Some people prefer a special dipping tool, but honestly, a fork does the job.
- Toothpicks: Super helpful for adding the candy eyes and whiskers while the chocolate is still wet. They give you more control than using your fingers.
- Small piping bag or zip-top bag: For adding any decorative details with the orange icing. A zip-top bag with a tiny corner snipped off works perfectly.
I’ve made these using both a food processor and the rolling pin method, and honestly, both work fine. The food processor is faster and gives you more consistent crumbs, but the rolling pin method has a certain rustic charm. Plus, it’s a great arm workout.
Preparation Method
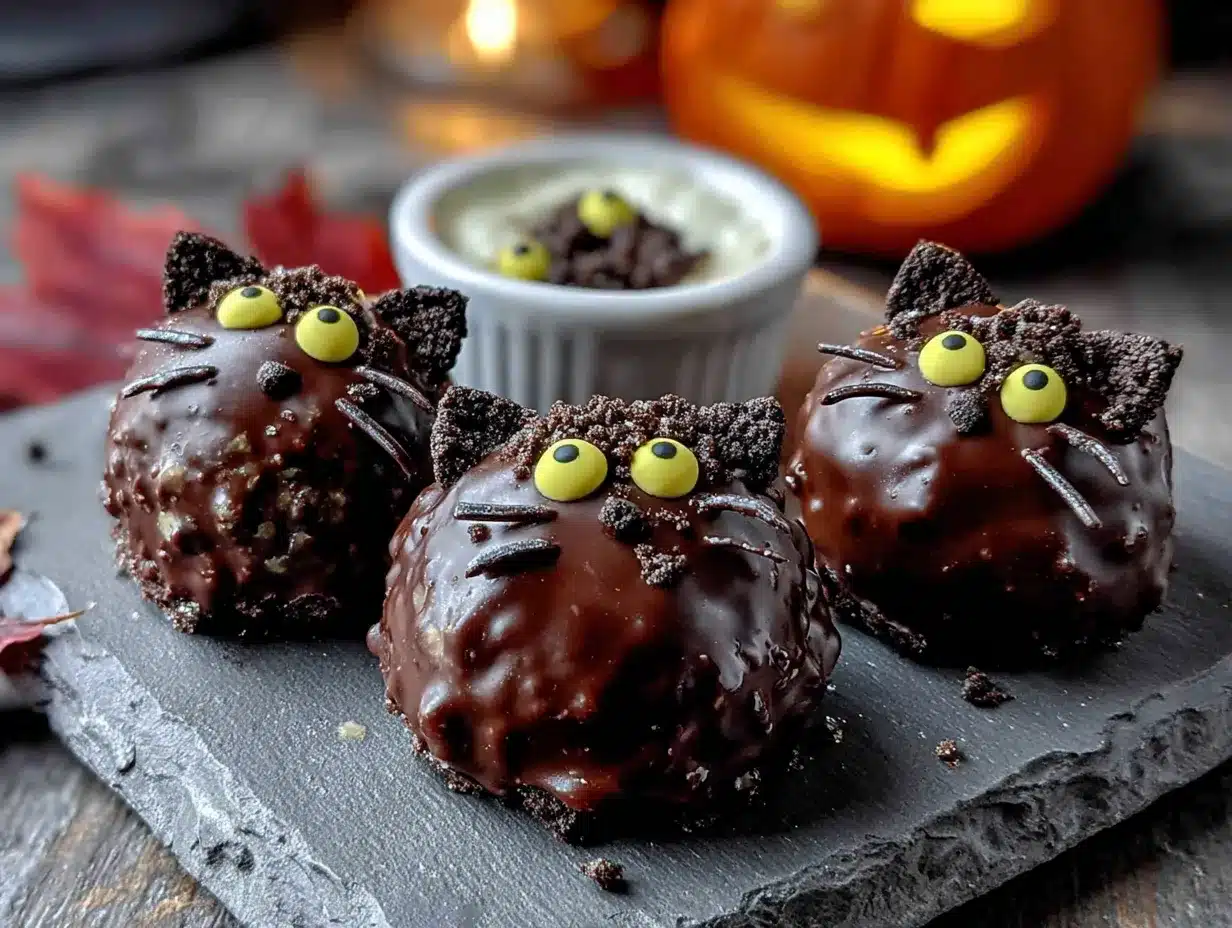
These cozy black cat Oreo truffles come together in a few simple steps. Take your time with each one, and you’ll have the cutest Halloween treats on the block.
- Crush the Oreos: Place the entire package of Oreos (cream filling included) into your food processor. Pulse until you have fine, even crumbs. You want them to look like dark sand. No large chunks should remain. If using the bag method, place the cookies in a zip-top bag, seal it, and go to town with a rolling pin. This takes about 5-7 minutes of steady crushing.
- Mix with cream cheese: Transfer the Oreo crumbs to a medium mixing bowl. Add the softened cream cheese. Use a spatula or your hands to mix everything together until fully combined. The mixture should come together into a thick, fudgy dough. It will be slightly sticky but should hold its shape when pressed. If it’s too sticky, add a few more crushed Oreos. If it’s too dry, add a tiny bit more cream cheese.
- Shape the truffles: Scoop about 1 tablespoon of the mixture and roll it into a ball. Then, gently pinch one side to form a slight point — this will be the cat’s face. Place each shaped truffle on the parchment-lined baking sheet. You should get about 24-30 truffles, depending on size. Pop the tray in the refrigerator for at least 20 minutes. This step is crucial — cold truffles are much easier to dip.
- Melt the candy melts: Place the black candy melts in a microwave-safe bowl. Microwave in 30-second intervals, stirring thoroughly between each interval. Be careful not to overheat them, or the chocolate will seize up and become lumpy. If the melts seem too thick, stir in 1 teaspoon of coconut oil. This will thin them out and make dipping smoother.
- Dip the truffles: Remove the chilled truffles from the fridge. Working one at a time, drop a truffle into the melted candy coating. Use a fork to gently roll it around until fully coated. Lift the truffle out with the fork, letting the excess chocolate drip back into the bowl. Gently tap the fork on the edge of the bowl to help remove extra coating. Place the dipped truffle back on the parchment paper. Repeat with the remaining truffles.
- Add the cat features: This is where the magic happens. While the chocolate is still wet, use a toothpick to place two candy eyes on each truffle, positioning them toward the pointed end. Then, add three small pieces of black licorice string on each side for whiskers. You want the whiskers to stick out slightly from the sides. Work quickly — the chocolate sets fast, especially if your truffles are cold.
- Add decorative details: If you’re using orange icing, pipe tiny pumpkins or Halloween designs on some of the truffles. I like to add a small orange dot between the eyes for a cute nose. You can also use the icing to draw little mouths or Halloween messages. Let your creativity run wild here.
- Let them set: Allow the truffles to sit at room temperature until the chocolate is completely set and firm. This usually takes about 15-20 minutes. If you’re in a hurry, pop them back in the refrigerator for 10 minutes. Once set, they’re ready to serve.
Sensory Cue: When you dip the truffles, you’ll feel the cold truffle hit the warm chocolate. The coating will harden almost immediately, creating that satisfying snap when you bite into it later. The truffles should look glossy and smooth, with no gray streaks or bare spots.
Pro Tip: If the candy melts start to thicken while you’re working, pop the bowl back in the microwave for 10 seconds. Stir well before continuing. Thick chocolate leads to lumpy truffles, so keep it flowing.
Cooking Tips & Techniques
I’ve made these truffles about a dozen times now, and I’ve learned a few things the hard way. Here are my best tips for getting perfect black cat Oreo truffles every time.
Keep the truffles cold. This is the most important tip I can give you. Cold truffles hold their shape better during dipping and create a smoother finish. If your truffles start to soften while you’re working, pop the tray back in the fridge for 10 minutes. I once tried to dip room-temperature truffles, and they fell apart in the chocolate. It was a mess, and I had to start over.
Don’t overmix the cream cheese. You want the Oreo crumbs and cream cheese to come together, but overmixing can make the truffles greasy. Mix just until everything is combined and the dough holds together. A few streaks of cream cheese are fine — they’ll disappear when you dip them.
Use a fork for dipping. A fork lets the excess chocolate drip off easily. Some people use spoons or dipping tools, but forks are the most practical. The tines create channels for the chocolate to run off, giving you a smoother finish. Just make sure to tap the fork gently on the bowl edge to remove any extra coating.
Work in small batches. Don’t try to dip all the truffles at once. Keep the undipped ones in the fridge while you work. This ensures they stay cold and firm. I usually work in batches of 6-8 truffles at a time. It takes a bit longer, but the results are worth it.
Fix mistakes quickly. If a candy eye slides off or a whisker looks crooked, you can fix it while the chocolate is still wet. Use a toothpick to reposition things. Once the chocolate sets, you’re stuck with whatever you did. Don’t stress about perfection — slightly imperfect cats have more personality anyway.
Plan your timing. These truffles need at least 20 minutes to chill before dipping and another 15-20 minutes to set after dipping. Factor that into your schedule. I usually make the truffle mixture the night before, shape them, and refrigerate overnight. Then I dip and decorate the next day. It breaks the work into manageable chunks.
My biggest failure: The first time I made these, I forgot to chill the truffles before dipping. I was in a hurry and thought, “How bad could it be?” Pretty bad, honestly. The truffles started to crumble in the warm chocolate, and I ended up with chocolate soup filled with Oreo chunks. I salvaged what I could, but they looked terrible. Lesson learned — patience is key with truffles.
Variations & Adaptations
These black cat Oreo truffles are endlessly adaptable. Here are some of my favorite variations:
White Chocolate Cats: Swap the black candy melts for white chocolate. You can leave them white for ghost cats or add food coloring to make orange pumpkin cats. The white chocolate version is sweeter and looks beautiful against a dark Halloween tablecloth. Just be careful with food coloring — gel colors work best and won’t seize the chocolate.
Peanut Butter Truffles: Add 2 tablespoons of peanut butter to the Oreo and cream cheese mixture. It adds a salty, nutty flavor that pairs beautifully with the chocolate. You might need to adjust the cream cheese slightly to keep the texture right. These are always a hit at parties.
Mint Oreo Cats: Use mint-flavored Oreos instead of classic ones. The green cream filling gives the truffles a subtle mint flavor that’s perfect for Halloween. You can also add a drop of peppermint extract to the cream cheese mixture for extra minty goodness.
Vegan Version: Use dairy-free cream cheese and vegan chocolate sandwich cookies. The texture will be slightly softer, so you might need to chill the truffles longer before dipping. Coconut cream can replace the cream cheese for a different but still delicious texture.
Gluten-Free Option: Gluten-free chocolate sandwich cookies work perfectly here. The texture is a bit crumblier, so handle the truffles gently. You might need to add a tiny bit more cream cheese to help everything hold together.
Spooky Spider Truffles: Instead of cat features, add eight black licorice legs to each truffle to make spiders. Use red icing for eyes. These are perfect if you want a more traditional Halloween look. Kids love them, and they’re surprisingly easy to make.
I’ve tried the peanut butter version twice now, and it’s become my personal favorite. Something about the salty-sweet combo just hits differently. My niece, of course, insists the original black cats are the best. We agree to disagree.
Serving & Storage Suggestions
These truffles are best served chilled or at room temperature. If you’re serving them at a party, keep them on a plate in the refrigerator until just before guests arrive. They’ll hold up well for about an hour at room temperature before they start to soften.
Presentation Ideas: Arrange the black cat truffles on a dark plate or black platter for maximum contrast. Add some orange sprinkles or candy corn around the edges for color. You can also place them on a bed of shredded coconut that’s been tinted green to look like grass. For a spooky touch, arrange them on a platter with fake spider webs and plastic spiders.
Complementary Dishes: These truffles pair beautifully with a glass of cold milk, hot apple cider, or pumpkin spice lattes. For a Halloween dessert table, serve them alongside pumpkin cookies, caramel apples, or chocolate bark. They’re also great with a scoop of vanilla ice cream for an extra indulgent treat.
Storage Instructions: Store the truffles in an airtight container in the refrigerator. They’ll stay fresh for up to one week. The texture actually improves after a day — the flavors meld together and the truffles become even creamier. Just make sure to keep them chilled, as the cream cheese can spoil at room temperature.
Freezer Instructions: These truffles freeze beautifully. Place them in a single layer on a baking sheet and freeze until solid. Then transfer them to a freezer-safe container or zip-top bag. They’ll keep for up to three months. Thaw them in the refrigerator overnight before serving. Don’t thaw them at room temperature, or they might get too soft.
Reheating Tips: These are best served cold, so no reheating is needed. If you want a softer texture, let them sit at room temperature for 10-15 minutes before serving. The chocolate will soften slightly, and the filling will become more fudgy.
Flavor Development: I’ve noticed that these truffles taste even better the next day. The Oreo crumbs absorb the cream cheese flavor, and everything becomes more cohesive. If you can resist eating them all on day one, you’ll be rewarded with even tastier truffles on day two.
Nutritional Information & Benefits
These truffles are a treat, so they’re not exactly health food. But here’s what you should know:
Estimated Nutritional Values (per truffle):
- Calories: 150-180
- Fat: 9-11g
- Carbohydrates: 18-22g
- Protein: 2-3g
- Sugar: 12-15g
Health Benefits: The cream cheese provides a small amount of calcium and protein. Dark chocolate (if you use it instead of candy melts) contains antioxidants. The Oreos, well, they provide happiness. That counts for something, right?
Dietary Considerations: These truffles contain dairy, gluten, and soy. They are not suitable for vegans, those with celiac disease, or anyone with dairy allergies (unless you use the substitutions mentioned above). Always check the labels on your ingredients to ensure they meet your dietary needs.
Potential Allergens: Oreos contain wheat, soy, and milk. Cream cheese contains milk. Candy melts may contain soy lecithin. If you’re serving these at a party, make sure to label them clearly so guests with allergies can make informed choices.
My Personal Take: Halloween is one night a year. I say enjoy the treats, make memories, and don’t stress about the calories. These truffles are about joy, creativity, and sharing something special with the people you love. A little indulgence is good for the soul.
Conclusion
These cozy black cat Oreo truffles are more than just a Halloween dessert — they’re a little piece of kitchen magic. They’re simple enough for kids to help with, impressive enough to bring to any party, and delicious enough to disappear in minutes. The fact that they look like adorable little cats is just the icing on the cake.
I hope you give these a try and make them your own. Maybe you’ll add different decorations, or try a flavor variation, or come up with a completely new shape. That’s the beauty of a simple recipe — it leaves room for creativity. My niece and I still make these together every October, and we always find something new to try.
If you make these black cat Oreo truffles, I’d love to hear about it. Drop a comment below and tell me how they turned out. Did you add your own twist? Did the kids help? Did they disappear as fast as mine always do? Share your photos and stories — I read every single one. And if you have a recipe request for the next holiday, let me know. I’m always looking for the next kitchen adventure.
Happy Halloween, and happy baking. May your truffles be cute, your chocolate be smooth, and your kitchen be filled with laughter.
Frequently Asked Questions
Can I use regular chocolate instead of candy melts?
You can, but regular chocolate doesn’t set as hard as candy melts. It will be softer to the touch and may smudge more easily. If you use regular chocolate, add a teaspoon of coconut oil to help it thin out. Dark chocolate works best because it’s firmer than milk or white chocolate.
How do I keep the candy melts from getting lumpy?
Heat them slowly and stir often. Microwave in 30-second bursts, stirring thoroughly between each one. If they still seem thick, add a tiny bit of coconut oil or vegetable shortening. Avoid getting any water in the chocolate — even a drop can cause it to seize up and become unusable.
Can I make these truffles ahead of time?
Absolutely. You can make the truffle mixture and shape them up to two days in advance. Keep them refrigerated until you’re ready to dip. Once dipped and decorated, they’ll stay fresh in the refrigerator for up to a week. They also freeze well for up to three months.
Why are my truffles cracking when I dip them?
This usually happens when the truffles are too cold. If they’re straight out of the freezer, the sudden temperature change can cause the chocolate to crack. Let them sit at room temperature for 5 minutes before dipping. Also, make sure your chocolate isn’t too hot — it should be warm, not scorching.
Can I use a different cookie instead of Oreos?
Yes, but the texture will change. Chocolate sandwich cookies work best because they have the cream filling that helps bind everything together. If you use a plain chocolate cookie, you’ll need to add more cream cheese or some melted butter to compensate. I’ve tried it with gluten-free cookies, and it works, but the truffles are a bit crumblier.
PrintCozy Black Cat Oreo Truffles: Easy Halloween Treat

These adorable black cat Oreo truffles are a simple, no-bake Halloween treat made with crushed Oreos, cream cheese, and black candy melts. They’re quick to make, require minimal ingredients, and are perfect for parties or family fun.
- Prep Time: 30 minutes
- Cook Time: 0 minutes
- Total Time: 1 hour 10 minutes (includes chilling and setting time)
- Yield: 24-30 truffles 1x
- Category: Dessert
- Cuisine: American
Ingredients
- 1 standard package Oreo cookies (about 36 cookies)
- 8 ounces cream cheese, softened
- 12 ounces black candy melts
- 24–30 small candy eyes
- Black licorice strings (or black decorating icing), cut into 2-inch pieces
- 1 teaspoon coconut oil (optional, for thinning candy melts)
- Orange decorating icing (optional, for decoration)
Instructions
- Crush the Oreos: Place the entire package of Oreos (cream filling included) into a food processor. Pulse until you have fine, even crumbs that look like dark sand. Alternatively, place cookies in a zip-top bag and crush with a rolling pin for 5-7 minutes.
- Mix with cream cheese: Transfer the Oreo crumbs to a medium mixing bowl. Add the softened cream cheese. Use a spatula or your hands to mix until fully combined into a thick, fudgy dough. It should be slightly sticky but hold its shape when pressed.
- Shape the truffles: Scoop about 1 tablespoon of the mixture and roll into a ball. Gently pinch one side to form a slight point for the cat’s face. Place each shaped truffle on a parchment-lined baking sheet. Refrigerate for at least 20 minutes.
- Melt the candy melts: Place black candy melts in a microwave-safe bowl. Microwave in 30-second intervals, stirring thoroughly between each, until smooth. If too thick, stir in 1 teaspoon coconut oil.
- Dip the truffles: Remove chilled truffles from the fridge. Working one at a time, drop a truffle into the melted candy coating. Use a fork to roll it until fully coated. Lift out, let excess drip off, and tap fork on bowl edge. Place back on parchment. Repeat with remaining truffles.
- Add the cat features: While chocolate is still wet, use a toothpick to place two candy eyes on each truffle toward the pointed end. Add three small pieces of black licorice string on each side for whiskers. Work quickly.
- Add decorative details: If using orange icing, pipe tiny pumpkins or a small orange dot between the eyes for a nose. Let creativity run wild.
- Let them set: Allow truffles to sit at room temperature until chocolate is firm, about 15-20 minutes. For faster setting, refrigerate for 10 minutes.
Notes
Keep truffles cold before dipping to maintain shape. Work in small batches, keeping undipped truffles in the fridge. If candy melts thicken, microwave for 10 seconds and stir. For best results, chill truffles overnight before dipping. These truffles taste even better the next day.
Nutrition
- Serving Size: 1 truffle
- Calories: 165
- Sugar: 14
- Sodium: 120
- Fat: 10
- Saturated Fat: 5
- Carbohydrates: 20
- Fiber: 1
- Protein: 2
Keywords: Halloween treats, Oreo truffles, black cat truffles, no-bake dessert, easy Halloween recipe, kid-friendly, chocolate truffles



