Love this? Save it for later!
Share the inspiration with your friends
My husband claimed to hate green bean casserole for fifteen years. Fifteen years. He’d make a face at Thanksgiving, push the green beans around his plate, and mutter something about “soggy canned things in mushroom soup.” I figured that was just his cross to bear. Then last Tuesday, I made this version “just for the kids” and found him standing over the counter, eating straight from the pan with a fork. Caught red-handed. “These are different,” he said, mouth half-full. “These are actually good.”
Honestly, I get it now. The classic version has some problems—mushy beans, that weird gray-ish sauce, the canned onion rings that get soft before you even serve them. It’s not exactly kid-friendly, let alone adult-friendly. But this air fryer version? It’s a whole different animal. We’re talking fresh green beans that still have a bit of snap, a creamy homemade sauce that tastes like comfort without the can, and crispy onions on top that stay crunchy for days. Let me tell you, when my kids asked for seconds of green beans—seconds—I knew I’d stumbled onto something special.
I was just trying to use up the green beans from our CSA box, honestly. I had some mushrooms that needed cooking, a little heavy cream left from a baking project, and a bag of onions I’d been avoiding. The air fryer was already out because I’d made chicken nuggets for the kids (don’t judge). So I figured, why not? Twenty minutes later, I had a bubbling, golden-topped casserole that smelled like Sunday dinner. The kids devoured it. My husband, the self-proclaimed green bean casserole hater, asked if I could make it again next week. Maybe you’ve been there—trying to get everyone around the table to agree on one dish. This one might just do it.
Why You’ll Love This Recipe
I’ve tested this recipe about seven times now, tweaking the sauce thickness, the cook time, the amount of cheese. My kids have been my official taste-testers, and they’ve been brutal when something wasn’t right. “Too mushroomy,” my daughter said on version three. “Not enough crunch,” my son complained on version five. But version six? That was the one where they both asked for leftovers in their lunch the next day. That’s when I knew this was ready to share.
- Quick & Easy: From start to table in under 30 minutes. The air fryer does most of the work while you prep the sauce on the stove. Perfect for those nights when soccer practice runs late and everyone’s hungry.
- Simple Ingredients: Fresh green beans, mushrooms, cream, onions, and basic pantry staples. No cans of cream-of-anything required. You likely have most of this already.
- Perfect for Family Dinners: This isn’t just a holiday side dish anymore. It’s a Tuesday night vegetable that actually gets eaten. Great for Thanksgiving too, but honestly, I make it year-round now.
- Crowd-Pleaser: My kids love it. My husband loves it. My neighbor who stopped by to borrow sugar ended up taking a container home. It’s that kind of recipe.
- Unbelievably Delicious: The texture is everything—tender-crisp beans, creamy sauce, crunchy topping. It’s comfort food that feels light, if that makes sense. You get the satisfaction without the heaviness.
What makes this different from every other green bean casserole out there? It’s the combination of fresh ingredients and the air fryer’s magic. The high heat crisps the onions without burning them, and it cooks the beans perfectly without turning them to mush. Plus, I add a tiny pinch of nutmeg to the sauce—trust me on this one. It’s a trick I learned from a chef friend, and it makes the creaminess sing without tasting like nutmeg at all. This isn’t just another version. It’s the version that converts haters and pleases kids. It’s the version you’ll make on repeat.
What Ingredients You Will Need
This recipe uses simple, honest ingredients to create something genuinely delicious. Most of these are pantry staples or easy to find at any grocery store. I’ve included notes on what to look for and what to swap if needed.
- Fresh green beans, 1 pound (450g) — Look for bright, firm beans that snap when you bend them. Trim the ends off, and cut them into bite-sized pieces if they’re long. I prefer thinner beans for this—they cook faster and have a nicer texture. If you only have frozen, thaw them first and pat them very dry.
- White mushrooms, 8 ounces (225g) — Cremini or button mushrooms both work great. Slice them thinly so they cook quickly and blend into the sauce. I’ve used baby bellas too, and they add a deeper flavor. Just don’t use canned mushrooms—they’re too watery and will make the sauce thin.
- Unsalted butter, 3 tablespoons (42g) — We’ll use this for sautéing the mushrooms and making the roux for the sauce. I prefer unsalted so I can control the salt level. If you only have salted, just reduce the added salt by about ¼ teaspoon.
- All-purpose flour, 3 tablespoons (24g) — This thickens the sauce. You can use gluten-free all-purpose flour if needed—I’ve tested it with Bob’s Red Mill 1-to-1, and it works fine.
- Whole milk, 1 cup (240ml) — Whole milk gives the creamiest sauce, but 2% works in a pinch. Avoid skim milk—it’ll be too thin. For a dairy-free version, use unsweetened oat milk or full-fat coconut milk (the creamy part from the can).
- Heavy cream, ½ cup (120ml) — This adds richness and helps the sauce stay smooth. You can substitute with half-and-half if you want it lighter, but the sauce won’t be quite as luscious.
- Chicken or vegetable broth, ½ cup (120ml) — Low-sodium is best so you can season to taste. I use chicken broth for deeper flavor, but vegetable broth works beautifully for a vegetarian version.
- Garlic, 2 cloves, minced — Fresh garlic is non-negotiable here. The jarred stuff won’t give you the same punch. If you’re in a hurry, you can use ½ teaspoon of garlic powder, but fresh is better.
- Salt, ½ teaspoon, plus more to taste — I use fine sea salt. Start with less and adjust at the end—different broths have different salt levels.
- Black pepper, ¼ teaspoon, freshly ground — Freshly ground pepper makes a difference here. It adds a little warmth that plays nicely with the creamy sauce.
- Nutmeg, ⅛ teaspoon, freshly grated if possible — This is my secret ingredient. It doesn’t taste like nutmeg—it just makes the sauce taste more… creamy. Trust me on this. If you don’t have whole nutmeg, pre-ground works fine.
- Yellow onions, 2 medium — We’ll slice these thin and air fry them until crispy. They shrink a lot, so don’t skimp. Vidalia or sweet onions work too, but they’ll be a little sweeter.
- Buttermilk, ½ cup (120ml) — This is for soaking the onions before breading. It adds tang and helps the flour stick. No buttermilk? Add 1 tablespoon of lemon juice or vinegar to regular milk and let it sit for 5 minutes.
- All-purpose flour, ½ cup (60g) — For coating the onions. Seasoned with salt, pepper, and a little garlic powder. You can use panko breadcrumbs for extra crunch if you want.
- Shredded cheddar cheese, ½ cup (60g), optional — My kids love it with a little cheese mixed into the sauce. It’s not traditional, but it’s delicious. Sharp cheddar adds the most flavor.
Equipment Needed
You don’t need much fancy equipment for this recipe, which is part of why I love it. Here’s what you’ll need:
- Air fryer — Any size works, but a 5.8-quart or larger is ideal so you can fit the whole casserole. I use a Cosori 5.8-quart, and it’s perfect. If yours is smaller, you might need to cook in batches.
- Oven-safe dish that fits in your air fryer — I use a 7-inch round ceramic dish or a small cast-iron skillet. Make sure it can handle the heat. A disposable aluminum pan works in a pinch.
- Large skillet — For sautéing the mushrooms and making the sauce. A 12-inch skillet gives you plenty of room.
- Mixing bowls — One for soaking the onions, one for the flour coating, and one for mixing the casserole before it goes in the air fryer.
- Cutting board and sharp knife — For trimming green beans, slicing mushrooms, and cutting onions. A sharp knife makes everything faster and safer.
- Whisk — For making the sauce smooth. A wooden spoon works too, but a whisk is better for avoiding lumps.
- Measuring cups and spoons — Precision matters here, especially for the sauce. I use glass measuring cups for liquids and metal ones for dry ingredients.
- Tongs or a slotted spoon — For handling the green beans and transferring the crispy onions.
I bought my air fryer on sale for about $60, and it’s been one of my best kitchen investments. If you don’t have one, you can make this in a regular oven at 400°F for about 20 minutes, but the onions won’t get quite as crispy. Honestly, an air fryer is worth it for recipes like this alone.
Preparation Method
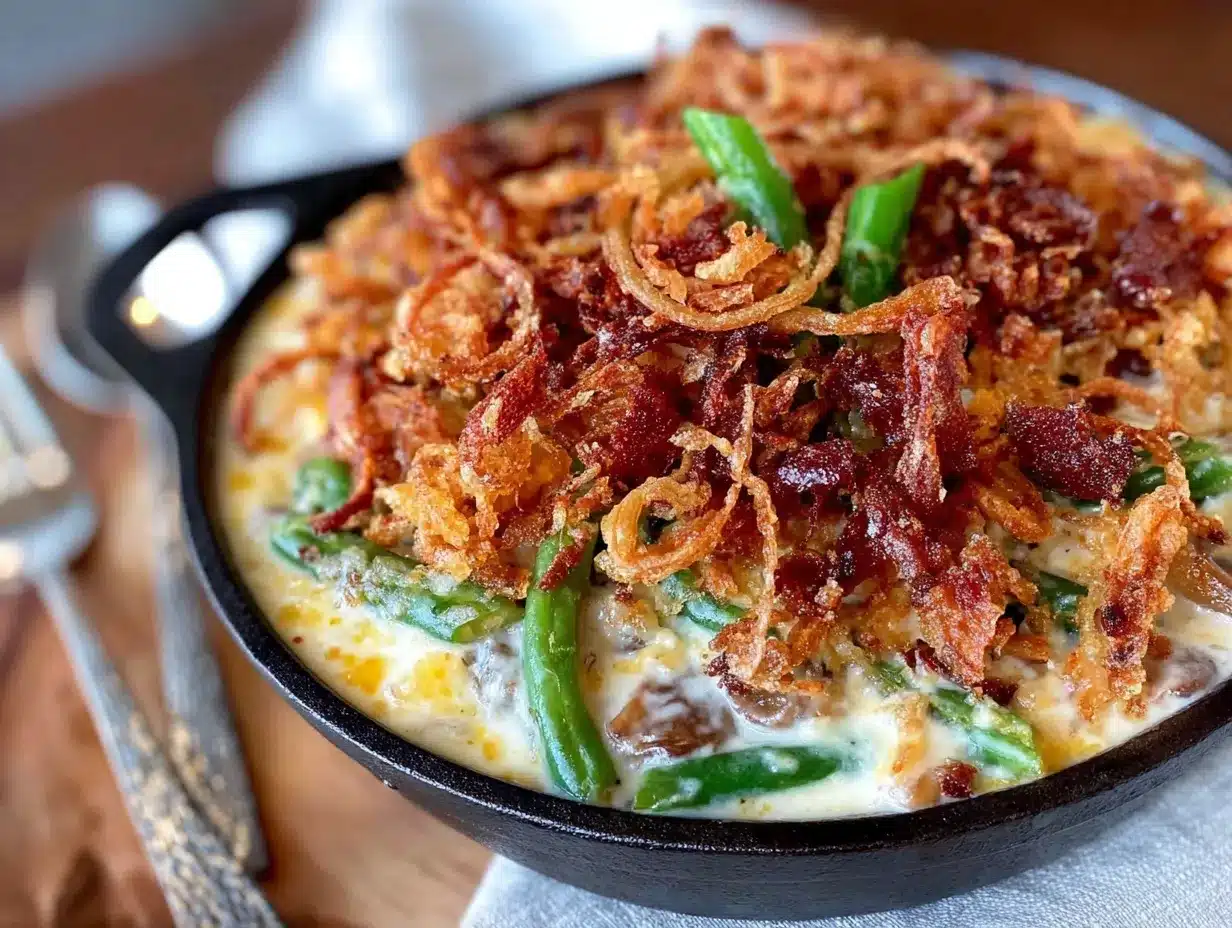
Let me walk you through this step by step. I’ve included all the little details I wish someone had told me the first time I made this.
- Prep the green beans. Wash them well, then trim off the stem ends. Cut them into about 2-inch pieces—bite-sized, but not too small. Bring a pot of salted water to a boil, then drop the green beans in for exactly 2 minutes. This is called blanching, and it keeps them bright green and tender-crisp. Drain them and immediately plunge them into a bowl of ice water to stop the cooking. Let them sit for a minute, then drain well and pat dry with a clean kitchen towel. (I forgot the ice bath once, and the beans kept cooking into mush. Learn from my mistake.)
- Make the crispy onions. Slice your onions as thinly as you can—a mandoline makes this easy, but a sharp knife works fine. Separate the rings into a bowl and pour the buttermilk over them. Let them soak for at least 10 minutes while you prep everything else. In another bowl, mix the flour with ½ teaspoon salt, ¼ teaspoon pepper, and ¼ teaspoon garlic powder. Grab a handful of soaked onion rings, let the excess buttermilk drip off, then toss them in the seasoned flour. Shake off the excess and place them on a plate. Don’t crowd the plate—they’ll stick together. Work in batches if needed.
- Air fry the onions. Spray the air fryer basket with cooking spray. Place the coated onion rings in a single layer—you’ll probably need to do two or three batches depending on your air fryer size. Spray the tops with more cooking spray. Air fry at 375°F for 8-10 minutes, shaking the basket halfway through, until golden brown and crispy. They’ll continue crisping as they cool, so don’t overdo it. Transfer to a paper towel-lined plate and sprinkle with a little salt while they’re still hot. Set aside.
- Sauté the mushrooms. In a large skillet over medium heat, melt 1 tablespoon of the butter. Add the sliced mushrooms and a pinch of salt. Cook, stirring occasionally, for 5-7 minutes until they release their liquid and start to brown. You want them golden, not gray. If they look dry, add another tablespoon of butter. Once they’re nicely browned, add the minced garlic and cook for 30 seconds until fragrant. Transfer the mushrooms to a bowl and set aside.
- Make the cream sauce. In the same skillet (don’t wipe it out—all that flavor is gold), melt the remaining 2 tablespoons of butter over medium heat. Sprinkle in the 3 tablespoons of flour and whisk constantly for 1-2 minutes. This cooks out the raw flour taste. Slowly pour in the milk, whisking the whole time to prevent lumps. Then add the heavy cream and broth, still whisking. Bring to a gentle simmer—you’ll see bubbles around the edges—and cook for 2-3 minutes until the sauce thickens enough to coat the back of a spoon. Stir in the salt, pepper, and nutmeg. Taste it. Add more salt if needed. If you’re using cheese, stir it in now until melted and smooth.
- Combine everything. Add the blanched green beans and cooked mushrooms to the sauce. Stir gently to coat everything evenly. If the sauce seems too thick, add a splash of milk. Too thin? Let it simmer another minute. Pour the mixture into your air fryer-safe dish. Smooth the top with a spatula.
- Air fry the casserole. Place the dish in the air fryer basket. Air fry at 375°F for 10 minutes, until the sauce is bubbling around the edges and the top is starting to brown. Carefully remove the dish (it’ll be hot!) and sprinkle the crispy onions evenly over the top. Return to the air fryer and cook for another 2-3 minutes, just until the onions are warmed through and the casserole is hot and bubbly.
- Rest and serve. Let the casserole sit for 5 minutes before serving. This lets the sauce set up a little so it’s not too runny. The smell at this point is absolutely ridiculous—creamy, savory, with that hint of nutmeg that makes everyone lean in. Serve hot, and watch it disappear.
Cooking Tips & Techniques
I’ve made this recipe enough times to know where things can go wrong. Here’s what I’ve learned the hard way so you don’t have to.
Don’t skip the blanching step. I know it’s an extra pot to wash, but boiling the green beans for 2 minutes does two things: it sets their bright green color, and it starts the cooking process so they’re perfectly tender after a short time in the air fryer. If you skip this, the beans will be either too crunchy or you’ll have to cook the casserole longer, which dries out the sauce. I tried skipping it once to save time, and the beans were still crunchy when the sauce was already bubbling. Not great.
Dry your mushrooms before slicing. Mushrooms are like little sponges—they absorb water. If you wash them right before cooking, they’ll steam instead of brown. Instead, wipe them clean with a damp paper towel or use a mushroom brush. If you must rinse them, do it ahead of time and let them dry completely on a towel. The browning is where the flavor lives, and you want that deep, savory notes in your sauce.
Watch your air fryer temperature. Every air fryer runs a little differently. Mine runs hot, so I sometimes reduce the temperature by 25 degrees. If this is your first time making the recipe, check the casserole at 8 minutes instead of 10. You’re looking for bubbling sauce and lightly browned edges. The onions on top should be golden, not dark brown. Burnt onions taste bitter, and nobody wants that.
Make the sauce ahead of time. This is a great time-saver. You can make the cream sauce up to two days in advance and keep it in the fridge. When you’re ready to assemble, just reheat it gently on the stove, add the green beans and mushrooms, and proceed with the recipe. The sauce might thicken as it sits—just thin it with a splash of milk when you reheat.
Don’t overcrowd the air fryer. When you’re making the crispy onions, give them room to breathe. If you pile them on top of each other, they’ll steam instead of crisp, and you’ll end up with sad, soggy onions. Work in batches, even if it takes a few extra minutes. The payoff is worth it. I usually make the onions while the casserole is in the air fryer, so everything finishes around the same time.
Toast the flour for extra flavor. This is a pro tip: when you make the roux, let the flour cook in the butter for an extra minute until it smells nutty and turns a light golden color. This adds a toasty depth to the sauce that you can’t get any other way. Just keep whisking so it doesn’t burn.
Variations & Adaptations
One of the best things about this recipe is how flexible it is. Here are some ways I’ve adapted it for different needs and tastes.
Dairy-Free Version: I made this for a friend who’s lactose intolerant, and it worked beautifully. Use olive oil instead of butter for sautéing the mushrooms and making the roux. Substitute the milk with unsweetened oat milk, the heavy cream with full-fat coconut cream (the thick part from a can of coconut milk), and skip the cheese. The coconut cream adds a subtle sweetness that’s actually lovely with the green beans. Use a dairy-free buttermilk substitute for the onions—just add a tablespoon of lemon juice to oat milk and let it sit for 5 minutes.
Gluten-Free Version: This is surprisingly easy. Use a gluten-free all-purpose flour blend for both the sauce and the onion coating. I’ve tested this with Bob’s Red Mill 1-to-1 Baking Flour, and it worked perfectly. The sauce might be slightly thinner, so let it simmer an extra minute. For the onions, the gluten-free flour might not stick quite as well, but they still get crispy. Just handle them gently when tossing.
Add Some Protein: My husband loves when I add cooked, crumbled bacon or diced ham to this casserole. It turns it into more of a main dish. Just stir in about ½ cup of cooked bacon or ham when you combine the green beans and sauce. The smoky flavor pairs beautifully with the creamy sauce. I’ve also added shredded rotisserie chicken for a quick weeknight dinner.
Spice It Up: If your family likes a little heat, add a pinch of cayenne pepper or red pepper flakes to the sauce. My brother-in-law adds a diced jalapeño to the mushrooms when he sautés them. It’s not traditional, but it’s delicious. Just go easy—you can always add more, but you can’t take it out.
Seasonal Swaps: In the summer, I use fresh green beans from the farmer’s market and add a handful of cherry tomatoes, halved, when I combine everything. In the fall, I sometimes swap half the green beans for roasted butternut squash cubes. Both are delicious in their own way. The basic sauce and method stay the same—just swap in whatever vegetables look good.
Make It a One-Dish Meal: I’ve added cooked quinoa or rice to the casserole to make it heartier. About 1 cup of cooked grains stirred in with the green beans works well. It stretches the dish and makes it more filling. My kids don’t even notice—they just eat it up.
Serving & Storage Suggestions
This casserole is best served hot, straight from the air fryer. The contrast between the creamy sauce and the crispy onions is at its peak in the first 10 minutes. But I’ve also eaten it cold straight from the fridge at 11 PM, and I’m not ashamed to admit it was still good.
Serving Temperature: Let the casserole rest for 5 minutes after it comes out of the air fryer. This lets the sauce set up so it’s not too runny on the plate. Serve it hot, with the crispy onions on top still crunchy. If you’re making this for a holiday meal, time it so the casserole comes out right when everyone sits down.
What to Serve With It: This is great alongside roasted chicken, grilled steak, or even a simple baked fish. For a vegetarian meal, serve it with crusty bread and a simple salad. It also works as a Thanksgiving side dish—honestly, it might be the best thing on the table. My kids like it with mashed potatoes and gravy, which is basically a carb-on-carb situation, but hey, sometimes that’s what you need.
Storage Instructions: Leftovers keep well in the fridge for up to 4 days. Store them in an airtight container. The crispy onions will soften over time, but the flavor is still there. To reheat, I recommend using the air fryer again—sprinkle a little water over the top to add moisture, then air fry at 350°F for 5-7 minutes until hot. You can also reheat in the microwave, but the texture won’t be as nice. If you’re meal prepping, store the crispy onions separately and add them just before serving.
Freezer Instructions: You can freeze the assembled casserole before adding the crispy onions. Just prepare the green bean mixture, pour it into a freezer-safe dish, and freeze for up to 3 months. Thaw overnight in the fridge, then air fry at 375°F for 15-20 minutes until hot and bubbly. Add the crispy onions for the last 3 minutes. I’ve done this for holiday prep, and it saves so much time. Don’t freeze the onions—they’ll get soggy.
How Flavors Develop: Honestly, this casserole tastes even better the next day. The flavors meld together overnight, and the sauce gets even creamier. If you’re making it for a special occasion, I actually recommend making it a day ahead and just reheating it. The crispy onions won’t be as crunchy, but the depth of flavor is worth it. My family fights over the leftovers, which is saying something for a green bean dish.
Nutritional Information & Benefits
I’m not a nutritionist, but I’ve done my best to estimate the values for this recipe. Keep in mind these are approximations and will vary based on specific ingredients and portion sizes.
Estimated Nutritional Values (per serving, serves 6):
| Nutrient | Amount |
|---|---|
| Calories | 245 |
| Total Fat | 14g |
| Saturated Fat | 8g |
| Cholesterol | 40mg |
| Sodium | 480mg |
| Total Carbohydrates | 24g |
| Dietary Fiber | 4g |
| Sugars | 8g |
| Protein | 7g |
| Vitamin A | 15% DV |
| Vitamin C | 20% DV |
| Calcium | 15% DV |
| Iron | 10% DV |
Health Benefits: Green beans are a good source of vitamins A, C, and K, plus fiber and folate. Mushrooms provide B vitamins and selenium, which supports immune function. The onions, even when crispy, still contain quercetin, an antioxidant that supports heart health. By making this from scratch, you’re avoiding the preservatives and excess sodium found in canned versions. It’s not health food, but it’s a whole lot better than the boxed stuff.
Dietary Considerations: This recipe can be made gluten-free and dairy-free with the substitutions I mentioned earlier. It’s naturally vegetarian if you use vegetable broth. To make it vegan, use the dairy-free substitutions and skip the cheese. It’s not low-carb, but you could reduce the flour in the sauce and use almond flour for the onions to lower the carbs. The main allergens here are dairy and wheat, so keep that in mind if you’re serving someone with sensitivities.
Conclusion
So there you have it—a green bean casserole that actually lives up to the hype. It’s creamy, crunchy, and full of flavor, and it comes together in under 30 minutes with simple ingredients you can feel good about. My husband, the former hater, now asks for this regularly. My kids, who used to push green beans around their plates, now ask for seconds. That’s the kind of recipe magic that keeps me coming back to the kitchen.
I hope you give this a try, and I hope it becomes a favorite in your house too. Feel free to tweak it to your family’s taste—add more cheese, throw in some bacon, or spice it up. That’s the beauty of cooking from scratch. You make it yours. And if your kids ask for seconds of green beans? Well, you’ll know you’ve done something right.
I’d love to hear how it goes! Drop a comment below and let me know if your family loved it as much as mine did. Did you try any fun variations? Did your picky eater surprise you? Share your stories—I read every single comment, and they honestly make my day. Happy cooking, friends!
Frequently Asked Questions
Can I use frozen green beans instead of fresh?
Yes, you can! Just thaw them completely and pat them very dry with a kitchen towel. Frozen beans have more water than fresh, so if you don’t dry them well, the sauce will be watery. Also, skip the blanching step—frozen beans are already blanched. Just add them straight to the sauce.
Why did my sauce turn out lumpy?
Lumpy sauce usually happens when you add the milk too quickly or don’t whisk enough. The key is to add the liquid slowly while whisking constantly. If you already have lumps, don’t panic—you can strain the sauce through a fine-mesh sieve, or use an immersion blender to smooth it out. I’ve done both, and it works fine.
Can I make this in a regular oven instead of an air fryer?
Absolutely. Preheat your oven to 400°F. Assemble the casserole in a baking dish and bake for 15-20 minutes until bubbly. Add the crispy onions and bake for another 3-5 minutes. The texture will be slightly different—the sauce won’t reduce as much, and the onions might not be as crunchy—but it’s still delicious.
How do I keep the crispy onions from getting soggy?
The best trick is to store them separately from the casserole until you’re ready to serve. If you’re making the whole dish ahead, keep the onions in an airtight container at room temperature and add them right before serving. If they do get soft, you can re-crisp them in the air fryer at 350°F for 2-3 minutes.
Can I double this recipe for a crowd?
Yes, but you’ll need to cook it in batches unless you have a very large air fryer. I usually make two separate batches in my 5.8-quart air fryer. If you’re using a regular oven, you can double it and bake it in a 9×13-inch dish. Just add 5-10 minutes to the baking time, and check that the center is hot and bubbly before serving.
Pin This Recipe!

Easy Kid-Approved Air Fryer Green Bean Casserole

A quick and easy air fryer green bean casserole with fresh green beans, creamy homemade sauce, and crispy onions. This crowd-pleasing side dish converts haters and pleases kids, ready in under 30 minutes.
- Prep Time: 15 minutes
- Cook Time: 20 minutes
- Total Time: 35 minutes
- Yield: 6 servings 1x
- Category: Side Dish
- Cuisine: American
Ingredients
- 1 pound (450g) fresh green beans, trimmed and cut into 2-inch pieces
- 8 ounces (225g) white mushrooms (cremini or button), thinly sliced
- 3 tablespoons (42g) unsalted butter
- 3 tablespoons (24g) all-purpose flour
- 1 cup (240ml) whole milk
- ½ cup (120ml) heavy cream
- ½ cup (120ml) low-sodium chicken or vegetable broth
- 2 cloves garlic, minced
- ½ teaspoon fine sea salt, plus more to taste
- ¼ teaspoon freshly ground black pepper
- ⅛ teaspoon freshly grated nutmeg (or pre-ground)
- 2 medium yellow onions, thinly sliced
- ½ cup (120ml) buttermilk
- ½ cup (60g) all-purpose flour (for coating onions)
- ½ teaspoon salt (for onion coating)
- ¼ teaspoon black pepper (for onion coating)
- ¼ teaspoon garlic powder (for onion coating)
- ½ cup (60g) shredded cheddar cheese (optional)
Instructions
- Prep the green beans: Wash and trim the stem ends, then cut into 2-inch pieces. Bring a pot of salted water to a boil, add green beans, and blanch for exactly 2 minutes. Drain and plunge into a bowl of ice water to stop cooking. Drain well and pat dry.
- Make the crispy onions: Slice onions thinly and separate into rings. Soak in buttermilk for at least 10 minutes. In a separate bowl, mix ½ cup flour with ½ teaspoon salt, ¼ teaspoon pepper, and ¼ teaspoon garlic powder. Drain onion rings, toss in seasoned flour, and shake off excess. Place on a plate in a single layer.
- Air fry the onions: Spray air fryer basket with cooking spray. Place coated onion rings in a single layer (work in batches). Spray tops with cooking spray. Air fry at 375°F for 8-10 minutes, shaking halfway, until golden and crispy. Transfer to a paper towel-lined plate and sprinkle with salt while hot. Set aside.
- Sauté the mushrooms: In a large skillet over medium heat, melt 1 tablespoon butter. Add sliced mushrooms and a pinch of salt. Cook 5-7 minutes until browned. Add minced garlic and cook 30 seconds until fragrant. Transfer to a bowl and set aside.
- Make the cream sauce: In the same skillet, melt remaining 2 tablespoons butter over medium heat. Whisk in 3 tablespoons flour and cook 1-2 minutes. Slowly whisk in milk, then heavy cream and broth. Bring to a gentle simmer and cook 2-3 minutes until thickened. Stir in salt, pepper, and nutmeg. If using cheese, stir in until melted.
- Combine everything: Add blanched green beans and cooked mushrooms to the sauce. Stir gently to coat. If sauce is too thick, add a splash of milk. Pour into an air fryer-safe dish and smooth the top.
- Air fry the casserole: Place dish in air fryer basket. Air fry at 375°F for 10 minutes until bubbling. Carefully remove, sprinkle crispy onions evenly on top, and return to air fryer for 2-3 minutes until heated through.
- Rest and serve: Let casserole sit for 5 minutes before serving. Serve hot.
Notes
Don’t skip blanching the green beans—it keeps them bright and tender-crisp. Dry mushrooms before slicing to ensure browning. Watch air fryer temperature as it may vary. Make sauce ahead of time for convenience. Store crispy onions separately to maintain crunch. For best texture, serve immediately after resting.
Nutrition
- Serving Size: 1 serving (about 1 c
- Calories: 245
- Sugar: 8
- Sodium: 480
- Fat: 14
- Saturated Fat: 8
- Carbohydrates: 24
- Fiber: 4
- Protein: 7
Keywords: green bean casserole, air fryer, easy, kid-friendly, Thanksgiving, side dish, creamy, crispy onions



