Love this? Save it for later!
Share the inspiration with your friends
The elementary school Halloween party was in six hours and I had completely forgotten my promise to bring treats. Everyone else would be showing up with elaborate cupcakes shaped like graveyards or those perfectly decorated sugar cookies that look like they came from a bakery. I had a bag of pretzel rods, some white chocolate chips I’d bought for a different project, and a vague sense of panic setting in. Honestly, I was this close to just grabbing a bag of candy from the gas station.
But then I spotted the almond slivers in the back of my pantry. You know that moment when your brain suddenly connects the dots? Pretzel rods are long and skinny. Almond slivers look like fingernails. White chocolate is the color of, well, creepy witch fingers. I mean, it wasn’t exactly a gourmet vision, but it was something. I melted the chocolate, dipped the pretzels, and stuck on the almond “nails” with the frantic energy of someone who had nothing to lose.
The result was honestly hilarious. They looked ridiculous—long, knobby, slightly lumpy white fingers with pointy almond nails. I threw them on a platter and braced for the worst. But here’s the thing: those spooky white chocolate witch finger pretzel rods were the first thing to disappear at the party. Kids were grabbing them, laughing, and pretending to eat their own fingers. The moms were asking for the recipe. I just stood there, sheepish, trying to explain that it was a happy accident born from total procrastination. That’s why I keep making them, though. They’re the perfect last-minute Halloween treat that looks way more complicated than it actually is. And honestly, isn’t that the best kind of recipe?
Why You’ll Love This Recipe
Let me tell you why these spooky white chocolate witch finger pretzel rods have become my go-to Halloween recipe. They solve the problem of wanting something festive without spending hours in the kitchen. After testing this recipe multiple times (and accidentally making a few batches that looked more like zombie toes than witch fingers), I’ve perfected the technique so you don’t have to guess.
- Quick & Easy: These come together in under 20 minutes of active time. Seriously, you can make a whole platter while your coffee is brewing.
- Simple Ingredients: No fancy grocery trips needed. You likely already have pretzel rods, white chocolate chips, and almond slivers in your pantry.
- Perfect for Halloween Parties: Great for classroom treats, office parties, or just a fun activity with the kids on a spooky afternoon.
- Crowd-Pleaser: Always gets rave reviews from kids and adults alike. The creepy factor is a conversation starter.
- Unbelievably Delicious: The salty crunch of the pretzel combined with the sweet white chocolate and the nutty almond is next-level snack magic.
What makes these different from other Halloween treats? It’s the texture contrast. That satisfying snap when you bite into the pretzel, followed by the creamy chocolate and the slight chew of the almond. I’ve tried other versions that use candy melts, but white chocolate chips give a much better flavor—they’re not as sweet and artificial tasting. This isn’t just another Halloween candy; it’s your new secret weapon for holiday entertaining.
These spooky white chocolate witch finger pretzel rods are the kind of treat that makes you close your eyes after the first bite. They’re Halloween fun reimagined—faster, simpler, but with the same festive satisfaction. Perfect for impressing guests without stress, or turning a simple snack into something memorable.
What Ingredients You Will Need
This recipe uses simple, wholesome ingredients to deliver bold flavor and satisfying texture without the fuss. All of these are pantry staples that you probably already have on hand, which makes these perfect for last-minute Halloween cravings.
- Pretzel Rods (12-15 rods): Look for sturdy, thick pretzel rods that won’t snap easily when dipped. I prefer the Snyder’s of Hanover brand for their consistent thickness and salt distribution. Avoid thin pretzel sticks—they’re too fragile for dipping.
- White Chocolate Chips (1 cup): Use high-quality white chocolate chips for the best flavor and smooth melting. I recommend Ghirardelli or Guittard—they melt more evenly and don’t get grainy. Avoid white candy melts if you want that authentic chocolate taste.
- Coconut Oil (1 teaspoon): This is optional but highly recommended. A tiny bit of coconut oil helps thin the white chocolate for smoother dipping and gives it a beautiful shine. You can use vegetable oil instead if that’s what you have.
- Almond Slivers (about 30-40 pieces): These become the “fingernails” on your witch fingers. Look for whole almond slivers, not the sliced ones—they need to be long enough to look like nails. You can also use sliced almonds in a pinch, but whole slivers look much more authentic.
- Red Food Coloring (optional): A tiny drop of red gel food coloring can be used to make a “blood” effect at the base of the nail. This is completely optional but adds to the spooky factor.
- Green or Purple Sprinkles (optional): For extra witchy vibes, you can sprinkle some green or purple sanding sugar over the wet chocolate. This gives them a magical, glittery finish.
For ingredient selection, always check your almond slivers for freshness. Stale almonds can ruin the flavor of your treat. Store them in an airtight container if you buy in bulk. If you’re making these for a school party, double-check for any nut allergies among the children—you can substitute the almond slivers with small candy eyeballs or just leave them plain for a different look.
Equipment Needed
You don’t need any fancy kitchen gadgets for this recipe, which is part of its charm. Here’s what you’ll need:
- Microwave-Safe Bowl: For melting the white chocolate. Glass or ceramic works best—avoid plastic bowls as they can retain odors and affect the chocolate’s flavor.
- Baking Sheet: Line it with parchment paper or a silicone baking mat. This is where your dipped pretzels will set. I’ve used wax paper in a pinch, but parchment is better because it doesn’t stick.
- Spatula: For stirring the chocolate as it melts. A silicone spatula is ideal because it won’t scratch your bowl and is easy to clean.
- Small Spoon or Offset Spatula: For spreading the chocolate evenly on the pretzels if needed. Honestly, I usually just dip them straight in the bowl.
- Tweezers: This is my secret weapon! Using tweezers to place the almond slivers gives you much more control than using your fingers. It keeps the chocolate mess to a minimum and ensures precise placement.
If you don’t have a microwave, you can melt the white chocolate using a double boiler. Just place a heatproof bowl over a pot of simmering water—make sure the bottom of the bowl doesn’t touch the water. This method takes a bit longer but gives you more control over the melting process. For budget-friendly options, dollar store baking sheets work just fine for this project.
Preparation Method

Let me walk you through making these spooky white chocolate witch finger pretzel rods. I’ve tested this method multiple times, and following these steps exactly will give you the best results.
- Prepare Your Workspace: Line a baking sheet with parchment paper and set it aside. Count out your pretzel rods and almond slivers so everything is ready to go. Trust me, once the chocolate is melted, you want to work quickly.
- Melt the White Chocolate: Place 1 cup of white chocolate chips in a microwave-safe bowl. Microwave in 30-second intervals at 50% power, stirring well after each interval. This is crucial—white chocolate burns easily if you use full power. After about 2-3 intervals, the chocolate should be mostly melted. Stir until smooth. If it’s too thick, add 1 teaspoon of coconut oil and stir until incorporated.
- Test the Consistency: The chocolate should be smooth and runny enough to coat the pretzel easily. If it’s too thick, add another ½ teaspoon of coconut oil. If it’s too thin (which rarely happens), let it sit for a minute to cool slightly.
- Dip the Pretzels: Hold a pretzel rod by one end and dip it into the melted white chocolate, rotating to coat about two-thirds of the rod. Lift it out and let the excess chocolate drip back into the bowl. You want a nice even coating, but don’t worry about perfection—the lumpy, uneven look actually makes them look more like real witch fingers!
- Place on Baking Sheet: Transfer the dipped pretzel to your prepared baking sheet. Gently tap the pretzel against the sheet to help the chocolate settle evenly. Repeat with the remaining pretzels, leaving about an inch of space between each one.
- Add the “Nails”: While the chocolate is still wet, use your tweezers to place an almond sliver at the tip of each pretzel. Press it gently so it sticks. The pointed end of the almond should face outward, away from the pretzel. This is where the tweezers really help—you can position the almond perfectly without getting chocolate all over your fingers.
- Create the Knuckle Effect: Here’s a trick I learned after my first few batches. Use the back of a small spoon or your finger (wearing a glove!) to gently press indentations along the chocolate-covered part of the pretzel. This creates the illusion of knuckles and joints. Don’t press too hard—you just want subtle dimples, not broken pretzels.
- Add Details (Optional): If you’re using red food coloring, dip a toothpick into the gel and swipe a tiny line at the base of the almond “nail” to look like blood. If using sprinkles, sprinkle them over the wet chocolate now. Work quickly before the chocolate sets.
- Let Them Set: Allow the pretzels to set at room temperature for about 30 minutes, or place them in the refrigerator for 10-15 minutes if you’re in a hurry. The chocolate should be firm to the touch before you handle them.
- Repeat if Desired: If you want a thicker chocolate coating, let the first layer set completely, then dip again. This gives a more substantial white chocolate layer that looks more like real fingers.
A quick note: if your chocolate starts to thicken while you’re working, pop it back in the microwave for 10 seconds and stir. Don’t overheat it, or it will seize up and become unusable. I’ve learned this the hard way—nothing is more frustrating than perfectly good chocolate turning into a grainy mess!
Cooking Tips & Techniques
After making these spooky white chocolate witch finger pretzel rods for three Halloween seasons straight, I’ve picked up a few tricks that make the process smoother and the results more impressive.
The Biggest Mistake People Make: Overheating the white chocolate. White chocolate is notoriously finicky—it burns at a lower temperature than milk or dark chocolate. Always use low power in the microwave and stir frequently. If you see any lumps forming, stop immediately and stir vigorously. Sometimes the residual heat is enough to melt them completely.
My Personal Failure Story: Last year, I tried to speed things up by using full power on the microwave. Within 45 seconds, my white chocolate had turned into a thick, grainy paste that was completely unusable. I had to start over, and I was already running late for my niece’s Halloween party. Now I always set a timer and never leave the microwave unattended.
Timing Strategy: I like to make these in batches. Melt half the chocolate, dip 6-7 pretzels, then melt the other half for the remaining batch. This keeps the chocolate at the perfect consistency throughout the process. If you try to dip all 15 pretzels at once, the chocolate in the bowl will start to set before you’re done.
Temperature Matters: Room temperature is your friend here. If your kitchen is too cold (below 65°F), the chocolate will set too quickly and you won’t have time to add the almond nails. If it’s too warm (above 75°F), the chocolate might not set properly and will stay sticky. Aim for a comfortable room temperature for best results.
Consistency Tip: For perfectly uniform witch fingers, try to use pretzel rods that are roughly the same length and thickness. I sort through my bag and pick out the most finger-sized ones. The really short or broken ones I save for snacking later.
Variations & Adaptations
One of the best things about this recipe is how easy it is to customize. Here are some variations I’ve tried and loved:
Dietary Adaptations: For a dairy-free version, use dairy-free white chocolate chips (like Enjoy Life brand) and skip the coconut oil if you’re avoiding it. The texture will be slightly different, but they still taste amazing. For a nut-free version, skip the almond slivers entirely and use small candy eyeballs or even M&M’s pressed into the tip instead.
Seasonal Variations: Beyond Halloween, these make great treats for other occasions. For Christmas, use white chocolate and red and green sprinkles to make “elf fingers.” For Valentine’s Day, use pink candy melts and heart-shaped sprinkles. The basic technique stays the same—you’re just changing the colors and decorations.
Flavor Twists: Add a few drops of peppermint extract to the melted white chocolate for a minty version. Or try orange extract for a creamsicle flavor that’s perfect for fall. I once made a batch with a pinch of cinnamon and nutmeg mixed into the chocolate, and they tasted like a churro in finger form!
Different Chocolate Options: While white chocolate gives the best “witch finger” look, you can use milk chocolate or dark chocolate for a different effect. Dark chocolate makes them look like “dirt fingers” from a zombie-themed party. For a colorful option, use green candy melts for a truly monstrous look.
My Personal Variation: My favorite version uses a drizzle of dark chocolate over the set white chocolate. It gives them a marbled, aged look that’s extra creepy. I just melt a few dark chocolate chips and use a fork to drizzle thin lines over the finished pretzels. It adds a whole new dimension of flavor and visual appeal.
Serving & Storage Suggestions
These spooky white chocolate witch finger pretzel rods are best served at room temperature. The chocolate should be firm but not hard, and the pretzel should have that satisfying crunch when bitten into. Arrange them on a platter in a fan shape, with the almond “nails” pointing outward for maximum creep factor.
Presentation Ideas: For Halloween parties, I like to stand them upright in a tall glass or a small pumpkin. You can also arrange them in a circle on a black platter to look like a witch’s hand reaching up from the ground. For a classroom treat, wrap each one individually in a small cellophane bag tied with orange or purple ribbon.
Complementary Dishes: These pair beautifully with other Halloween treats like pumpkin dip, caramel apples, or a warm mug of apple cider. For a full Halloween dessert table, serve them alongside chocolate-covered Oreo spiders and ghost-shaped rice krispie treats.
Storage Instructions: Store your witch finger pretzels in an airtight container at room temperature for up to 5 days. Do not refrigerate them unless absolutely necessary—the humidity in the fridge can cause the chocolate to develop white streaks (called bloom) and the pretzels can become stale faster. If you must refrigerate, let them come to room temperature before serving to restore the texture.
Freezer Instructions: These freeze beautifully! Place them in a single layer in a freezer-safe container with parchment paper between layers. They’ll keep for up to 3 months. Thaw at room temperature for about 15 minutes before serving. The texture of the pretzel stays surprisingly crunchy even after freezing.
How Flavors Develop: Interestingly, these taste even better the next day. The flavors of the white chocolate and almond meld together overnight, and the pretzel softens just slightly, making the texture even more pleasant. I actually prefer making them a day ahead for this reason.
Nutritional Information & Benefits
Here’s a rough estimate of the nutritional content per serving (one witch finger pretzel rod):
| Nutrient | Amount per Serving |
|---|---|
| Calories | 180-200 |
| Total Fat | 10-12g |
| Saturated Fat | 6-7g |
| Carbohydrates | 22-24g |
| Sugar | 14-16g |
| Protein | 3-4g |
| Sodium | 200-250mg |
While these are definitely a treat rather than a health food, there are a few benefits worth noting. The almonds provide healthy fats and a small amount of vitamin E, which is great for skin health. White chocolate contains calcium from the milk solids. And let’s be honest—sometimes you just need a fun, festive treat to enjoy with loved ones.
Dietary Considerations: This recipe is vegetarian. For gluten-free, use gluten-free pretzel rods (they exist! I’ve used them before and they work perfectly). As mentioned earlier, for nut-free versions, skip the almond slivers. Always check your ingredient labels for potential allergens, especially if serving at a school or public event.
Conclusion
These spooky white chocolate witch finger pretzel rods are honestly the most fun I’ve ever had with a Halloween recipe. They’re quick, easy, and guaranteed to get laughs and compliments wherever you bring them. The best part? They look like you spent hours on them when really, you just melted some chocolate and stuck on some almonds. That’s my kind of recipe.
I really encourage you to make these your own. Add different sprinkles, try different chocolate colors, or experiment with the decorations. The first time I made these, I was just trying to salvage a forgotten party commitment. Now they’re a Halloween tradition in my house. I’d love to hear how yours turn out! Leave a comment below with your variations or tag me in your photos. Happy Halloween, and happy snacking!
Frequently Asked Questions
Can I make these ahead of time?
Absolutely! These spooky white chocolate witch finger pretzel rods can be made up to 5 days in advance. Store them in an airtight container at room temperature. They actually taste even better the next day as the flavors meld together.
Why did my white chocolate seize up?
White chocolate seizes when it gets too hot or when any water gets into the bowl. Always use low power in the microwave and make sure your bowl is completely dry. If your chocolate does seize, you can try adding a teaspoon of coconut oil and stirring vigorously—sometimes it can be saved!
Can I use candy melts instead of white chocolate?
Yes, you can use white candy melts, but the flavor won’t be as rich. Candy melts are designed for coating and set up very smoothly. However, I personally prefer the taste of real white chocolate. If using candy melts, follow the package instructions for melting.
How do I get the almond nails to stay on?
The key is to press the almond sliver into the chocolate while it’s still wet. If the chocolate has started to set, the almond won’t stick. Work quickly and use tweezers for precision. If an almond falls off after the chocolate has set, you can dab a tiny bit of melted chocolate on the spot and reattach it.
Can I freeze these witch finger pretzels?
Yes! Place them in a single layer in a freezer-safe container with parchment paper between layers. They’ll keep for up to 3 months. Thaw at room temperature for about 15 minutes before serving. The pretzel stays surprisingly crunchy even after freezing.
Pin This Recipe!
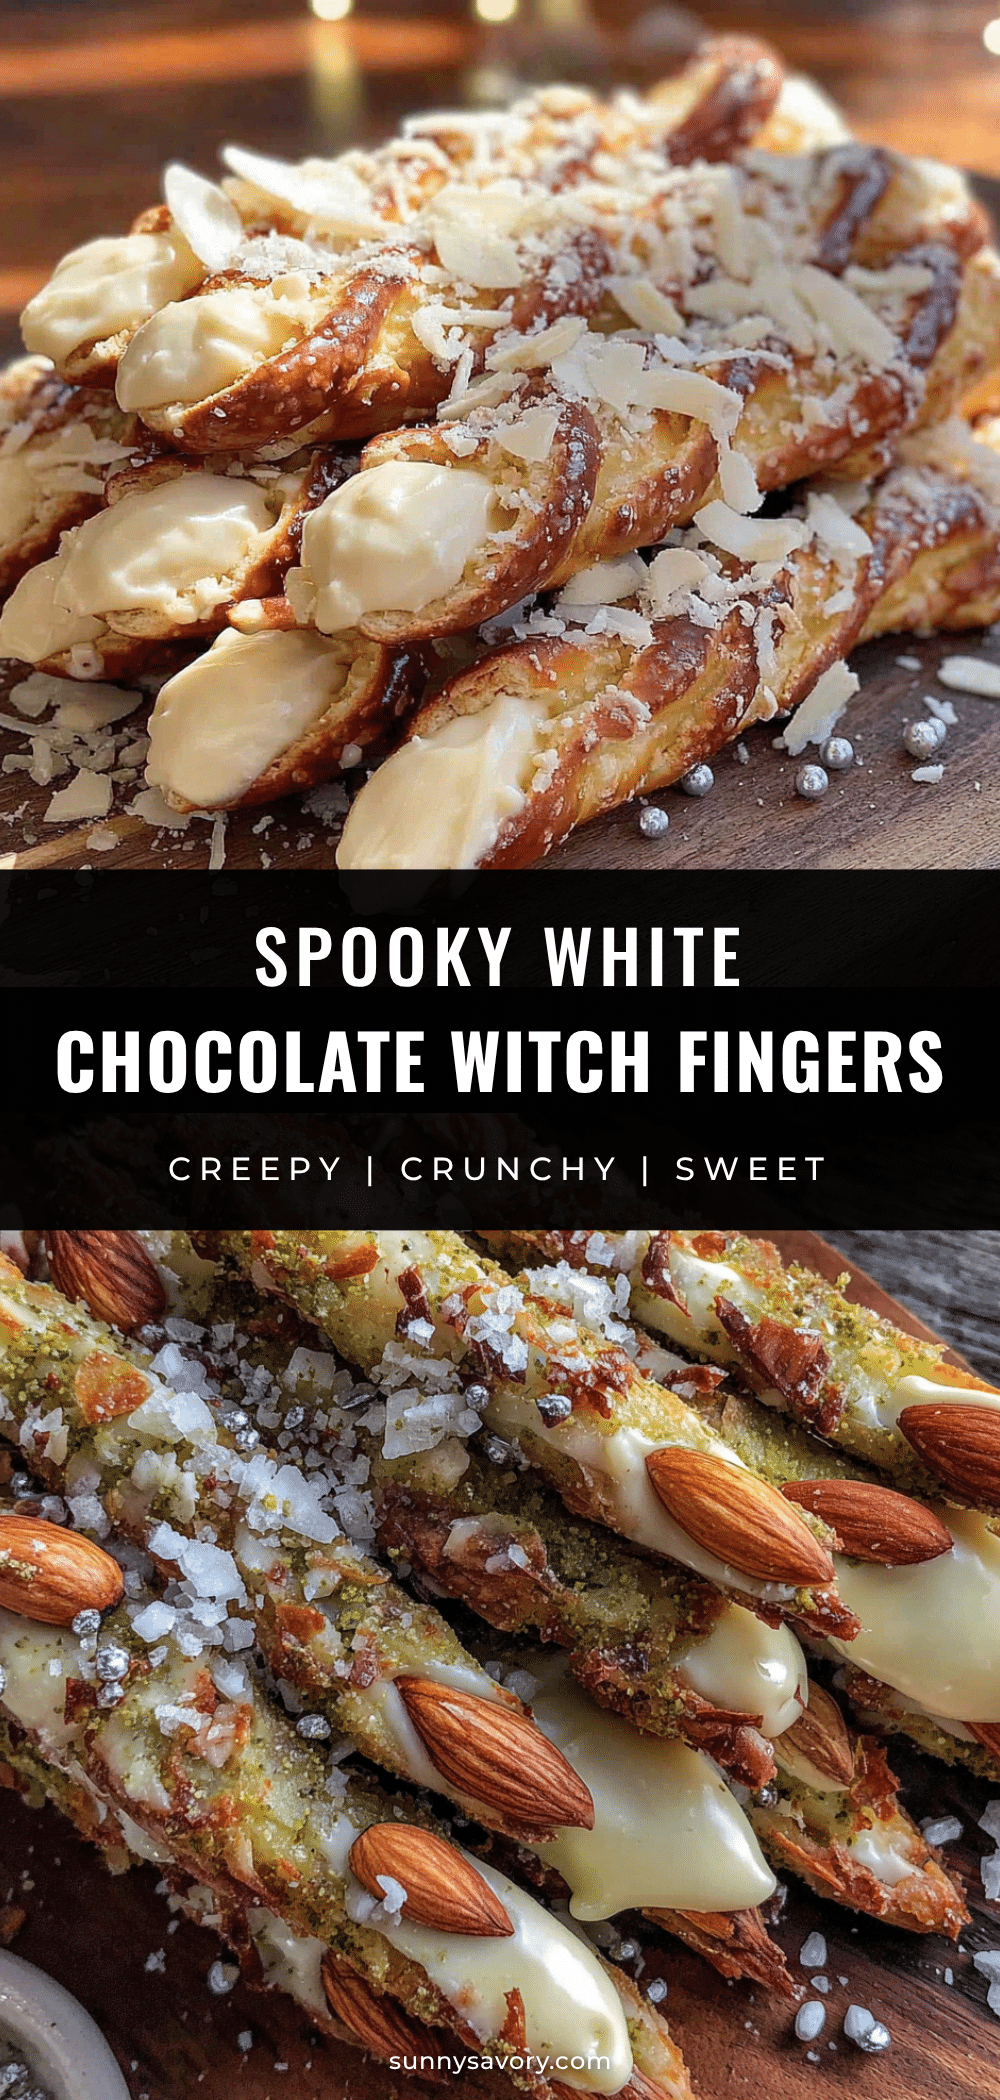
Easy White Chocolate Witch Finger Pretzel Rods

These spooky white chocolate witch finger pretzel rods are a quick and easy Halloween treat that looks way more complicated than it actually is. Made with pretzel rods, white chocolate, and almond slivers, they’re perfect for last-minute parties and guaranteed to be a crowd-pleaser.
- Prep Time: 15 minutes
- Cook Time: 5 minutes
- Total Time: 20 minutes
- Yield: 12-15 servings 1x
- Category: Dessert
- Cuisine: American
Ingredients
- 12–15 pretzel rods
- 1 cup white chocolate chips
- 1 teaspoon coconut oil (optional)
- 30–40 almond slivers
- Red food coloring (optional)
- Green or purple sprinkles (optional)
Instructions
- Line a baking sheet with parchment paper. Count out pretzel rods and almond slivers.
- Place white chocolate chips in a microwave-safe bowl. Microwave in 30-second intervals at 50% power, stirring well after each interval, until mostly melted. Stir until smooth. If too thick, add 1 teaspoon coconut oil and stir.
- Test consistency: chocolate should be smooth and runny enough to coat the pretzel easily. If too thick, add another ½ teaspoon coconut oil.
- Hold a pretzel rod by one end and dip into melted white chocolate, rotating to coat about two-thirds of the rod. Let excess drip back into the bowl.
- Transfer dipped pretzel to prepared baking sheet. Gently tap to settle chocolate. Repeat with remaining pretzels, leaving about an inch of space between each.
- While chocolate is still wet, use tweezers to place an almond sliver at the tip of each pretzel, pointed end outward. Press gently to stick.
- Use the back of a small spoon or a gloved finger to gently press indentations along the chocolate-covered part to create a knuckle effect.
- Optional: Dip a toothpick in red food coloring and swipe a tiny line at the base of the almond ‘nail’ for a blood effect. If using sprinkles, sprinkle over wet chocolate now.
- Let pretzels set at room temperature for about 30 minutes, or refrigerate for 10-15 minutes until chocolate is firm.
- Optional: For a thicker coating, let first layer set completely, then dip again.
Notes
White chocolate burns easily; always use low power in the microwave and stir frequently. Work quickly once chocolate is melted. For best results, use pretzel rods of similar length and thickness. These taste even better the next day.
Nutrition
- Serving Size: 1 witch finger pretz
- Calories: 190
- Sugar: 15
- Sodium: 225
- Fat: 11
- Saturated Fat: 6.5
- Carbohydrates: 23
- Fiber: 1
- Protein: 3.5
Keywords: Halloween treats, witch finger pretzels, white chocolate pretzels, easy Halloween recipe, spooky snacks, last-minute Halloween treats