Love this? Save it for later!
Share the inspiration with your friends
My niece asked why I couldn’t just add a little red food coloring to my regular sugar cookie dough instead of making a whole separate recipe. I started to explain why that wouldn’t work—then stopped. She was eight, and honestly, she had a point. I mean, why was I overcomplicating this? The truth is, I’d been testing red velvet crinkle cookies for weeks, and my kitchen looked like a flour bomb had gone off in a beet farm. But her simple question made me rethink everything.
That afternoon, I ditched the complicated cream cheese variations and went back to basics. I took my favorite chocolate crinkle cookie base, swapped in some cocoa powder and buttermilk powder, and added just enough red gel color to make it look like a Valentine’s Day dream. The first batch came out perfectly—soft, fudgy, and that gorgeous red against the snowy powdered sugar. I mean, let me tell you, I actually squealed when I pulled them out of the oven. My niece just smiled and said, “Told you.”
These cookies have become my go-to for Valentine’s Day, Galentine’s parties, or any time I want to make someone feel special without spending hours in the kitchen. The heart shape makes them extra adorable, but the real magic is in the texture—crispy on the outside, chewy and rich on the inside. Maybe you’ve been there, staring at a Pinterest board full of complicated desserts and thinking, “There has to be an easier way.” Well, this is it. These cookies are proof that sometimes the simplest approach wins, and honestly, that’s a lesson I keep learning every time I bake them.
Why You’ll Love This Recipe
Let me tell you why these cookies have earned a permanent spot in my baking rotation. I’ve tested this recipe at least a dozen times, tweaking the flour ratio, the chilling time, and even the brand of cocoa powder. What I landed on is something truly special—a cookie that looks bakery-fancy but comes together with everyday ingredients.
- Quick & Easy: From start to finish, you’re looking at about 30 minutes of active prep time. The dough chills for just an hour, so you can whip these up on a weeknight without any stress.
- Simple Ingredients: No fancy grocery trips needed. You probably have butter, sugar, eggs, and flour in your kitchen right now. The red food coloring is the only “special” ingredient, and you can find it at any grocery store.
- Perfect for Valentine’s Day: These heart-shaped beauties are made for sharing. They’re great for classroom parties, office treats, or a cozy night in with your sweetheart.
- Crowd-Pleaser: I’ve brought these to potlucks, cookie swaps, and family gatherings. They disappear faster than almost anything else I make. Kids love the color, adults love the flavor—everyone wins.
- Unbelievably Delicious: The combination of rich cocoa, a hint of vanilla, and that crackly powdered sugar coating is pure comfort food magic. The texture is soft and fudgy, almost like a brownie in cookie form.
What makes these cookies different from the rest? It’s the technique. I use a combination of melted butter and a short chill time to get that perfect crinkle effect without the dough drying out. Plus, the heart shape adds a playful touch that makes them feel special without any complicated piping or decorating. This isn’t just another red velvet cookie—it’s the best version I’ve ever made, and I’m pretty sure you’ll agree after one bite.
What Ingredients You Will Need
This recipe uses simple, wholesome ingredients to deliver bold chocolate flavor and that signature red velvet color without any fuss. Most of these are pantry staples, so you can probably get started right now.
- All-purpose flour – 2 ½ cups (315 grams). Spoon and level it for accuracy. I prefer King Arthur Flour for consistent results.
- Unsweetened cocoa powder – ½ cup (45 grams). Use natural cocoa powder, not Dutch-processed, for the best crinkle effect. Hershey’s works great here.
- Baking powder – 1 teaspoon. Make sure it’s fresh—test it by dropping a bit in hot water; it should bubble immediately.
- Salt – ½ teaspoon. Fine sea salt is best. It balances the sweetness and enhances the chocolate flavor.
- Unsalted butter – ½ cup (1 stick, 113 grams), melted and slightly cooled. Melting the butter gives these cookies a chewier texture.
- Granulated sugar – 1 cup (200 grams). Regular white sugar works perfectly.
- Large egg – 1, at room temperature. If you forget to take it out of the fridge, place it in a bowl of warm water for 5 minutes.
- Vanilla extract – 1 teaspoon. Pure vanilla extract adds a warm, rich flavor. Imitation works in a pinch, but pure is better.
- Buttermilk – 2 tablespoons (30 ml). This is the secret to that tender, soft crumb. If you don’t have buttermilk, add ½ teaspoon of vinegar or lemon juice to regular milk and let it sit for 5 minutes.
- Red gel food coloring – 1 to 2 teaspoons. Gel coloring is much more concentrated than liquid drops, so you need less. I recommend Americolor Super Red for a vibrant shade without altering the dough’s texture.
- Powdered sugar – ½ cup (60 grams), for rolling. This creates that signature crinkle look. Sift it first to avoid clumps.
A quick note on the food coloring: if you prefer natural options, you can use beet powder or natural red food coloring, but the color will be more muted. For that bright, classic red velvet look, gel coloring is your best bet.
Equipment Needed
You don’t need a fancy bakery setup to make these cookies. Here’s what you’ll need:
- Mixing bowls – One large and one medium. Glass or stainless steel works best.
- Whisk – For combining dry ingredients evenly.
- Electric hand mixer or stand mixer – A hand mixer is fine, but a stand mixer with the paddle attachment makes things even easier. You can also mix by hand with a wooden spoon—it just takes a little more elbow grease.
- Rubber spatula – For scraping down the bowl and folding in the dry ingredients.
- Measuring cups and spoons – For accuracy. I prefer metal measuring cups for dry ingredients and glass for liquids.
- Heart-shaped cookie cutter – About 2 ½ to 3 inches wide. If you don’t have one, you can shape the dough into balls and press a heart shape gently with your thumb after baking.
- Baking sheets – Two large, light-colored baking sheets. Dark sheets can cause the bottoms to burn.
- Parchment paper or silicone baking mats – These prevent sticking and make cleanup a breeze.
- Cooling rack – For letting the cookies cool completely before storing.
- Small fine-mesh sieve – For sifting powdered sugar over the cookies. This prevents clumps and gives an even coating.
Preparation Method
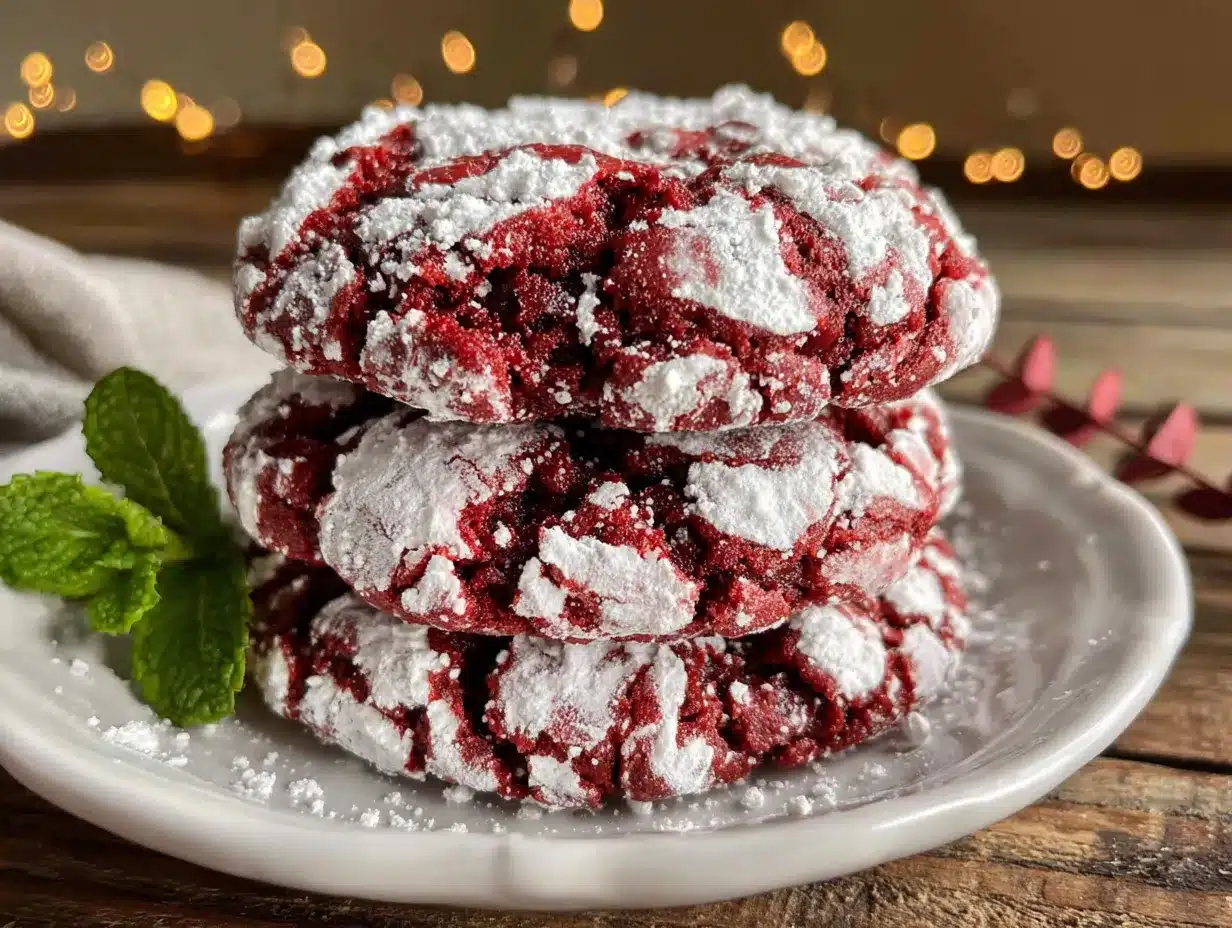
Follow these steps carefully, and you’ll have a batch of gorgeous red velvet heart crinkle cookies in no time. I’ve included timing and sensory cues so you know exactly what to look for at each stage.
- Mix the dry ingredients. In a medium bowl, whisk together the all-purpose flour, cocoa powder, baking powder, and salt. Make sure there are no lumps—cocoa powder can be stubborn. Set this aside.
- Combine the wet ingredients. In a large mixing bowl, combine the melted butter and granulated sugar. Whisk until well combined—it should look like wet sand. Add the egg, vanilla extract, and buttermilk, and whisk until smooth. The mixture should be glossy and slightly thick.
- Add the food coloring. Add 1 teaspoon of red gel food coloring to the wet mixture and stir. The color should be a deep, vibrant red. If it looks too pink, add another ½ teaspoon. Remember, the color will darken slightly as the cookies bake, so don’t be afraid to go bold.
- Combine wet and dry ingredients. Gradually add the dry ingredients to the wet mixture, stirring with a rubber spatula until just combined. Do not overmix—stop as soon as you no longer see streaks of flour. The dough will be soft and slightly sticky. That’s exactly what you want.
- Chill the dough. Cover the bowl with plastic wrap and refrigerate for at least 1 hour. Chilling is crucial—it firms up the dough so the cookies don’t spread too much and helps create that beautiful crinkle effect. If you’re in a hurry, you can chill for 30 minutes, but the crinkle will be less pronounced.
- Preheat the oven. About 10 minutes before the dough is done chilling, preheat your oven to 350°F (175°C). Line two baking sheets with parchment paper or silicone mats.
- Shape the cookies. Scoop out rounded tablespoons of dough (about 1 ½ tablespoons each) and roll them into balls. If the dough is too sticky to handle, lightly grease your hands with a little butter or cooking spray.
- Roll in powdered sugar. Place the powdered sugar in a shallow bowl. Roll each dough ball in the powdered sugar until completely coated. Don’t be shy—you want a thick, snowy layer. This is what creates the crinkle effect as the cookies bake.
- Shape into hearts. Place the coated dough balls on the prepared baking sheets, spacing them about 2 inches apart. Gently press a heart-shaped cookie cutter into the center of each ball to create the heart indent. Don’t press all the way through—just enough to leave an impression. If the cutter sticks, dip it in powdered sugar first.
- Bake. Bake for 10 to 12 minutes, or until the edges are set and the tops are crackled. The centers will look slightly soft—that’s okay. They’ll continue to set as they cool. For softer, fudgier cookies, bake for 10 minutes. For crisper edges, go for 12.
- Cool. Let the cookies cool on the baking sheet for 5 minutes. This allows them to firm up without sticking. Then transfer them to a cooling rack to cool completely. If you want, dust them with a little extra powdered sugar while they’re still warm for an even more dramatic look.
Cooking Tips & Techniques
After making these cookies more times than I care to admit, I’ve learned a few tricks that make all the difference. Let me share them with you so you can skip the trial and error.
Don’t skip the chill time. I know it’s tempting to rush, but chilling the dough does two things: it prevents the cookies from spreading into flat discs, and it helps the powdered sugar coating stick better. One hour is the sweet spot. I once tried 20 minutes, and the cookies turned into sad, red puddles. Learn from my mistake.
Use gel food coloring, not liquid. Liquid food coloring adds too much moisture to the dough, which can throw off the texture. Gel coloring is concentrated, so you need less, and it won’t mess with the consistency. I learned this the hard way when my first batch turned out more like cake than cookies.
Roll generously in powdered sugar. This is the secret to that beautiful crinkle effect. If you skimp on the powdered sugar, the cookies will look more like red blobs than crackled gems. I like to roll each ball twice—once to coat, then again after a quick shake to remove excess.
Watch the baking time closely. Ovens vary, so start checking at the 9-minute mark. The cookies are done when the edges look set and the tops are covered in cracks. The centers should still look slightly underdone—they’ll continue baking from the residual heat on the sheet. Overbaking gives you dry, crumbly cookies, and nobody wants that.
Use a light-colored baking sheet. Dark sheets absorb more heat and can cause the bottoms to burn before the tops are done. If you only have dark sheets, reduce the oven temperature by 25°F and keep a close eye on them.
Variations & Adaptations
One of the best things about this recipe is how versatile it is. Here are some variations I’ve tried and loved:
- Gluten-Free Version: Substitute the all-purpose flour with a 1:1 gluten-free baking flour blend. I’ve used Bob’s Red Mill with great results. Add ¼ teaspoon of xanthan gum if your blend doesn’t already include it. The texture will be slightly more tender, but the crinkle effect still works beautifully.
- Vegan Adaptation: Replace the butter with vegan butter (like Earth Balance), the egg with a flax egg (1 tablespoon ground flaxseed mixed with 3 tablespoons water), and the buttermilk with 2 tablespoons of almond milk mixed with ½ teaspoon vinegar. The cookies will be a bit more delicate, so handle them gently.
- Chocolate Lover’s Twist: Add ½ cup of mini chocolate chips or white chocolate chips to the dough before chilling. The little pockets of melted chocolate take these cookies to another level. I did this for a party once, and they were gone in 10 minutes.
- Peppermint Red Velvet: Add ½ teaspoon of peppermint extract along with the vanilla. This gives the cookies a festive, holiday feel. Perfect for Christmas cookie exchanges or winter parties.
- Lemon Red Velvet: Swap the buttermilk for 2 tablespoons of fresh lemon juice mixed with a pinch of sugar. The citrus brightens the chocolate flavor and adds a subtle tang. This is my personal favorite for spring baking.
Serving & Storage Suggestions
These cookies are best served at room temperature, straight from the cooling rack. The powdered sugar coating stays crisp, and the centers are soft and fudgy. If you want to get fancy, arrange them on a platter with fresh strawberries and a dusting of extra powdered sugar for a stunning Valentine’s Day presentation.
For storage, place the cooled cookies in an airtight container at room temperature. They’ll stay fresh for up to 5 days. I like to layer them between sheets of parchment paper to prevent the powdered sugar from smudging. If the cookies soften over time, you can re-crisp them in a 300°F oven for 3 to 5 minutes.
These cookies also freeze beautifully. Place them in a single layer on a baking sheet and freeze until solid, then transfer to a freezer-safe bag or container. They’ll keep for up to 3 months. To thaw, let them sit at room temperature for about 20 minutes. The powdered sugar might absorb a little moisture during freezing, so I like to give them a fresh dusting before serving.
One thing I love about these cookies is that the flavors actually deepen after a day or two. The cocoa becomes richer, and the texture softens slightly. So if you can resist eating them all right away, they’re even better on day two.
Nutritional Information & Benefits
Here’s the approximate nutritional breakdown for one cookie (based on 24 cookies):
- Calories: 145
- Total Fat: 5g
- Saturated Fat: 3g
- Cholesterol: 20mg
- Sodium: 85mg
- Total Carbohydrates: 23g
- Dietary Fiber: 1g
- Sugars: 14g
- Protein: 2g
While these are definitely a treat, they’re made with simple, recognizable ingredients. The cocoa powder provides a small amount of antioxidants, and the buttermilk adds a touch of calcium. If you’re looking to reduce sugar, you can cut the granulated sugar to ¾ cup, but the texture will be slightly less tender. For a lower-fat option, substitute half the butter with unsweetened applesauce—the cookies will be a bit cakier but still delicious.
I believe in enjoying treats in moderation, and these cookies are worth every single bite. They’re the kind of dessert that makes you feel good because they’re made with love and real ingredients, not a laundry list of preservatives.
Conclusion
These Perfect Red Velvet Heart-Shaped Crinkle Cookies are more than just a pretty face. They’re soft, fudgy, and packed with rich chocolate flavor, with that stunning crinkle effect that makes them look like they came from a bakery. The heart shape adds a playful touch that’s perfect for Valentine’s Day, anniversaries, or any day you want to show someone you care.
I love that this recipe is forgiving enough for beginners but impressive enough to wow seasoned bakers. Whether you make them for a party, a gift, or just because, they never fail to bring smiles. And honestly, that’s the best part of baking—sharing something delicious with the people you love.
I’d love to hear how yours turn out! Leave a comment below and let me know if you tried any variations or if these cookies made someone’s day extra special. Don’t forget to share this recipe with a friend who loves baking—or someone who needs a little sweetness in their life. Happy baking, friends!
Frequently Asked Questions
Can I make the dough ahead of time?
Absolutely! You can prepare the dough up to 2 days in advance and keep it covered in the refrigerator. Let it sit at room temperature for about 10 minutes before shaping if it feels too firm.
Why did my cookies not crinkle?
The most common reason is not rolling them generously enough in powdered sugar. Make sure each dough ball is completely coated with a thick layer. Also, check that your baking powder is fresh—old baking powder won’t create enough lift for the crinkle effect.
Can I use natural red food coloring instead of gel?
You can, but the color will be less vibrant, and you’ll need more liquid coloring, which can affect the dough’s texture. If using liquid, reduce the buttermilk to 1 tablespoon to compensate for the extra moisture.
How do I get the heart shape to stay visible after baking?
Press the heart-shaped cutter into the dough balls firmly but gently before baking. Don’t press all the way through—just deep enough to leave an impression. The indent will spread slightly during baking but should remain visible.
Can I freeze the unbaked dough?
Yes! Roll the dough into balls, coat them in powdered sugar, and place them on a baking sheet in the freezer until solid. Transfer to a freezer bag and store for up to 3 months. Bake directly from frozen, adding 2 to 3 minutes to the baking time.
Pin This Recipe!

Perfect Red Velvet Heart Crinkle Cookies: Easy Valentine’s Treat
These soft, fudgy red velvet crinkle cookies are shaped like hearts and coated in snowy powdered sugar. They’re quick to make with simple ingredients and perfect for Valentine’s Day or any occasion.
- Prep Time: 30 minutes
- Cook Time: 12 minutes
- Total Time: 1 hour 42 minutes
- Yield: 24 servings 1x
- Category: Dessert
- Cuisine: American
Ingredients
- 2 ½ cups (315 grams) all-purpose flour
- ½ cup (45 grams) unsweetened cocoa powder
- 1 teaspoon baking powder
- ½ teaspoon fine sea salt
- ½ cup (1 stick, 113 grams) unsalted butter, melted and slightly cooled
- 1 cup (200 grams) granulated sugar
- 1 large egg, at room temperature
- 1 teaspoon pure vanilla extract
- 2 tablespoons (30 ml) buttermilk
- 1 to 2 teaspoons red gel food coloring
- ½ cup (60 grams) powdered sugar, for rolling
Instructions
- Mix the dry ingredients. In a medium bowl, whisk together the all-purpose flour, cocoa powder, baking powder, and salt. Set aside.
- Combine the wet ingredients. In a large mixing bowl, combine the melted butter and granulated sugar. Whisk until well combined. Add the egg, vanilla extract, and buttermilk, and whisk until smooth and glossy.
- Add the food coloring. Stir in 1 teaspoon of red gel food coloring until the mixture is a deep, vibrant red. Add more if needed.
- Combine wet and dry ingredients. Gradually add the dry ingredients to the wet mixture, stirring with a rubber spatula until just combined. Do not overmix. The dough will be soft and slightly sticky.
- Chill the dough. Cover the bowl with plastic wrap and refrigerate for at least 1 hour.
- Preheat the oven. About 10 minutes before the dough is done chilling, preheat your oven to 350°F (175°C). Line two baking sheets with parchment paper or silicone mats.
- Shape the cookies. Scoop out rounded tablespoons of dough (about 1 ½ tablespoons each) and roll them into balls.
- Roll in powdered sugar. Place the powdered sugar in a shallow bowl. Roll each dough ball in the powdered sugar until completely coated.
- Shape into hearts. Place the coated dough balls on the prepared baking sheets, spacing them about 2 inches apart. Gently press a heart-shaped cookie cutter into the center of each ball to create a heart indent.
- Bake. Bake for 10 to 12 minutes, or until the edges are set and the tops are crackled. The centers will look slightly soft.
- Cool. Let the cookies cool on the baking sheet for 5 minutes, then transfer to a cooling rack to cool completely.
Notes
Chilling the dough is crucial for the crinkle effect. Use gel food coloring for best results. Roll generously in powdered sugar. Watch baking time closely to avoid overbaking. For gluten-free, use a 1:1 gluten-free flour blend. For vegan, use vegan butter, flax egg, and almond milk with vinegar.
Nutrition
- Serving Size: 1 cookie
- Calories: 145
- Sugar: 14
- Sodium: 85
- Fat: 5
- Saturated Fat: 3
- Carbohydrates: 23
- Fiber: 1
- Protein: 2
Keywords: red velvet cookies, heart cookies, Valentine's Day cookies, crinkle cookies, easy cookie recipe



