Love this? Save it for later!
Share the inspiration with your friends
My neighbor asked why I couldn’t just skip the overnight rise and use my sourdough discard straight away. I started to explain why that wouldn’t work — then stopped. Honestly, I had no good reason except that every recipe I’d ever seen insisted on a long, slow fermentation. I mean, who was I to argue with the experts? But standing there in my kitchen, staring at a jar of bubbly discard that was about to get thrown out, I thought, why not try? So I did. And let me tell you — the result was so good I actually called her over to taste it. She just smiled and said, “Told you.”
That moment changed how I think about sourdough discard entirely. I used to treat it like a burden — something to collect and then feel guilty about wasting. But this same-day focaccia? It turned my whole perspective around. The discard gives the bread this incredible tangy depth without needing to wait around. You get that signature sourdough flavor, those beautiful irregular air pockets, and a crust that shatters when you bite into it. And you get it all in about 40 minutes of hands-on time. Maybe you’ve been there — staring at a jar of discard, wondering what to do with it that isn’t another loaf of sandwich bread. This is your answer. It’s become my go-to for busy days when I want homemade bread without the all-day commitment.
Why You’ll Love This Recipe
This isn’t just another focaccia recipe — it’s the one that finally makes sourdough discard feel useful instead of stressful. I’ve tested this more times than I can count, adjusting hydration levels, oil amounts, and baking times until everything clicked. Here’s what makes it special:
- Quick & Easy: From mixing to eating in about 40 minutes of active time. No overnight proofing, no complicated folds every 30 minutes.
- Simple Ingredients: You probably have everything already — flour, water, olive oil, salt, and your discard. No fancy grocery runs needed.
- Perfect for Discard: Finally, a recipe that actually wants your unfed, straight-from-the-fridge discard. No feeding required, no planning ahead.
- Crowd-Pleaser: I’ve brought this to three different gatherings and watched it disappear every single time. Kids and adults both go crazy for it.
- Unbelievably Delicious: The texture is exactly what you want from focaccia — crispy golden crust, soft airy interior, and that unmistakable sourdough tang.
What makes this recipe different from all the others? It’s the technique. Most same-day focaccia recipes skip the discard entirely or require a starter that’s been fed recently. But I figured out that using discard straight from the fridge actually works better — the cold temperature slows the fermentation just enough to develop flavor without needing patience. Plus, the hydration level is dialed in so the dough is forgiving enough for beginners but produces bakery-quality results. This recipe isn’t just good — it’s the kind that makes you close your eyes after the first bite. It’s comfort food reimagined: faster, easier, but with the same soul-soothing satisfaction.
What Ingredients You Will Need
This recipe uses simple, wholesome ingredients to deliver bold flavor and satisfying texture without the fuss. Most of these are pantry staples you likely already have on hand.
For the Focaccia Dough
- All-purpose flour — 3 cups (375g). I prefer King Arthur Flour for consistent results, but any brand works. Bread flour also works for a chewier texture.
- Sourdough discard — 1 cup (240g), straight from the fridge, unfed. This is the star of the show — the more mature your discard, the tangier your focaccia.
- Warm water — 1 cup (240ml), about 90°F. Not too hot or you’ll kill the natural yeast activity.
- Olive oil — ¼ cup (60ml) plus extra for the pan. Use good quality extra virgin for the best flavor.
- Salt — 1½ teaspoons (9g). Fine sea salt works best for even distribution.
- Instant yeast — 1 teaspoon (3g). This gives the focaccia its rise since we’re not waiting for the discard to ferment. (adds reliability)
- Honey or sugar — 1 teaspoon (5g). Just a tiny bit to help the yeast activate. (use maple syrup for vegan option)
For the Topping
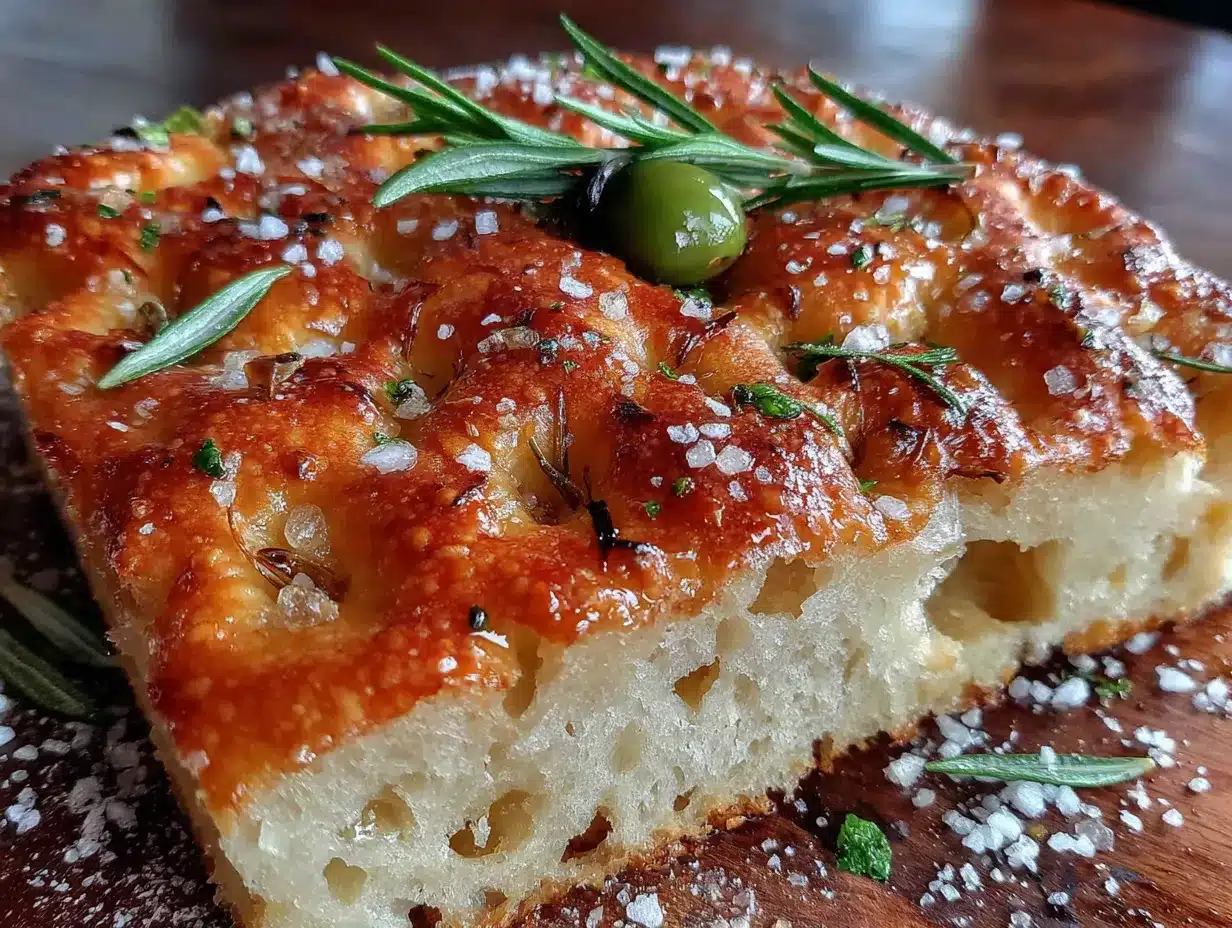
- Flaky sea salt — such as Maldon, for sprinkling on top before baking
- Fresh rosemary — 2 tablespoons, finely chopped (optional but traditional)
- Extra olive oil — for drizzling after baking
- Optional add-ins — cherry tomatoes, olives, caramelized onions, or garlic cloves pressed into the dough
One thing I learned the hard way — don’t skip the honey or sugar. The first time I made this, I thought the discard alone would be enough to feed the yeast. It wasn’t. The bread came out dense and flat. That tiny bit of sugar makes all the difference in getting a good rise. Also, if your discard has been sitting in the fridge for more than two weeks, give it a quick sniff — it should smell pleasantly sour, not funky or alcoholic. Fresh discard gives the best results.
Equipment Needed
- 9×13 inch baking pan — metal or glass both work. I prefer metal for better heat conduction and a crisper bottom crust.
- Large mixing bowl — any bowl large enough to hold the dough and allow for mixing
- Wooden spoon or dough scraper — the dough is sticky, so a spoon or scraper works better than your hands initially
- Kitchen scale — optional but highly recommended for consistent results. Measuring flour by volume can vary wildly.
- Plastic wrap or a clean kitchen towel — for covering the dough while it rises
- Oven — preheated to 425°F (220°C)
If you don’t have a 9×13 pan, you can use a 10-inch cast iron skillet or a round cake pan — just adjust the baking time slightly. I’ve even used a disposable aluminum pan in a pinch and it worked fine. The key is having a pan with sides so the dough doesn’t spread too thin.
Preparation Method
- Mix the dough (5 minutes): In a large bowl, combine 3 cups (375g) all-purpose flour, 1½ teaspoons (9g) salt, and 1 teaspoon (3g) instant yeast. Whisk together. Add 1 cup (240g) sourdough discard, 1 cup (240ml) warm water, ¼ cup (60ml) olive oil, and 1 teaspoon (5g) honey or sugar. Stir with a wooden spoon until a shaggy, sticky dough forms. It will look rough — that’s normal. Don’t be tempted to add more flour.
- First rest (10 minutes): Cover the bowl with plastic wrap or a damp towel and let it rest for 10 minutes. This autolyse step lets the flour absorb the liquid and makes the dough easier to handle later. You’ll notice the dough looks smoother and more cohesive after resting.
- Stretch and fold (5 minutes): With slightly wet hands (this prevents sticking), grab one side of the dough, stretch it up, and fold it over the center. Rotate the bowl a quarter turn and repeat. Do this 4-6 times total, going around the bowl. The dough will start to feel stronger and more elastic. Cover and let rest another 10 minutes.
- Second stretch and fold (5 minutes): Repeat the stretch and fold process one more time. You’ll notice the dough is smoother and holds its shape better. Cover and let rest for 20 minutes. During this time, the yeast is working and the dough is developing structure.
- Prepare the pan (5 minutes): Pour 2-3 tablespoons of olive oil into your 9×13 pan. Use your fingers to spread it evenly over the bottom and up the sides. The oil is essential for that crispy, golden crust. Don’t skimp here.
- Transfer and stretch (5 minutes): Gently scrape the dough into the oiled pan. It will be sticky. Using oiled fingertips, gently press and stretch the dough to fill the pan. Don’t worry if it doesn’t reach the edges — it will spread during the rise. If the dough resists, let it rest for 5 minutes and try again.
- Final rise (20-30 minutes): Cover the pan with plastic wrap or a towel and let it rise in a warm spot. The dough should become puffy and nearly double in size. It’s ready when you press it gently and an indentation remains. This usually takes 20-30 minutes, but in a cooler kitchen it might take 40.
- Preheat and dimple (10 minutes): About 10 minutes before the rise is done, preheat your oven to 425°F (220°C). Once the dough is puffy, drizzle 1 tablespoon olive oil over the top. Using your fingertips, press deep dimples all over the dough — really get in there. This isn’t just for looks; the dimples hold the oil and create those signature craggy pockets. Sprinkle generously with flaky sea salt and fresh rosemary if using.
- Bake (20-25 minutes): Place the pan on the middle rack and bake until the focaccia is deep golden brown on top and sounds hollow when tapped. Rotate the pan halfway through for even browning. The internal temperature should reach about 200°F (93°C).
- Cool and serve (10 minutes): Let the focaccia cool in the pan for 5 minutes, then transfer to a wire rack. Brush with additional olive oil while still warm — this gives it that gorgeous sheen. Let cool for at least 10 minutes before slicing. I know it’s tempting to dig in immediately, but the texture improves as it sets.
Cooking Tips & Techniques
The biggest mistake I made the first few times was being afraid of sticky dough. Sourdough discard focaccia is supposed to be wet — that’s what gives it those beautiful air pockets. If you add too much flour, you’ll end up with a dense, bready texture instead of that light, airy crumb. Trust the process and keep your hands oiled or wet when handling the dough.
Another thing I learned the hard way — don’t rush the dimpling step. I used to just poke a few holes and call it done. But pressing firmly and deeply creates those signature focaccia craters that fill with olive oil and crisp up into little flavor bombs. Go all the way to the bottom of the pan. It feels wrong, but it’s exactly right.
For the best crust, make sure your oven is fully preheated. I’ve tested this at lower temperatures and the crust just doesn’t develop the same crackling texture. Also, placing the pan on the middle rack rather than the bottom ensures even browning without burning the bottom. If your focaccia is browning too quickly on top but isn’t done in the center, tent it loosely with foil for the last 5 minutes.
One of my favorite tricks — let the baked focaccia sit in the pan for exactly 5 minutes after coming out of the oven. This allows the bottom to steam slightly and release from the pan easily. If you try to remove it too soon, it might stick. Too late, and the bottom gets soggy from trapped steam. Five minutes is the sweet spot.
Variations & Adaptations
Herb and Garlic Focaccia
Press 4-5 thinly sliced garlic cloves into the dimples before baking, along with the rosemary. Add a sprinkle of dried oregano or thyme for extra depth. I tried this for a dinner party and it was gone before the main course even hit the table.
Everything Bagel Focaccia
Before baking, sprinkle the top with everything bagel seasoning — sesame seeds, poppy seeds, dried garlic, dried onion, and salt. This variation is dangerously addictive. My kids fight over the corner pieces because they get the most seasoning.
Tomato and Olive Focaccia
Press halved cherry tomatoes and pitted olives into the dough before the final rise. The tomatoes roast and burst in the oven, creating little pockets of sweetness. Use Kalamata olives for a briny contrast. This version is perfect for summer when tomatoes are at their peak.
Gluten-Free Adaptation
Substitute the all-purpose flour with a 1:1 gluten-free baking flour blend that contains xanthan gum. The dough will be stickier and won’t rise as much, but the flavor will still be fantastic. Add an extra 5 minutes to the baking time.
Cheese Lover’s Focaccia
Sprinkle ½ cup of grated Parmesan or crumbled feta over the top during the last 5 minutes of baking. The cheese melts and gets crispy around the edges. I’ve also tried adding shredded mozzarella underneath the toppings for a cheesy pull-apart effect.
Serving & Storage Suggestions
This focaccia is best served warm, straight from the oven, when the crust is at its crispiest and the interior is pillowy soft. Let it cool for at least 10 minutes before slicing — this allows the steam to redistribute and prevents a gummy texture. I like to serve it alongside a bowl of good olive oil mixed with balsamic vinegar for dipping, or slathered with herbed butter.
For a complete meal, pair it with a hearty soup like minestrone or tomato basil, a big green salad with lemon vinaigrette, or serve it as the bread for sandwiches. It’s also fantastic torn into pieces and used for dipping in olive oil and spices as an appetizer. Leftover focaccia makes incredible croutons — just cube it, toss with olive oil and herbs, and bake at 350°F until crispy.
To store, keep the focaccia in an airtight container at room temperature for up to 2 days. Don’t refrigerate it — the cold air dries out the bread and makes it stale faster. If it does get a bit stale, refresh it in a 350°F oven for 5 minutes. For longer storage, wrap the cooled focaccia tightly in plastic wrap and then foil, and freeze for up to 3 months. Thaw at room temperature and reheat in the oven for 5-7 minutes. The flavor actually develops more after freezing — something about the ice crystals breaking down the starches creates a more complex taste.
Nutritional Information & Benefits
Per serving (1/8 of the recipe): approximately 220 calories, 8g fat, 32g carbohydrates, 5g protein, 2g fiber, 380mg sodium. These values are estimates and will vary based on your specific ingredients and toppings.
While focaccia isn’t health food, it does offer some surprising benefits. The sourdough fermentation process breaks down phytic acid in the flour, making the minerals more bioavailable. This means your body can actually absorb more of the nutrients from the bread. Plus, the natural fermentation creates beneficial bacteria that support gut health. Using sourdough discard also means you’re reducing food waste — a small but meaningful step toward sustainable cooking.
This recipe is vegetarian and can be made vegan by using maple syrup instead of honey. It contains gluten and is not suitable for celiac disease without the gluten-free adaptation. The olive oil provides heart-healthy monounsaturated fats, and you can boost the nutritional profile by adding seeds or whole grain flours. Personally, I love that I can enjoy homemade bread without the guilt — it’s real food made from real ingredients, and that counts for something.
Conclusion
This same-day sourdough discard focaccia has become a staple in my kitchen for good reason. It’s quick enough for a weeknight, impressive enough for guests, and forgiving enough for beginners. The discard gives it that signature tangy flavor without the wait, and the texture is exactly what you want from focaccia — crispy, airy, and satisfying. I’ve made it more times than I can count, and it never gets old.
I’d love to hear how yours turns out. Did you try any of the variations? Did you add your own twist? Drop a comment below and let me know — I genuinely read every single one. And if you snap a photo, tag me on social media so I can see your beautiful creation. Happy baking, friend. You’ve got this.
Frequently Asked Questions
Can I use active sourdough starter instead of discard?
Yes, absolutely. If you use active starter, reduce the instant yeast to ½ teaspoon since the starter will provide some leavening. You may also need to adjust the water slightly since active starter is thinner than discard.
Why didn’t my focaccia rise?
Several things could be at play. Your discard might be too old or inactive, your yeast might be expired, or your water might have been too hot (over 110°F kills yeast). Also, cold kitchens can slow down rising — try placing the pan in a warm spot or near the oven while it preheats.
Can I make this gluten-free?
Yes, with a good 1:1 gluten-free baking flour blend that contains xanthan gum. The texture will be slightly different — less airy and more dense — but the flavor is still fantastic. Add an extra 5-10 minutes to the baking time.
How do I get more bubbles in my focaccia?
Higher hydration is the key. Make sure your dough is wet and sticky — don’t add extra flour. Also, be gentle when transferring it to the pan. Rough handling deflates the bubbles. Using a metal pan instead of glass also helps with heat conduction and bubble formation.
Can I refrigerate the dough overnight?
This recipe is designed for same-day baking, so refrigeration isn’t recommended. The instant yeast will continue to work in the fridge and may overproof the dough. If you want a cold-ferment version, reduce the yeast to ¼ teaspoon and refrigerate for 8-12 hours before proceeding with the pan and dimpling steps.
Pin This Recipe!

Best Easy Same-Day Sourdough Discard Focaccia (40-Min Recipe)

This same-day sourdough discard focaccia delivers a tangy depth, crispy golden crust, and soft airy interior in just 40 minutes of hands-on time. Perfect for busy days when you want homemade bread without the all-day commitment.
- Prep Time: 15 minutes
- Cook Time: 25 minutes
- Total Time: 40 minutes
- Yield: 8 servings 1x
- Category: Bread
- Cuisine: Italian
Ingredients
- 3 cups (375g) all-purpose flour
- 1 cup (240g) sourdough discard, straight from the fridge, unfed
- 1 cup (240ml) warm water (about 90°F)
- ¼ cup (60ml) olive oil, plus extra for the pan
- 1½ teaspoons (9g) fine sea salt
- 1 teaspoon (3g) instant yeast
- 1 teaspoon (5g) honey or sugar (use maple syrup for vegan)
- Flaky sea salt (e.g., Maldon) for topping
- 2 tablespoons fresh rosemary, finely chopped (optional)
- Extra olive oil for drizzling after baking
- Optional add-ins: cherry tomatoes, olives, caramelized onions, or garlic cloves
Instructions
- Mix the dough (5 minutes): In a large bowl, combine 3 cups (375g) all-purpose flour, 1½ teaspoons (9g) salt, and 1 teaspoon (3g) instant yeast. Whisk together. Add 1 cup (240g) sourdough discard, 1 cup (240ml) warm water, ¼ cup (60ml) olive oil, and 1 teaspoon (5g) honey or sugar. Stir with a wooden spoon until a shaggy, sticky dough forms. It will look rough — that’s normal. Don’t be tempted to add more flour.
- First rest (10 minutes): Cover the bowl with plastic wrap or a damp towel and let it rest for 10 minutes. This autolyse step lets the flour absorb the liquid and makes the dough easier to handle later. You’ll notice the dough looks smoother and more cohesive after resting.
- Stretch and fold (5 minutes): With slightly wet hands (this prevents sticking), grab one side of the dough, stretch it up, and fold it over the center. Rotate the bowl a quarter turn and repeat. Do this 4-6 times total, going around the bowl. The dough will start to feel stronger and more elastic. Cover and let rest another 10 minutes.
- Second stretch and fold (5 minutes): Repeat the stretch and fold process one more time. You’ll notice the dough is smoother and holds its shape better. Cover and let rest for 20 minutes. During this time, the yeast is working and the dough is developing structure.
- Prepare the pan (5 minutes): Pour 2-3 tablespoons of olive oil into your 9×13 pan. Use your fingers to spread it evenly over the bottom and up the sides. The oil is essential for that crispy, golden crust. Don’t skimp here.
- Transfer and stretch (5 minutes): Gently scrape the dough into the oiled pan. It will be sticky. Using oiled fingertips, gently press and stretch the dough to fill the pan. Don’t worry if it doesn’t reach the edges — it will spread during the rise. If the dough resists, let it rest for 5 minutes and try again.
- Final rise (20-30 minutes): Cover the pan with plastic wrap or a towel and let it rise in a warm spot. The dough should become puffy and nearly double in size. It’s ready when you press it gently and an indentation remains. This usually takes 20-30 minutes, but in a cooler kitchen it might take 40.
- Preheat and dimple (10 minutes): About 10 minutes before the rise is done, preheat your oven to 425°F (220°C). Once the dough is puffy, drizzle 1 tablespoon olive oil over the top. Using your fingertips, press deep dimples all over the dough — really get in there. This isn’t just for looks; the dimples hold the oil and create those signature craggy pockets. Sprinkle generously with flaky sea salt and fresh rosemary if using.
- Bake (20-25 minutes): Place the pan on the middle rack and bake until the focaccia is deep golden brown on top and sounds hollow when tapped. Rotate the pan halfway through for even browning. The internal temperature should reach about 200°F (93°C).
- Cool and serve (10 minutes): Let the focaccia cool in the pan for 5 minutes, then transfer to a wire rack. Brush with additional olive oil while still warm — this gives it that gorgeous sheen. Let cool for at least 10 minutes before slicing. I know it’s tempting to dig in immediately, but the texture improves as it sets.
Notes
Don’t be afraid of sticky dough — it’s supposed to be wet for airy pockets. Keep hands oiled or wet when handling. Press dimples firmly and deeply all the way to the bottom of the pan. Ensure oven is fully preheated for best crust. Let baked focaccia sit in pan for exactly 5 minutes before removing. For storage, keep at room temperature in an airtight container for up to 2 days; do not refrigerate. Refresh stale focaccia in a 350°F oven for 5 minutes. Freeze for up to 3 months.
Nutrition
- Serving Size: 1/8 of recipe
- Calories: 220
- Sugar: 1
- Sodium: 380
- Fat: 8
- Saturated Fat: 1
- Carbohydrates: 32
- Fiber: 2
- Protein: 5
Keywords: sourdough discard focaccia, same-day focaccia, easy focaccia, sourdough discard recipe, quick focaccia, no-knead focaccia



