Love this? Save it for later!
Share the inspiration with your friends
I had sworn off butternut squash soup for years. Honestly, it was the texture — that thick, sweet, almost baby-food consistency that seemed to be the only version anyone made. Every fall, friends would rave about their new recipes, and I would nod politely, thinking, “Good for you, but I’ll pass.” Then last Tuesday, standing in my tiny kitchen with a squash I’d bought on a whim and a stick of butter I was determined to use up, I found myself making a version for myself. Just for me. And I caught my own hand reaching for a second bowl before I’d even finished the first.
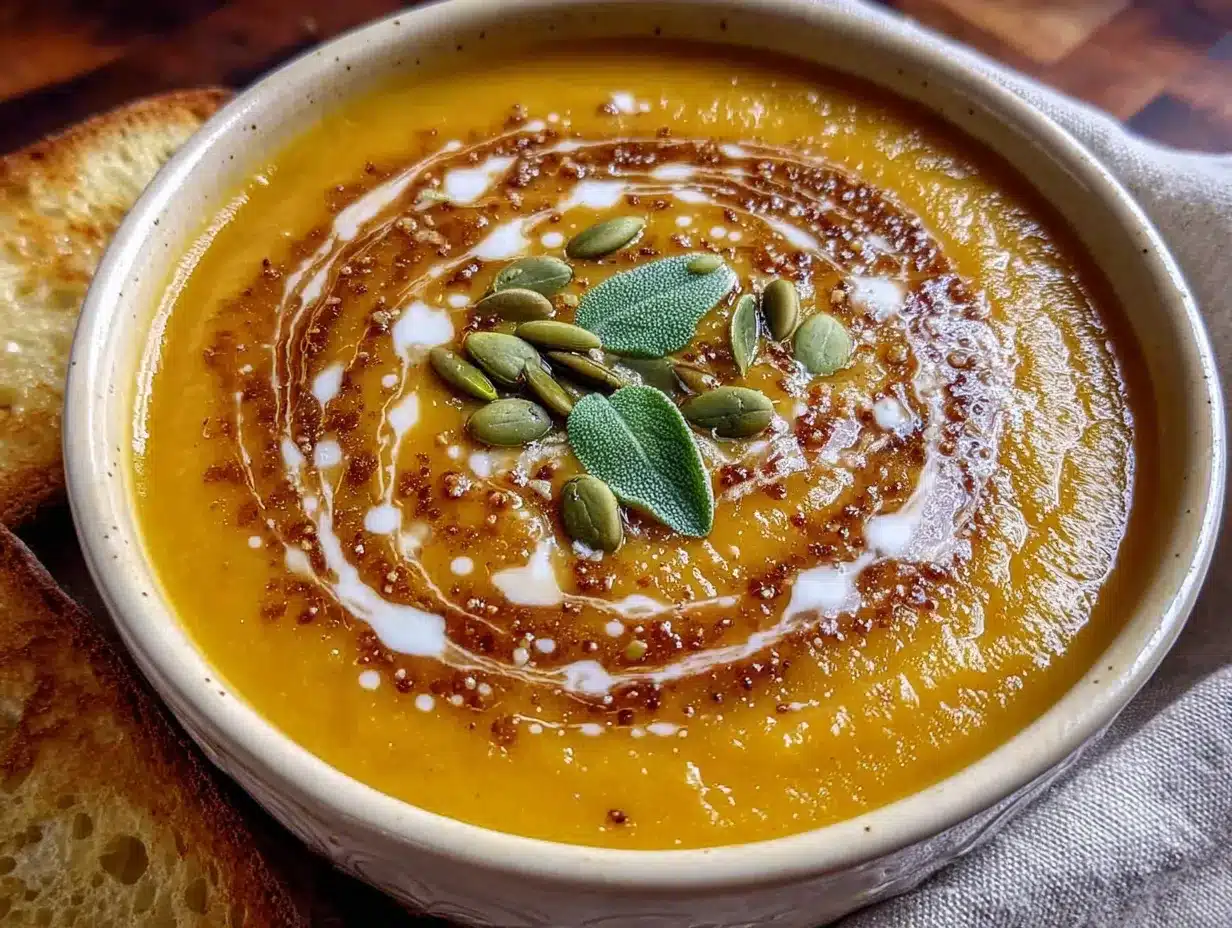
That’s the thing about this lighter roasted butternut squash soup with brown butter. It doesn’t try to be anything it’s not. It’s not thick and cloying. It’s not swimming in cream. It’s brothy and silky — almost elegant — with that nutty, toasty depth from the brown butter that makes you close your eyes and go quiet for a second. The roasting does the heavy lifting, coaxing out the natural sweetness of the squash without needing sugar or honey. And the brown butter? It’s not a garnish here. It’s the whole point.
I know — maybe you’ve been burned before by a butternut squash soup that promised the world but delivered a bowl of sweet mush. I get it. But this one is different. It’s lighter, yes, but not in that sad, diet-y way. Lighter because it lets the ingredients speak for themselves. Lighter because you don’t need a quart of cream to make it feel special. And honestly, it’s the kind of soup that makes you feel good about eating well without feeling like you’re missing out on anything. I’ve made it four times since that Tuesday, and I’m not stopping anytime soon.
Why You’ll Love This Recipe
This isn’t just another butternut squash soup recipe. It’s the one I turn to when I want something that feels both cozy and clean — like a warm hug that doesn’t leave you feeling heavy. Here’s why it works:
- Quick & Easy: From start to finish, you’re looking at about 45 minutes. The oven does most of the work while you brown the butter and chop an onion. Perfect for a weeknight when you want something good without a big production.
- Simple Ingredients: You probably already have everything except the squash and butter. Onion, garlic, broth, salt, pepper — that’s it. No fancy cream, no obscure spices, no trips to a specialty store.
- Perfect for Meal Prep: This soup keeps beautifully in the fridge for up to five days, and it freezes like a dream. Make a double batch on Sunday and eat well all week.
- Crowd-Pleaser: I’ve served this to my dad (who “doesn’t do soup”), my picky niece, and a friend who claims to hate squash. All of them asked for seconds. It’s that good.
- Unbelievably Delicious: The brown butter is the secret weapon here. It adds a deep, nutty richness that makes you forget there’s no cream. The roasting caramelizes the squash just enough to bring out its natural sweetness without making it cloying. It’s balanced, it’s satisfying, and it’s honestly the best version of this soup I’ve ever had.
What makes this recipe different from the rest is the technique. Roasting the squash with a little oil and salt until it’s deeply caramelized — not just soft — gives you that complex, savory-sweet flavor that no amount of stovetop simmering can achieve. And the brown butter isn’t just drizzled on top; it’s blended right into the soup, so every spoonful gets that nutty, toasty goodness. It’s comfort food reimagined — lighter, faster, but with the same soul-soothing satisfaction.
What Ingredients You Will Need
This recipe uses simple, wholesome ingredients to deliver bold flavor and satisfying texture without the fuss. Most of these are pantry staples, and the ones that aren’t are easy to find at any grocery store.
- 1 medium butternut squash (about 2.5-3 pounds) — peeled, seeded, and cut into 1-inch cubes. Look for one that feels heavy for its size with a firm, unblemished skin. (I find the pre-cut cubes at the store work in a pinch, but they don’t caramelize as well because they’re often smaller and drier.)
- 2 tablespoons olive oil — for roasting the squash. A good quality extra-virgin olive oil adds a subtle fruitiness, but regular olive oil works fine too.
- 1 medium yellow onion — chopped. Yellow onions have the right balance of sweetness and bite for this soup. Red or white onions will work, but they’ll change the flavor slightly.
- 3 cloves garlic — smashed. I leave them whole-ish so they don’t burn during roasting. If you’re using pre-minced garlic, add it with the onion on the stovetop instead.
- 4 cups low-sodium vegetable broth — or chicken broth if you’re not keeping it vegetarian. Low-sodium is important here because the broth reduces and concentrates. You can always add more salt later, but you can’t take it out.
- 3 tablespoons unsalted butter — for browning. I recommend Kerrygold or another European-style butter for best flavor. The higher fat content browns more evenly and tastes nuttier.
- 1 teaspoon kosher salt — plus more to taste. I use Diamond Crystal; if you’re using Morton’s or fine sea salt, start with half that amount.
- ½ teaspoon black pepper — freshly ground, ideally. Pre-ground pepper works, but fresh really does taste better here.
- Optional: ¼ cup plain Greek yogurt or coconut cream — for swirling on top. This is totally optional but adds a lovely tangy contrast to the sweet squash and nutty butter. (Use dairy-free yogurt or coconut cream for a vegan version.)
- Optional: 2 tablespoons maple syrup or honey — if your squash isn’t very sweet. I’ve only needed this once, but it’s good to have on hand just in case. Taste your roasted squash first before adding any sweetener.
- Optional: Pinch of cayenne pepper or red pepper flakes — for a little heat. I add this about half the time. It doesn’t make the soup spicy, just more interesting.
Ingredient Selection Tip: When choosing a butternut squash, look for one with a long neck and a small bulb. The neck part is solid flesh with no seeds, which means less waste and more consistent cubes. The bulb has the seeds, but you can scoop those out easily. If you’re buying pre-cut cubes, make sure they’re all roughly the same size so they roast evenly.
Equipment Needed
You don’t need much for this recipe, which is part of its charm. Here’s what you’ll need:
- Baking sheet — a rimmed half-sheet pan works best. The rim catches any juices and keeps your oven clean. If you don’t have one, any large baking sheet will do.
- Parchment paper or silicone baking mat — not strictly necessary, but it makes cleanup a breeze and prevents the squash from sticking. I use parchment paper every time.
- Large pot or Dutch oven — for simmering the soup. A 5-quart Dutch oven is ideal, but any heavy-bottomed pot works. The heavier the pot, the more even the heat.
- Immersion blender or regular blender — an immersion blender is easier and less messy, but a regular blender works too. If using a regular blender, blend in batches and never fill it more than halfway with hot liquid. (I learned that lesson the hard way — hot soup explosion is not fun to clean up.)
- Small skillet — for browning the butter. A light-colored skillet is best so you can see the butter change color. I use a stainless steel pan; nonstick works too but makes it harder to see the color.
- Chef’s knife and cutting board — a sharp knife makes peeling and cubing the squash much easier. If your knife is dull, this step will be frustrating. (Trust me on this one.)
- Vegetable peeler — for peeling the squash. A Y-shaped peeler works better than a straight one for the curves of a butternut squash.
Budget-Friendly Tip: If you don’t have an immersion blender, you can use a potato masher or a food mill. The texture won’t be as silky, but it’ll still taste great. Or you can let the soup cool slightly and blend it in a regular blender — just be careful with the hot liquid.
Preparation Method
Let’s get cooking. This recipe comes together in about 45 minutes, and most of that time is hands-off while the squash roasts.
- Preheat your oven to 400°F (200°C). Line a baking sheet with parchment paper or a silicone mat. While the oven heats, peel your butternut squash. Cut off the stem end and the bottom, then slice the squash in half where the neck meets the bulb. Peel each piece with a vegetable peeler, then cut them in half lengthwise. Scoop out the seeds from the bulb half with a spoon — you can save them for roasting later if you like, but I usually toss them. Cut the squash into 1-inch cubes. (This takes about 10 minutes the first time, but you’ll get faster. I promise.)
- Toss the cubed squash with 2 tablespoons olive oil, ½ teaspoon kosher salt, and a few grinds of black pepper. Spread them in a single layer on the prepared baking sheet. Don’t crowd them — if they’re too close together, they’ll steam instead of roast. If your baking sheet is small, use two sheets. Roast for 25-30 minutes, flipping halfway through, until the squash is deeply golden and caramelized on the edges. The pieces should be tender enough to pierce easily with a fork but not mushy. (The caramelization is where the magic happens — don’t pull them out too early just because they’re soft.)
- While the squash roasts, start the brown butter. Cut 3 tablespoons of unsalted butter into pieces and add them to a small skillet over medium heat. Swirl the pan occasionally as the butter melts. It will foam up, then the foam will subside, and you’ll start to see little brown specks forming at the bottom of the pan. This is the milk solids toasting — that’s where the nutty flavor comes from. Keep a close eye on it; brown butter can go from perfect to burnt in about 30 seconds. When it smells nutty and the specks are a deep amber color, remove it from the heat immediately and pour it into a heatproof bowl. (Don’t leave it in the hot pan or it’ll keep cooking.) Set it aside.
- In your large pot or Dutch oven, heat 1 tablespoon of olive oil over medium heat. Add the chopped onion and a pinch of salt. Cook, stirring occasionally, for 5-7 minutes until the onion is soft and translucent but not browned. Add the smashed garlic cloves and cook for another minute until fragrant. (If you’re using pre-minced garlic, add it now and cook for 30 seconds.)
- Add the roasted squash to the pot, along with 4 cups of low-sodium vegetable broth. Stir everything together, scraping up any browned bits from the bottom of the pot. Bring the soup to a gentle simmer, then reduce the heat to low and let it cook for 10 minutes. This allows the flavors to meld and the squash to soften a bit more. (Don’t let it boil — a gentle simmer is all you need.)
- Remove the pot from the heat and let it cool for 5 minutes. This is important for safety if you’re using a regular blender. Using an immersion blender, blend the soup until it’s completely smooth. If using a regular blender, work in batches — fill the blender no more than halfway, hold the lid down with a kitchen towel, and blend until smooth. Pour each batch into a clean pot or large bowl. (I’ve had hot soup explode on me before. It’s not fun. Please be careful.)
- Once the soup is blended, stir in the brown butter. Reserve a little bit for drizzling on top if you want to be fancy. Taste the soup and adjust the seasoning — you might want more salt, a pinch of cayenne, or a squeeze of lemon juice to brighten it up. If the soup is thicker than you’d like, add a splash more broth or water until it reaches your desired consistency.
- Ladle the soup into bowls. If you’re using the optional yogurt or coconut cream, swirl a spoonful into each bowl. Drizzle with the reserved brown butter. Add a few cracks of black pepper on top. Serve hot, with crusty bread or a simple green salad on the side.
Cooking Tips & Techniques
I’ve made this soup more times than I can count, and I’ve made every mistake in the book so you don’t have to. Here’s what I’ve learned:
Don’t skip the roasting. I know it’s tempting to just boil the squash and call it a day, but roasting is what gives this soup its depth. The caramelization adds a savory sweetness that you just can’t get from simmering. Plus, roasting concentrates the flavor, so you need less broth and the soup tastes more intensely of squash. If you’re short on time, you can roast the squash a day ahead and store it in the fridge.
Watch the brown butter like a hawk. Brown butter is the star of this show, but it’s also the easiest thing to mess up. It goes from pale yellow to nutty brown to burnt black in under a minute. I like to use a light-colored pan so I can see the color change clearly. When the foam subsides and you see brown specks forming, swirl the pan and smell it — it should smell nutty and toasty, not acrid. Pull it off the heat immediately and pour it into a cold bowl to stop the cooking.
Season in layers. I add salt at three different points: a little on the squash before roasting, a pinch on the onions while they cook, and more at the end after blending. This builds flavor gradually and prevents the soup from tasting flat or overseasoned. If you add all the salt at the end, you’ll need more of it to get the same effect.
Blend it well. A silky texture is what makes this soup feel luxurious without cream. If you’re using an immersion blender, move it around the pot in a figure-eight pattern to make sure you get all the chunks. If using a regular blender, blend each batch for at least 30 seconds. The soup should be completely smooth with no fibrous bits. (I once got lazy and didn’t blend long enough — the texture was off and I regretted it.)
Taste before serving. This is the most important step. Squash sweetness varies wildly depending on the season and where it was grown. Some squash are naturally sweeter than others. Taste your soup and adjust accordingly — a pinch of salt if it’s flat, a squeeze of lemon if it’s too sweet, a dash of cayenne if it needs a kick. Your taste buds are the best tool you have.
Variations & Adaptations
One of the best things about this soup is how flexible it is. Here are a few ways to make it your own:
- Vegan Version: Swap the butter for a high-quality vegan butter or use 3 tablespoons of coconut oil. The coconut oil won’t brown the same way, but it’ll add a subtle richness. Use vegetable broth and skip the yogurt swirl, or use coconut cream instead.
- Spicy Kick: Add ½ teaspoon of smoked paprika and ¼ teaspoon of cayenne pepper along with the roasted squash. The smokiness pairs beautifully with the brown butter, and the heat cuts through the sweetness. I make this version when I want something a little more exciting.
- Curried Butternut Squash Soup: Sauté 1 tablespoon of grated fresh ginger and 1 teaspoon of curry powder with the onions. The ginger adds warmth and the curry adds complexity. This is my go-to when I’m craving something with more spice.
- Apple-Butternut Squash Soup: Add one peeled and chopped apple (I like Granny Smith for tartness) to the roasting pan with the squash. The apple adds a bright, fruity note that complements the brown butter beautifully. This is a great fall variation.
- Coconut-Lime Version: Replace 1 cup of the broth with full-fat coconut milk and add the juice of 1 lime at the end. The coconut makes it richer and the lime keeps it bright. Top with toasted coconut flakes for extra texture.
- Air Fryer Option: If you don’t want to heat up the oven, you can roast the squash in an air fryer at 375°F (190°C) for 15-20 minutes, shaking the basket halfway through. The squash gets even crispier this way, which adds a nice texture contrast when blended.
Personal Variation: I once made this soup with a mix of butternut squash and sweet potato when I didn’t have enough squash. It was sweeter than usual, so I added an extra squeeze of lemon and a pinch more salt to balance it out. It worked surprisingly well — the sweet potato made the soup even creamier without any dairy.
Serving & Storage Suggestions
This soup is versatile enough to be the star of a cozy dinner or a supporting player in a bigger meal. Here’s how I like to serve it:
Serving Temperature: Serve this soup hot, but not boiling. Let it cool for a few minutes after blending so the flavors settle. I like to ladle it into warmed bowls — just run them under hot water for a few seconds and dry them off. It keeps the soup hot longer.
Presentation: A swirl of Greek yogurt or coconut cream on top makes it look restaurant-worthy. Drizzle the reserved brown butter in a spiral. Add a few cracks of black pepper and a sprinkle of flaky sea salt. If you’re feeling fancy, top it with toasted pumpkin seeds or a few fresh sage leaves fried in butter. (Fried sage is incredible — it gets crispy and adds an herby, earthy note.)
What to Serve With It: This soup pairs beautifully with a crusty sourdough or a simple green salad with a lemony vinaigrette. For a heartier meal, serve it alongside a grilled cheese sandwich or a roasted chicken breast. I’ve also served it as a first course for Thanksgiving — it’s light enough not to fill anyone up, but satisfying enough to feel like a treat.
Storage Instructions: Let the soup cool completely before storing. Transfer it to an airtight container and refrigerate for up to 5 days. The flavors actually get better after a day or two as they meld together. To freeze, pour the cooled soup into freezer-safe bags or containers, leaving an inch of headroom for expansion. It will keep for up to 3 months. Thaw overnight in the refrigerator before reheating.
Reheating Tips: Reheat the soup gently on the stovetop over medium-low heat, stirring occasionally. If it’s too thick after refrigeration, add a splash of broth or water to thin it out. You can also reheat individual portions in the microwave — just do it in 30-second bursts, stirring in between, to avoid hot spots. (I’ve burned my tongue on microwaved soup more times than I care to admit.)
Flavor Development: This soup is even better the next day. The brown butter flavor deepens and the squash sweetness mellows out. I often make a double batch on purpose just so I have leftovers for lunch.
Nutritional Information & Benefits
This soup is as good for you as it is delicious. Here’s a rough breakdown per serving (makes 4 servings):
- Calories: Approximately 220 per serving
- Fat: 14g (mostly from the olive oil and brown butter)
- Carbohydrates: 24g
- Fiber: 5g
- Protein: 4g
- Sugar: 8g (natural from the squash)
- Sodium: 480mg (varies depending on your broth and added salt)
Health Benefits: Butternut squash is packed with vitamin A (over 400% of your daily needs per cup), which is great for eye health and immune function. It’s also a good source of vitamin C, potassium, and fiber. The olive oil provides healthy monounsaturated fats, and the brown butter adds a small amount of vitamin A and healthy saturated fats. (Yes, butter can be part of a healthy diet in moderation — it’s all about balance.)
Dietary Considerations: This recipe is naturally gluten-free and can be made vegan with the swaps mentioned above. It’s also relatively low in calories for a creamy soup, making it a great option if you’re watching your weight. The main allergens are dairy (from the butter) and potentially tree nuts (if you use coconut cream).
Personal Wellness Perspective: I love that this soup feels indulgent but is actually quite light. It’s the kind of meal that leaves you feeling satisfied — not stuffed — and gives you energy without weighing you down. It’s become my go-to for those days when I want comfort food that also makes me feel good about what I’m eating.
Conclusion
This lighter roasted butternut squash soup with brown butter is proof that you don’t need cream or complicated techniques to make something truly special. It’s simple, honest cooking that lets the ingredients shine — and honestly, that’s the kind of cooking I love most.
I hope you give this recipe a try and make it your own. Maybe you’ll add a pinch of cayenne like I sometimes do, or maybe you’ll discover that a swirl of coconut cream is your thing. That’s the beauty of a good recipe — it’s a starting point, not a rulebook.
If you make this soup, I’d love to hear about it. Leave a comment below and tell me how it turned out, or share your own twist on it. And if you’re looking for more cozy, wholesome recipes, be sure to check out my creamy roasted tomato soup for another lighter take on a classic, or my easy whole wheat dinner rolls — they’re the perfect side for dipping.
Until next time, happy cooking. And remember — the best meals are the ones you make with intention, not stress. You’ve got this.
Frequently Asked Questions
Can I make this soup ahead of time?
Absolutely. In fact, it tastes even better the next day. Make it up to 5 days ahead and store it in the fridge. Reheat gently on the stovetop, adding a splash of broth if it’s too thick.
Can I freeze this soup?
Yes! Let the soup cool completely, then transfer it to freezer-safe containers or bags. It will keep for up to 3 months. Thaw overnight in the fridge before reheating.
Do I have to peel the butternut squash?
I recommend it for this recipe. The skin gets tough when roasted and won’t blend into a smooth texture. A Y-shaped vegetable peeler makes the job much easier.
Can I use pre-cut butternut squash from the store?
You can, but the texture won’t be quite as good. Pre-cut cubes are often smaller and drier, so they don’t caramelize as well. If you use them, keep an eye on the roasting time — they may cook faster.
How do I know when the brown butter is done?
Watch for the butter to foam, then the foam subsides. You’ll see little brown specks forming at the bottom of the pan, and it will smell nutty and toasty. Remove it from the heat immediately — it can go from perfect to burnt in seconds.
Pin This Recipe!
Lighter Roasted Butternut Squash Soup with Brown Butter

A brothy, silky butternut squash soup with deep nutty flavor from brown butter. Roasted squash provides natural sweetness without cream, making it a lighter yet satisfying comfort food.
- Prep Time: 15 minutes
- Cook Time: 30 minutes
- Total Time: 45 minutes
- Yield: 4 servings 1x
- Category: Soup
- Cuisine: American
Ingredients
- 1 medium butternut squash (about 2.5–3 pounds), peeled, seeded, and cut into 1-inch cubes
- 2 tablespoons olive oil
- 1 medium yellow onion, chopped
- 3 cloves garlic, smashed
- 4 cups low-sodium vegetable broth
- 3 tablespoons unsalted butter (preferably European-style like Kerrygold)
- 1 teaspoon kosher salt (plus more to taste)
- ½ teaspoon black pepper (freshly ground)
- Optional: ¼ cup plain Greek yogurt or coconut cream (for swirling)
- Optional: 2 tablespoons maple syrup or honey (if squash isn’t sweet)
- Optional: Pinch of cayenne pepper or red pepper flakes
Instructions
- Preheat oven to 400°F (200°C). Line a baking sheet with parchment paper or a silicone mat.
- Peel butternut squash, cut into 1-inch cubes. Toss with 2 tablespoons olive oil, ½ teaspoon kosher salt, and a few grinds of black pepper. Spread in a single layer on the prepared baking sheet.
- Roast for 25-30 minutes, flipping halfway through, until deeply golden and caramelized on edges and tender.
- While squash roasts, make brown butter: Cut 3 tablespoons unsalted butter into pieces and add to a small skillet over medium heat. Swirl occasionally. Butter will foam, then foam subsides and brown specks form at bottom. When it smells nutty and specks are deep amber, remove from heat immediately and pour into a heatproof bowl. Set aside.
- In a large pot or Dutch oven, heat 1 tablespoon olive oil over medium heat. Add chopped onion and a pinch of salt. Cook 5-7 minutes until soft and translucent. Add smashed garlic cloves and cook 1 minute until fragrant.
- Add roasted squash and 4 cups low-sodium vegetable broth to the pot. Stir, scraping up browned bits. Bring to a gentle simmer, then reduce heat to low and cook 10 minutes.
- Remove pot from heat and let cool 5 minutes. Using an immersion blender, blend until completely smooth. (If using a regular blender, work in batches, filling no more than halfway.)
- Stir in brown butter, reserving a little for drizzling. Taste and adjust seasoning with more salt, cayenne, or a squeeze of lemon if desired. Add more broth or water if too thick.
- Ladle into bowls. Swirl in optional yogurt or coconut cream, drizzle with reserved brown butter, and add a few cracks of black pepper. Serve hot.
Notes
Don’t skip roasting the squash—it’s key for depth of flavor. Watch brown butter carefully as it can burn quickly. Season in layers for best flavor. Soup tastes even better the next day. For vegan version, use vegan butter or coconut oil and vegetable broth.
Nutrition
- Serving Size: 1 bowl (about 1.5 cu
- Calories: 220
- Sugar: 8
- Sodium: 480
- Fat: 14
- Saturated Fat: 5
- Carbohydrates: 24
- Fiber: 5
- Protein: 4
Keywords: butternut squash soup, roasted butternut squash soup, brown butter soup, healthy soup, fall soup, winter soup, gluten-free soup, vegetarian soup



