Love this? Save it for later!
Share the inspiration with your friends
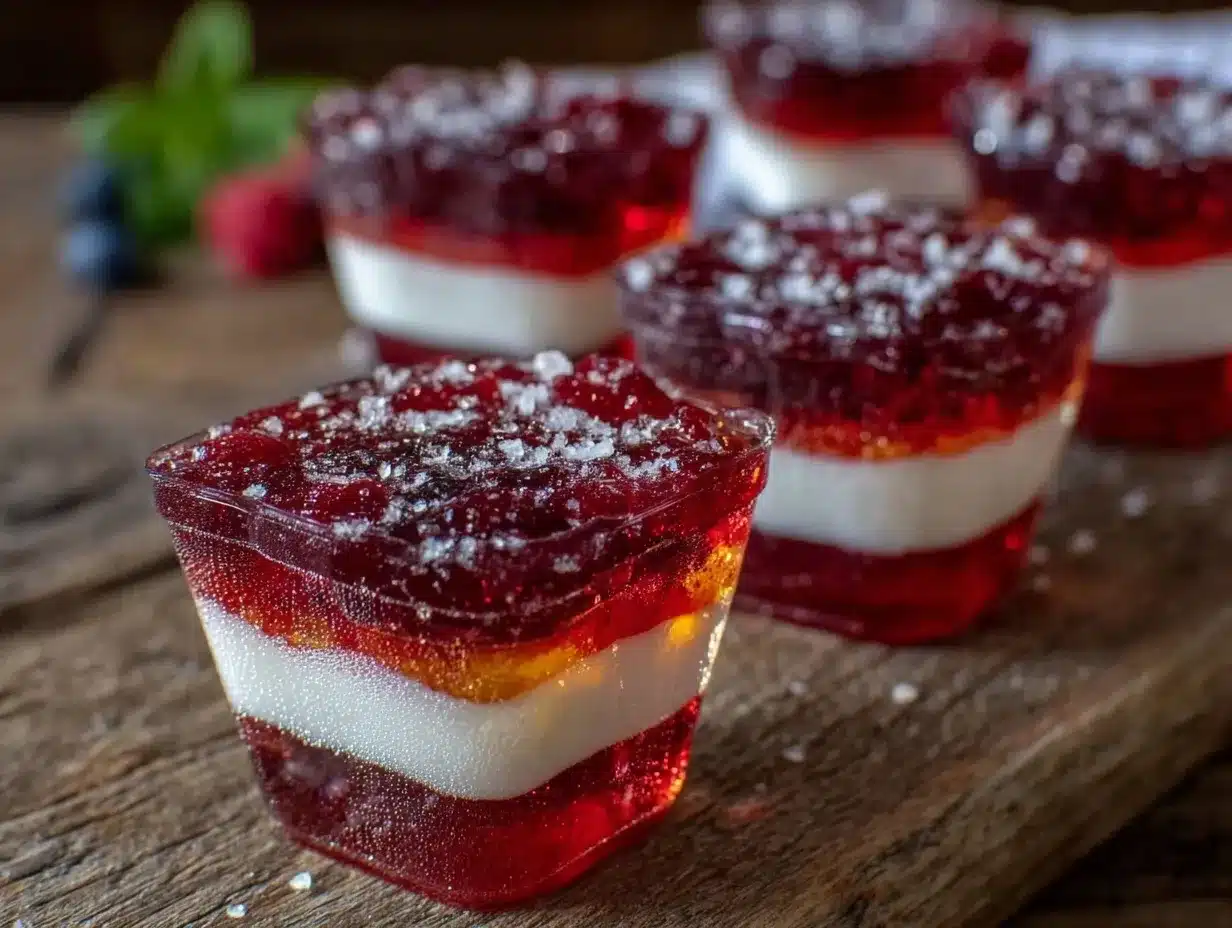
“I was running late to the neighborhood block party last Fourth of July,” I admitted to my friend Lisa as I rummaged through my fridge. Honestly, I had forgotten to bring a dessert, and with everyone else showing up with elaborate pies and cakes, I felt a little panicked. Then, Lisa handed me a colorful cup filled with red, white, and blue layers. “Try this,” she said with a grin. It was her Festive Patriotic Jello Flag Cups, and let me tell you, they were the hit of the party.
The way the vibrant layers caught the sunlight, the slightly wobbly texture, and the burst of sweet, fruity flavors made everyone smile. I remember feeling amazed that something so simple could look so impressive and taste so refreshing on a hot summer day. Maybe you’ve been there—the scramble to pull together a quick dessert that still feels special. That’s exactly why this recipe stuck with me and why I keep making it every year.
Let’s face it, not everyone has time for fussing over desserts on busy celebration days, but everyone loves a fun, festive treat that’s easy to share. These Jello flag cups are like a little party in a cup, perfect for kids and adults alike. The layers mimic the American flag with juicy red berries, creamy white gelatin, and a cool blue layer that just makes you want to cheer. Plus, they’re portable, so you can bring them anywhere—picnic, potluck, or your own backyard BBQ.
What’s even better? You don’t have to be a dessert pro to make these. They come together with pantry staples and a few fresh ingredients, and honestly, even the mess-ups taste great (trust me, I spilled a bit of the blue layer once, but it didn’t stop anyone from asking for seconds). This recipe has become my go-to for any patriotic occasion, and I’m excited to share it with you.
Why You’ll Love This Recipe
After making these Festive Patriotic Jello Flag Cups multiple times, I can say they truly deliver on fun and flavor. Whether you’re a seasoned cook or just need a no-fuss dessert, this recipe is a winner. Here’s what makes it stand out:
- Quick & Easy: Whips up in about 30 minutes of active prep, with simple chilling time—perfect for last-minute celebrations.
- Simple Ingredients: Uses basic Jello flavors, fresh fruit, and cool whipped cream—no specialty shops or complicated shopping lists needed.
- Perfect for Summer Holidays: Ideal for 4th of July, Memorial Day, or any summer cookout where you want a light, refreshing dessert.
- Crowd-Pleaser: Kids love the layers and colors, and adults appreciate the nostalgic, classic flavors with a modern twist.
- Unbelievably Delicious: The combo of tart berries, creamy white layer, and the subtle sweetness of the blue Jello is the kind of treat you close your eyes for.
This isn’t just your average jello cup. The secret is in the layering technique and choosing the right brands for the best texture. I personally go for Jell-O’s classic flavors because they set just right—not too firm, not too soft. Also, the creamy white layer uses a mix of sweetened condensed milk and gelatin, which gives it a smooth, dreamy feel instead of the usual plain gelatin look.
It’s the kind of dessert that brings smiles and sparks conversations—“How’d you make this?”—and honestly, that’s the best part. It’s festive without fuss, nostalgic yet fresh, and really easy to share. Plus, it’s a fantastic way to show some patriotism in a fun, edible way.
What Ingredients You Will Need
This recipe uses simple, wholesome ingredients to create those bold, vibrant layers and a creamy texture without any fuss. Most of these are pantry staples, and the fresh fruit is easy to find in summer markets or grocery stores. Here’s what you’ll need:
- Red Layer:
- 1 package (3 oz / 85 g) strawberry or cherry-flavored gelatin (I prefer Jell-O brand for consistent flavor)
- 1 cup (240 ml) boiling water
- 1/2 cup (120 ml) cold water
- Fresh strawberries, sliced (about 1/2 cup / 75 g), for garnish and extra texture
- White Layer:
- 1 package (3 oz / 85 g) unflavored gelatin powder
- 1 cup (240 ml) whole milk or half-and-half (use coconut milk for dairy-free)
- 1/2 cup (120 ml) sweetened condensed milk (adds creaminess and sweetness)
- 1 cup (240 ml) boiling water
- Blue Layer:
- 1 package (3 oz / 85 g) blue raspberry-flavored gelatin (or blueberry if preferred)
- 1 cup (240 ml) boiling water
- 1/2 cup (120 ml) cold water
- Fresh blueberries (about 1/2 cup / 75 g), optional for garnish
- Optional Toppings:
- Whipped cream (store-bought or homemade)
- Extra berries for decoration
When selecting gelatin, I recommend classic brands like Jell-O because their flavors are bright and reliable. You can swap fresh strawberries and blueberries for frozen if fresh aren’t available—just thaw and drain excess water to keep the layers firm. For the white layer, using sweetened condensed milk is my trick for that smooth, soft texture that feels a bit like a cream cheese filling but lighter.
If you want a vegan or vegetarian version, look for agar-agar powder instead of gelatin and use coconut milk in the white layer. The flavors and textures will differ, but it’s a tasty alternative.
Equipment Needed
Luckily, this recipe doesn’t require any fancy gadgets or specialty kitchen tools. Here’s what you’ll need to get started:
- Medium-sized mixing bowls (at least three) for preparing each gelatin layer separately
- Measuring cups and spoons to ensure precise liquid and powder amounts
- A whisk or fork to stir the gelatin mixtures smoothly
- Clear plastic or glass cups (8-12 oz / 240-355 ml) for serving and layering the Jello
- A small saucepan or kettle to boil water
- Refrigerator with enough space to chill the cups while layers set
If you don’t have measuring cups, a kitchen scale is a great alternative for accuracy. When it comes to stirring gelatin, a whisk works best to avoid lumps, but a fork does the job fine if that’s what’s on hand. For serving, I find clear cups really make the patriotic layers pop visually.
One tip from experience: have a small cooling rack or tray handy to keep the cups steady in the fridge while layers set. It prevents spills and makes transport easier when you take them to the party.
Preparation Method
- Prepare the Red Layer: In a mixing bowl, dissolve the strawberry or cherry gelatin powder into 1 cup (240 ml) of boiling water. Stir for about 2 minutes until fully dissolved with no granules visible. Add 1/2 cup (120 ml) cold water and mix well. Pour about 1/3 cup (80 ml) of this mixture into each clear cup. Add a few sliced strawberries on top for texture if you like. Chill in the refrigerator for about 30 minutes or until firm but not fully set (it should still be slightly tacky to touch).
- Make the White Layer: Sprinkle the unflavored gelatin over 1/4 cup (60 ml) cold milk and let it bloom for 5 minutes. Meanwhile, heat 3/4 cup (180 ml) milk and the sweetened condensed milk in a small saucepan until warm but not boiling. Remove from heat and add the bloomed gelatin, stirring until completely dissolved. Pour this creamy mixture gently over the red layer in each cup, filling another 1/3 cup (80 ml). Refrigerate again for 30 minutes until set but still slightly tacky.
- Prepare the Blue Layer: Dissolve the blue raspberry gelatin powder in 1 cup (240 ml) boiling water, stirring well. Add 1/2 cup (120 ml) cold water and stir. Pour carefully over the white layer, about 1/3 cup (80 ml) per cup. Optionally, drop a few blueberries on top of each cup before chilling for an added touch. Refrigerate for at least 2 hours, or until fully set.
- Serve: Once the blue layer is firm, add a dollop of whipped cream and extra berries if desired. Serve chilled for a refreshing, festive treat.
Pro Tip: Pour each layer slowly over the back of a spoon to avoid mixing the colors. I learned this the hard way the first time I rushed and ended up with a pinkish mess instead of crisp stripes! Also, patience is key—letting each layer set properly keeps the flag pattern sharp and clean.
This process takes about 2.5 to 3 hours total with chilling, but the actual hands-on time is under 30 minutes. Perfect for multitasking while you prep your other party dishes.
Cooking Tips & Techniques
Making these Festive Patriotic Jello Flag Cups is straightforward, but a few tips learned over time will help you get the best results:
- Layering Technique: Always allow each layer to become tacky before adding the next. If you pour the next layer too soon, the colors will bleed and ruin the flag effect.
- Use a Spoon to Pour: Pour the gelatin mixture gently over the back of a spoon held just above the previous layer. This slows the pour and prevents breaking the layer below.
- Temperature Matters: Don’t let your gelatin cool completely before pouring—it should be warm, but not hot, to avoid melting the previous layer.
- Fruit Placement: Adding fresh berries inside the cups adds texture and bursts of flavor, but avoid overcrowding or the layers won’t set properly.
- Common Mistake: Skipping the gelatin blooming step in the white layer can cause lumps or a gritty texture. Patience here pays off.
- Chilling Space: Make sure your fridge has enough room to keep cups level and avoid spills. I once had to juggle plates and ended with a few jiggly disasters!
Honestly, these tips took a couple of tries to get right, but once you’ve nailed the layering, it’s pure fun. Plus, if you’re looking for more easy crowd-pleasers, I remember how well my crispy garlic chicken went alongside these cups at a summer cookout. The contrast of savory and sweet was just perfect.
Variations & Adaptations
One of the best things about these Jello flag cups is how easy it is to tweak them for different tastes or dietary needs. Here are some ideas:
- Dietary Adjustments: Swap the milk and sweetened condensed milk in the white layer for coconut milk and coconut cream for a dairy-free version. Use agar-agar powder for a vegetarian-friendly option instead of gelatin.
- Flavor Twists: Try raspberry and lime Jello for the red and green Jello for a St. Patrick’s Day twist, or use peach and blueberry for a summer harvest theme.
- Layer Texture: Add a layer of vanilla yogurt instead of the white gelatin mixture for a tangier, creamier texture.
- Cooking Method: If you want to speed up chilling, place cups in the freezer for 15-20 minutes between layers, but watch closely to avoid freezing.
- Personal Variation: Once, I sprinkled crushed graham crackers on top for a little crunch and it was a surprising hit with the kids!
Feel free to customize the fruit toppings or Jello flavors based on what’s fresh and in season. The layering concept stays the same, making it easy to adapt for any occasion.
Serving & Storage Suggestions
These Jello cups are best served chilled, straight from the fridge. The cool temperature keeps the layers firm and the flavors refreshing. Presentation-wise, clear cups really showcase the flag colors, so try to keep them neat and simple.
Serve them with a generous dollop of whipped cream and a few fresh berries on top for extra flair. They pair wonderfully with grilled meats or light salads, making them perfect for summer celebrations.
For storage, keep the cups covered tightly with plastic wrap or in an airtight container in the refrigerator. They maintain their best texture for up to 3 days. If you need to prepare ahead, assemble the cups and chill overnight—the flavors meld beautifully with time.
When reheating isn’t really an option for Jello, but if you notice any condensation forming, gently pat it dry with a paper towel before serving—the layers will still hold strong. Over time, the fruit may release a bit of juice, which adds a natural sweetness to the dessert.
Nutritional Information & Benefits
Each Festive Patriotic Jello Flag Cup contains roughly:
- Calories: 150-180 (depending on toppings)
- Carbohydrates: 30g
- Protein: 2g
- Fat: 2-4g
- Sugar: 25g (mostly from gelatin and condensed milk)
The fresh fruit adds vitamins C and antioxidants, while the gelatin provides a source of protein and supports joint and skin health. This dessert is gluten-free and can be easily adapted for dairy-free or vegetarian diets.
From my perspective, it’s a sweet treat that feels lighter than most desserts, so you can enjoy it without feeling weighed down during your summer festivities.
Conclusion
These Festive Patriotic Jello Flag Cups are truly a simple way to bring color, fun, and flavor to your 4th of July or any patriotic celebration. Whether you’re short on time or just want a cheerful dessert that everyone will love, this recipe has you covered. The layers are eye-catching, the flavors nostalgic, and the preparation straightforward.
Honestly, I love how adaptable it is—so you can make it your own, whether that means swapping in your favorite berries or trying a non-dairy version. It’s a recipe that invites creativity while keeping the classic charm intact.
Give it a try, and if you do, I’d love to hear how you made it your own or what occasion you served it at. Go ahead and leave a comment, share your photos, or tell me about your favorite patriotic dessert traditions. This recipe is all about celebrating with joy and ease—so let’s make every bite count!
FAQs
- Can I make these Jello flag cups ahead of time?
Yes! You can assemble the cups and chill them overnight. Just keep them covered to prevent drying out. - What can I use instead of gelatin for a vegetarian version?
Agar-agar powder is a great plant-based substitute. Use according to package instructions but expect a slightly different texture. - How do I prevent the layers from mixing?
Make sure each layer is tacky but not fully firm before pouring the next. Pour gently over the back of a spoon to slow the flow. - Can I use other fruits besides strawberries and blueberries?
Absolutely! Raspberries, blackberries, or even small pieces of kiwi can work well depending on your color scheme. - What if I don’t have sweetened condensed milk for the white layer?
You can substitute with a mix of milk and powdered sugar or use sweetened coconut cream for a dairy-free option, but the texture might be slightly different.
Pin This Recipe!

Festive Patriotic Jello Flag Cups Recipe for Easy 4th of July Celebrations
A quick and easy layered Jello dessert that mimics the American flag with red, white, and blue layers, perfect for summer holidays and patriotic celebrations.
- Prep Time: 25 minutes
- Cook Time: 3 hours
- Total Time: 3 hours 25 minutes
- Yield: 8 servings 1x
- Category: Dessert
- Cuisine: American
Ingredients
- 1 package (3 oz / 85 g) strawberry or cherry-flavored gelatin
- 1 cup (240 ml) boiling water
- 1/2 cup (120 ml) cold water
- Fresh strawberries, sliced (about 1/2 cup / 75 g), for garnish
- 1 package (3 oz / 85 g) unflavored gelatin powder
- 1 cup (240 ml) whole milk or half-and-half (use coconut milk for dairy-free)
- 1/2 cup (120 ml) sweetened condensed milk
- 1 cup (240 ml) boiling water
- 1 package (3 oz / 85 g) blue raspberry-flavored gelatin
- 1 cup (240 ml) boiling water
- 1/2 cup (120 ml) cold water
- Fresh blueberries (about 1/2 cup / 75 g), optional for garnish
- Whipped cream (store-bought or homemade), optional
- Extra berries for decoration, optional
Instructions
- Prepare the Red Layer: Dissolve the strawberry or cherry gelatin powder into 1 cup boiling water. Stir for about 2 minutes until fully dissolved. Add 1/2 cup cold water and mix well. Pour about 1/3 cup into each clear cup. Add sliced strawberries on top if desired. Chill for about 30 minutes until firm but slightly tacky.
- Make the White Layer: Sprinkle unflavored gelatin over 1/4 cup cold milk and let bloom for 5 minutes. Heat 3/4 cup milk and sweetened condensed milk until warm but not boiling. Remove from heat and add bloomed gelatin, stirring until dissolved. Pour gently over red layer, about 1/3 cup per cup. Refrigerate for 30 minutes until set but tacky.
- Prepare the Blue Layer: Dissolve blue raspberry gelatin powder in 1 cup boiling water, stir well. Add 1/2 cup cold water and stir. Pour carefully over white layer, about 1/3 cup per cup. Optionally add blueberries on top. Refrigerate for at least 2 hours until fully set.
- Serve: Once blue layer is firm, add a dollop of whipped cream and extra berries if desired. Serve chilled.
Notes
Pour each layer slowly over the back of a spoon to avoid mixing colors. Allow each layer to become tacky before adding the next to keep layers distinct. Use Jell-O brand gelatin for best texture. For vegetarian or vegan versions, substitute gelatin with agar-agar and use coconut milk. Fresh or frozen berries can be used; thaw and drain frozen berries to keep layers firm. Chill cups on a flat surface to avoid spills.
Nutrition
- Serving Size: 1 cup (about 8-12 oz
- Calories: 150180
- Sugar: 25
- Sodium: 50
- Fat: 24
- Saturated Fat: 12
- Carbohydrates: 30
- Fiber: 12
- Protein: 2
Keywords: Jello flag cups, patriotic dessert, 4th of July dessert, layered Jello, easy summer dessert, red white and blue dessert