Love this? Save it for later!
Share the inspiration with your friends
My youngest had refused squash for years. “It’s mushy and weird,” she’d announce every time I tried to slide a roasted butternut cube onto her plate. I’d nod, scrape it back into my own bowl, and move on. You pick your battles, right? Then last fall, I picked up a delicata squash at the farmer’s market without a real plan. I sliced it into rings, tossed them with oil and salt, and threw them in the oven next to the chicken I was already roasting. Honestly, I was just trying to use it up before it went soft. I walked back into the kitchen ten minutes later and found her standing on a stool, pulling the hot baking sheet toward her. “What are those?” she asked, already reaching for a ring. I told her. She ate six before I could get them onto a plate. She didn’t say sorry for all the years of squash refusal. She didn’t have to. The empty baking sheet said enough.
That’s the thing about this recipe. It doesn’t argue with anyone. It just sits there, all crispy edges and tender centers, and lets people decide for themselves. Maybe you’ve got a kid who swears they hate vegetables. Maybe you’re the one who’s not sure about squash. Either way, these crispy roasted delicata squash rings have a way of changing minds without anyone trying very hard. I’ve made them for picky neighbors, skeptical in-laws, and a Thanksgiving table full of people who normally skip the vegetable dishes. They disappear every single time.
And here’s the best part for a family on a budget: delicata squash is cheap. One squash costs about two dollars and feeds four people as a side dish. You don’t peel it. You don’t need fancy equipment. You just slice, season, and roast. The rings come out golden and a little caramelized, with that satisfying crunch on the outside and a creamy, sweet interior that tastes like autumn on a plate. I keep making them because they’re the kind of recipe that makes everyone at the table happy without making the cook crazy. And honestly, that’s the whole goal, isn’t it?
Why You’ll Love This Recipe
Let me tell you why this one earns a permanent spot in my weekly rotation. I’ve tested it at least a dozen times, tweaking temperatures and seasonings until I got it just right. Here’s what makes it work:
- Quick & Easy: From cutting board to table in under 30 minutes. No marinating, no complicated steps, no fuss.
- Simple Ingredients: You need exactly five things: a delicata squash, olive oil, salt, pepper, and whatever seasoning you feel like adding. That’s it.
- Perfect for Family Meals: These rings go with everything. Roast chicken, grilled fish, pasta, burgers, even breakfast eggs. I’m not kidding.
- Crowd-Pleaser: Kids eat them like they’re fries. Adults hover around the baking sheet. I’ve watched people who “don’t like squash” go back for thirds.
- Unbelievably Delicious: The edges get crispy and browned while the centers stay tender and sweet. It’s the texture contrast that gets everyone.
What makes this different from other roasted squash recipes? Most recipes tell you to peel the squash first. You don’t need to with delicata. The skin is thin, tender, and completely edible. It also gets beautifully crispy when roasted at high heat, which is exactly what gives these rings their satisfying crunch. I’ve tried roasting delicata with the skin on and off, and honestly, the skin-on version wins every time. It holds the rings together better and adds a slightly chewy texture that contrasts perfectly with the soft interior.
This recipe isn’t just good—it’s the kind that makes you close your eyes after the first bite. It’s comfort food that happens to be good for you. It’s fast enough for a Tuesday night but pretty enough for a holiday table. And it’s cheap enough that you don’t feel bad making it twice a week all fall long.
What Ingredients You Will Need
This recipe uses simple, wholesome ingredients to deliver bold flavor and satisfying texture without the fuss. Most of these are probably already in your kitchen. Here’s what you need and why each one matters:
- Delicata squash (1 medium, about 1 to 1.5 pounds): Look for a squash that feels heavy for its size and has no soft spots. The skin should be firm and bright yellow with green stripes. One medium squash yields about 20 to 24 rings, which serves 3 to 4 people as a side dish. If you’re feeding a crowd, grab two.
- Olive oil (2 tablespoons, plus more for the baking sheet): Use a good-quality extra virgin olive oil for the best flavor, but regular olive oil works fine too. The oil helps the rings crisp up and carries the seasoning. I’ve tried avocado oil here too—it works great and has a higher smoke point if you’re worried about burning.
- Fine sea salt (1 teaspoon): Don’t skimp here. Salt brings out the natural sweetness of the squash and helps the edges brown. I prefer fine sea salt because it distributes evenly, but kosher salt works too—just use about 1.5 teaspoons if you’re swapping.
- Black pepper (½ teaspoon, freshly ground): Freshly ground pepper adds a subtle warmth that balances the sweetness. Pre-ground works in a pinch, but you’ll notice the difference in flavor.
- Garlic powder (½ teaspoon, optional but recommended): This adds a savory depth that makes the rings taste almost like roasted potatoes. I use garlic powder instead of fresh garlic because it coats the rings evenly and doesn’t burn in the oven.
- Paprika (½ teaspoon, optional): Smoked paprika adds a lovely smoky flavor that pairs beautifully with the squash’s natural sweetness. Regular paprika works too and gives the rings a pretty orange color.
Seasoning variations I’ve tested:
- For a sweeter ring, skip the garlic and paprika and add ½ teaspoon of cinnamon and a pinch of nutmeg. This version tastes like dessert and my kids ask for it constantly.
- For a spicy kick, add ¼ teaspoon of cayenne pepper along with the garlic powder. My husband loves this version with grilled steak.
- For an herby version, toss the roasted rings with 1 tablespoon of fresh chopped parsley or thyme right before serving. It adds a fresh pop of flavor and color.
Ingredient tips from my kitchen: I buy my delicata squash from the local farmer’s market when they’re in season, which runs from September through December. If you can’t find them at the market, most grocery stores carry them in the fall. Look for ones that are firm and free of bruises. Store them in a cool, dark place for up to two weeks—don’t refrigerate them whole or they’ll get soft and lose flavor.
If you’re feeling adventurous, try this with other winter squash varieties. Acorn squash works well if you slice it into thin wedges instead of rings. Butternut squash needs peeling, so it’s more work. Honestly, delicata is the easiest and best for this recipe. The edible skin is a game-changer.
Equipment Needed
You don’t need much to make these crispy roasted delicata squash rings. Here’s what I use and what you can substitute if you’re working with a minimal kitchen:
- Sharp chef’s knife (8-inch is ideal): Delicata squash is firm, so a sharp knife makes clean slices without slipping. I use my Wusthof chef’s knife and it glides right through. If your knife is dull, you’ll struggle and risk cutting yourself. A serrated knife works in a pinch too.
- Cutting board: Any sturdy cutting board works. I prefer a wooden one because it’s gentler on my knife, but plastic is fine. Just make sure it’s stable and won’t slide around while you’re cutting.
- Baking sheet (half-sheet pan, 18×13 inches): A rimmed baking sheet is essential to catch any oil that runs off the rings. I use a heavy-duty aluminum one from Nordic Ware. It distributes heat evenly and doesn’t warp in the oven. If you only have a smaller baking sheet, use two so the rings have enough space to crisp up.
- Parchment paper or silicone baking mat: This makes cleanup effortless and prevents the rings from sticking. I’ve roasted directly on the baking sheet before and while it works, the cleanup is annoying. Parchment paper is cheap and worth the few cents per sheet.
- Mixing bowl (medium, about 3 quarts): Any bowl works for tossing the rings with oil and seasoning. I use a stainless steel bowl because it’s lightweight and easy to clean. A glass or ceramic bowl works just as well.
- Measuring spoons: For accurate seasoning. I have a set of magnetic measuring spoons that stay together in my drawer—they make finding the right size easy even when I’m in a hurry.
- Kitchen tongs: For flipping the rings halfway through roasting. Tongs give you better control than a spatula and keep your hands away from the hot pan. I use silicone-tipped tongs to avoid scratching my baking sheet.
Budget-friendly tip: If you don’t have a baking sheet, use any oven-safe pan you have, even a cast-iron skillet. Just make sure the rings are in a single layer. Crowding them is the number one mistake people make, and it leads to steamed, soggy squash instead of crispy rings.
Preparation Method
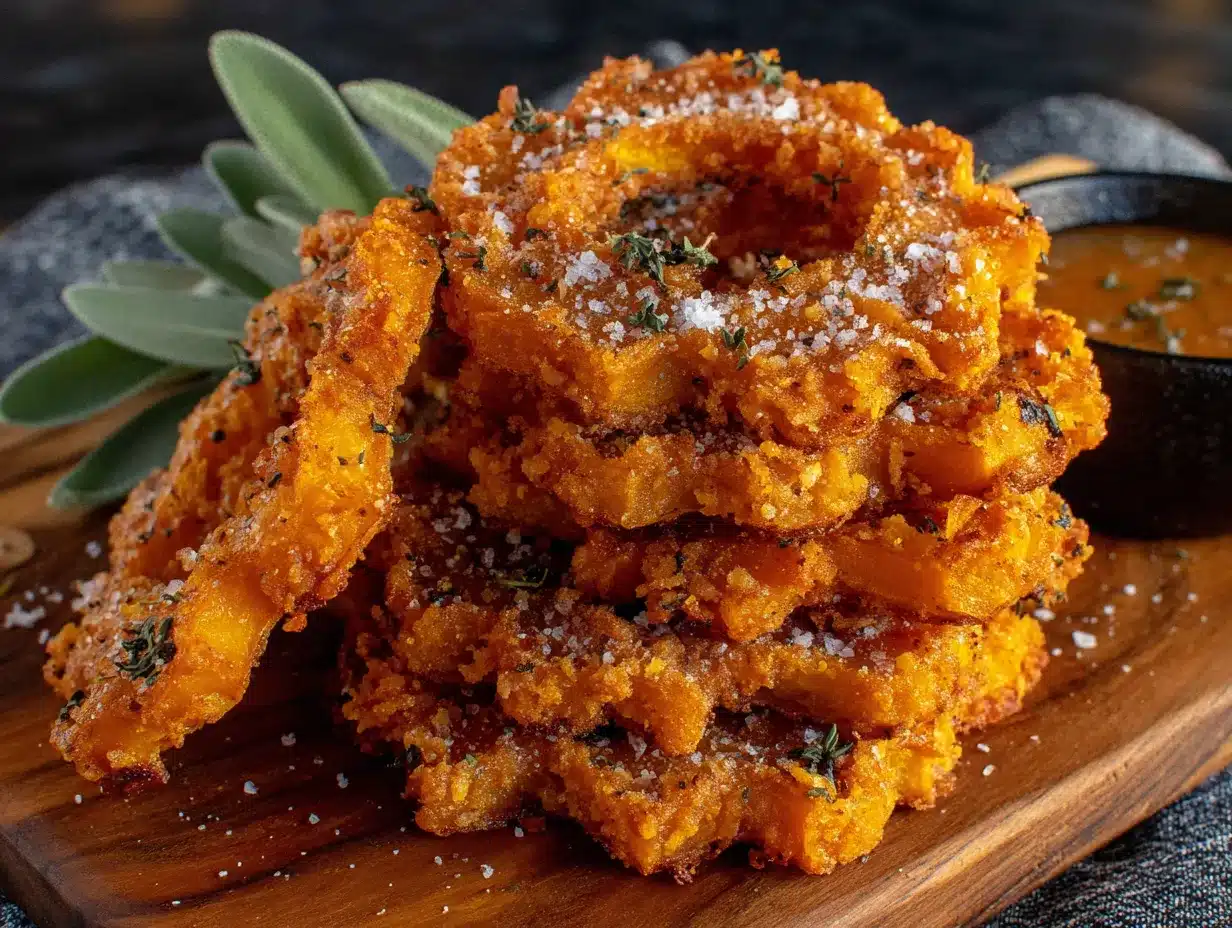
Let’s get cooking. This recipe comes together fast, so I recommend having everything prepped before you start. Here’s the step-by-step process I’ve refined through many batches:
- Preheat your oven to 425°F (220°C). This high heat is crucial for getting those crispy edges. While the oven heats up, line your baking sheet with parchment paper or a silicone mat. Set it aside for now.
- Wash the delicata squash thoroughly. Since we’re eating the skin, give it a good scrub under running water to remove any dirt or residue. Pat it dry with a clean kitchen towel. Don’t skip this step—I’ve found grit on a few squash from the farmer’s market and it’s not pleasant to bite into.
- Trim both ends off the squash. Cut about ¼ inch off the stem end and the blossom end. This creates a flat surface and removes any tough bits. You can compost these trimmings.
- Slice the squash into rings. Cut crosswise into ½-inch thick rounds. I aim for consistent thickness so they cook evenly. If some rings are thinner than others, they’ll burn before the thicker ones are done. Take your time here—it’s the most important step. One medium squash should give you about 20 to 24 rings.
- Scoop out the seeds. Use a small spoon or your fingers to remove the seeds and stringy pulp from the center of each ring. Don’t worry about getting every single seed—a few left behind won’t hurt anything. I usually do this over a small bowl and toss the seeds. (You can roast them like pumpkin seeds if you’re feeling ambitious!)
- Place the rings in a mixing bowl. Add 2 tablespoons of olive oil, 1 teaspoon of fine sea salt, ½ teaspoon of black pepper, and your optional seasonings (garlic powder and paprika if using). Toss everything together with your hands until every ring is evenly coated. I find using my hands works better than a spoon—I can feel when each ring is covered. Yes, it’s a little messy. That’s okay.
- Arrange the rings on the prepared baking sheet. Spread them in a single layer with a little space between each ring. If they’re touching, they’ll steam instead of roast. If your baking sheet is too small, use two sheets or roast in batches. I’ve made the mistake of overcrowding before and ended up with sad, limp rings. Learn from my error.
- Roast for 10 minutes. Set a timer. Don’t open the oven door during this time—you want the heat to stay consistent. The rings will start to brown on the bottom and the edges will begin crisping.
- Flip the rings. After 10 minutes, remove the baking sheet from the oven. Use tongs to flip each ring over. Work quickly so the pan doesn’t cool down too much. You’ll notice the bottoms are golden brown and the tops are still pale—that’s exactly what you want.
- Roast for another 8 to 10 minutes. Return the baking sheet to the oven and roast until the rings are golden brown and crispy on both sides. Keep an eye on them during the last 2 minutes—ovens vary and you don’t want them to burn. The rings are done when they’re deeply golden with darker brown spots on the edges.
- Let them rest for 2 minutes. Remove the baking sheet from the oven and let the rings sit on the pan for a couple of minutes. This allows them to firm up slightly and makes them easier to transfer. Don’t skip this resting time—I’ve broken many a perfect ring by moving it too soon.
- Serve immediately. Transfer the rings to a serving platter or directly to plates. They’re best eaten within 10 minutes of coming out of the oven while the edges are still crispy. If you need to hold them, keep them in a warm oven (200°F) on a wire rack for up to 20 minutes, but honestly, they won’t last that long.
Sensory cues to watch for: When you flip the rings after the first 10 minutes, the bottoms should be golden brown with darker edges. The kitchen will smell nutty and slightly sweet—that’s the squash caramelizing. When they’re done, the rings should be firm to the touch but give slightly when pressed. A perfectly roasted ring makes a faint crackling sound when you bite into it. That’s the sound of success.
My personal efficiency tip: While the squash is roasting, wash your cutting board and knife and wipe down the counter. By the time the rings are done, your kitchen is clean and you can focus on eating. I learned this trick after too many meals where I finished cooking and faced a mountain of dishes.
Cooking Tips & Techniques
After making these crispy roasted delicata squash rings more times than I can count, I’ve collected a few hard-won lessons. Let me share them so you don’t have to learn the hard way like I did:
The biggest mistake I see people make is slicing the rings too thin or too thick. I’ve done both. Too thin (¼ inch or less) and they burn before the centers are tender. Too thick (¾ inch or more) and the centers stay raw while the outsides get dark. The sweet spot is exactly ½ inch. I actually measured with a ruler the first few times until I got the feel for it. Now I can eyeball it, but there’s no shame in measuring. Consistency is everything here.
Don’t skip the flipping step. I know it’s tempting to just let them roast without touching them, but flipping ensures even browning. The first time I made these, I was distracted and forgot to flip. The bottoms were almost burnt while the tops were pale and soft. Not my finest moment. Set a timer on your phone if you need to—it’s worth the extra 30 seconds of effort.
High heat is non-negotiable. I’ve tried roasting these at 375°F and 400°F, and neither produced the same crispy results. At 425°F, the edges caramelize beautifully while the centers stay tender. If your oven runs hot, check the rings at 8 minutes instead of 10 during the first roasting phase. Every oven is different, and getting to know yours is part of becoming a better cook.
Let the rings breathe on the baking sheet. This is a tip I picked up from a professional chef friend. After roasting, if you transfer the rings immediately to a plate, they can steam and lose their crispiness. Letting them rest on the hot baking sheet for 2 minutes allows excess moisture to evaporate and the texture to set. It makes a noticeable difference.
Season generously. Squash is naturally sweet, so it needs enough salt to balance that sweetness. I use a full teaspoon of fine sea salt for one medium squash. If you’re watching your sodium, you can reduce it to ¾ teaspoon, but don’t go lower than that or the rings will taste flat. You can always add a sprinkle of flaky sea salt at the end if they need a little more.
Batch size matters. If you’re doubling the recipe, use two baking sheets and swap their positions halfway through roasting (top rack to bottom and vice versa). Don’t try to cram everything onto one sheet—you’ll end up with steamed squash and disappointment. Trust me on this one.
Variations & Adaptations
One of the best things about this recipe is how adaptable it is. I’ve experimented with all sorts of variations over the past year, and here are the ones that worked best:
Sweet cinnamon version: Skip the garlic powder and paprika. Instead, toss the rings with ½ teaspoon of cinnamon, ¼ teaspoon of nutmeg, and 1 tablespoon of maple syrup along with the oil and salt. Roast as directed. The rings come out tasting like a healthier version of sweet potato fries. My kids go absolutely wild for this version—they’ve been known to eat an entire squash’s worth in one sitting.
Spicy chipotle version: Add 1 teaspoon of chipotle powder (or to taste) along with the garlic powder. The smoky heat pairs beautifully with the sweet squash. My husband loves this version with tacos or alongside a simple grilled chicken breast. Start with less chipotle if you’re sensitive to heat—you can always add more next time.
Parmesan crusted version: After tossing the rings with oil and seasonings, sprinkle ¼ cup of finely grated Parmesan cheese over them before roasting. The cheese melts and creates an extra-crispy, savory crust. This version is dangerous—I’ve watched people eat an entire batch standing at the counter. Use a vegetarian Parmesan if that’s important to you, or try nutritional yeast for a dairy-free alternative.
Herb and lemon version: After roasting, toss the hot rings with 2 tablespoons of fresh chopped parsley, 1 tablespoon of fresh thyme leaves, and the zest of one lemon. The bright, fresh flavors cut through the richness and make the rings feel lighter. This is my go-to version when I’m serving them alongside fish or a big salad.
Air fryer adaptation: If you have an air fryer, you can make these in half the time. Preheat the air fryer to 400°F. Toss the rings with oil and seasonings as directed, then arrange them in a single layer in the air fryer basket (you may need to work in batches). Cook for 6 to 8 minutes, shaking the basket halfway through, until golden and crispy. They come out even crispier than the oven version, if you can believe it.
Dietary adaptations: This recipe is naturally gluten-free, dairy-free (unless you add the Parmesan), and vegan. For a lower-fat version, use just 1 tablespoon of oil and spray the rings with cooking spray instead. They won’t be quite as crispy, but they’ll still be delicious. For a lower-carb option, these rings are already fairly low in carbs—one serving has about 15 grams of carbohydrates, most of which come from fiber and natural sugars.
Serving & Storage Suggestions
Serving temperature and presentation: These rings are best served hot, straight from the oven. I like to arrange them on a large wooden board or a white platter so the golden color pops. Sprinkle a little flaky sea salt and fresh herbs over the top for a restaurant-worthy presentation. If you’re serving them at a dinner party, they look beautiful layered with fresh arugula and drizzled with a balsamic glaze.
What to serve with them: These rings go with almost everything. Here are my favorite pairings:
- Protein: Roasted chicken, grilled steak, pan-seared salmon, baked tofu, or simple scrambled eggs
- Grains: Quinoa, farro, wild rice, or crusty bread to soak up any juices
- Salads: A simple green salad with lemon vinaigrette or a kale Caesar
- Dips: Garlic aioli, ranch dressing, honey mustard, or a simple yogurt sauce with lemon and herbs
Storage instructions: If you have leftovers (which is rare in my house), store them in an airtight container in the refrigerator for up to 3 days. I’ve found they lose some crispiness after refrigeration, but they’re still delicious. Don’t leave them at room temperature for more than 2 hours—they’re a vegetable and should be treated like any other cooked vegetable.
Reheating methods: The best way to reheat these is in the oven or air fryer. For the oven, spread them on a baking sheet and warm at 375°F for 5 to 7 minutes. For the air fryer, reheat at 350°F for 3 to 4 minutes. The microwave works in a pinch, but the rings will be soft and lose their crispy texture. I’ve tried it—it’s not great.
How flavors develop over time: These rings are best fresh, but I’ve noticed that the flavors actually deepen and meld together after a day in the fridge. The sweetness becomes more pronounced and the seasonings mellow out. If you’re meal prepping, you can roast the rings ahead of time and reheat them as needed throughout the week. They’re a great addition to grain bowls or salads for lunch.
Freezing instructions: I don’t recommend freezing these rings. The texture changes significantly after thawing—they become watery and lose their crispiness completely. If you need to prep ahead, slice the raw squash into rings and store them in an airtight container in the refrigerator for up to 3 days. Then toss with oil and seasonings right before roasting.
Nutritional Information & Benefits
Here’s the estimated nutritional breakdown for one serving (about 6 rings, which is ¼ of the recipe):
| Nutrient | Amount per Serving |
|---|---|
| Calories | 120 |
| Total Fat | 7g |
| Saturated Fat | 1g |
| Carbohydrates | 15g |
| Fiber | 3g |
| Sugar | 6g (natural) |
| Protein | 2g |
| Sodium | 580mg (varies with salt) |
| Vitamin A | 120% of Daily Value |
| Vitamin C | 20% of Daily Value |
| Potassium | 400mg |
Health benefits of key ingredients: Delicata squash is packed with vitamin A (from beta-carotene), which supports eye health and immune function. It’s also a good source of vitamin C, potassium, and fiber. The fiber helps keep you full and supports digestive health. The olive oil provides healthy monounsaturated fats, which are good for heart health. Together, these ingredients make a side dish that’s as nutritious as it is delicious.
Dietary considerations: This recipe is naturally gluten-free, dairy-free (without the Parmesan variation), and vegan. It’s also Whole30-friendly and paleo-friendly as written. If you’re watching your sodium, reduce the salt to ½ teaspoon and add extra herbs and spices for flavor. The rings are relatively low in calories and carbohydrates compared to other side dishes like roasted potatoes or rice.
Potential allergens: This recipe is free from the top eight allergens (milk, eggs, fish, shellfish, tree nuts, peanuts, wheat, and soy) when made as written. If you add the Parmesan variation, it contains dairy. Always check your specific ingredients if you’re cooking for someone with allergies.
My personal wellness perspective: I love that this recipe lets me feed my family a vegetable that’s actually good for them without any complaining. It’s a win-win: they get something crispy and satisfying, and I get to feel good about what’s on their plates. For me, that’s what healthy eating is really about—finding foods that nourish both body and spirit without feeling like a sacrifice.
Conclusion
These crispy roasted delicata squash rings have become a staple in my kitchen for good reason. They’re fast, affordable, and somehow manage to please everyone at the table—from the pickiest preschooler to the most skeptical adult. The recipe is forgiving enough for a busy weeknight but impressive enough for a holiday spread. And honestly, anything that gets my kids to eat squash without a fight is a winner in my book.
I hope you’ll try them and make them your own. Maybe you’ll love the simple salted version as much as I do, or maybe you’ll discover a new favorite variation that I haven’t even thought of yet. That’s the beauty of a simple recipe like this—it’s a starting point, not a finish line. Add your favorite spices, serve them with your family’s favorite dip, or pile them on top of a grain bowl for lunch. However you make them, I think you’ll find yourself coming back to this recipe again and again.
If you give these a try, I’d love to hear how they turned out. Drop a comment below and let me know which variation your family loved most, or share a photo of your crispy rings on social media. And if you’ve got a picky eater who surprised you, tell me about that too—those stories are my favorite kind. Happy cooking, and here’s to finding new ways to make vegetables the star of the table!
Frequently Asked Questions
Can I use other types of squash for this recipe?
Yes, but the results will vary. Acorn squash works if you slice it into thin wedges instead of rings. Butternut squash needs to be peeled first, which adds extra work. I’ve also tried this with delicata’s close cousin, sweet dumpling squash, and it worked beautifully. The key is using a squash with thin, edible skin so you don’t have to peel it.
Why are my roasted squash rings soggy instead of crispy?
The most common culprit is overcrowding the baking sheet. If the rings are touching each other, they steam instead of roast. Make sure they’re in a single layer with space between each ring. Another possible issue is that your oven temperature is too low—stick with 425°F for the best results. Finally, make sure you’re not using too much oil. Two tablespoons is plenty for one medium squash.
Can I make these ahead of time for a party?
You can slice the squash into rings up to 3 days ahead and store them in an airtight container in the refrigerator. Toss them with oil and seasonings right before roasting for the best texture. If you need to roast them in advance, reheat them in a 375°F oven for 5 to 7 minutes to restore some crispiness. They won’t be quite as good as fresh, but they’ll still be delicious.
How do I keep the leftovers crispy?
The best way to store leftovers is in an airtight container in the refrigerator for up to 3 days. To reheat, use the oven or air fryer rather than the microwave. Spread them on a baking sheet and warm at 375°F for 5 to 7 minutes, or air fry at 350°F for 3 to 4 minutes. The microwave will make them soft, so avoid it if crispiness matters to you.
Is the skin of delicata squash safe to eat?
Yes, absolutely! The skin of delicata squash is thin, tender, and completely edible when cooked. In fact, leaving the skin on is one of the best things about this recipe—it saves you the hassle of peeling and adds a lovely texture contrast. Just make sure to wash the squash thoroughly before slicing to remove any dirt or residue.
Pin This Recipe!

Perfect Kid-Approved Crispy Roasted Delicata Squash Rings

Crispy roasted delicata squash rings that are quick, easy, and a crowd-pleaser. The edible skin and high heat create a satisfying crunch with a tender, sweet interior.
- Prep Time: 10 minutes
- Cook Time: 20 minutes
- Total Time: 30 minutes
- Yield: 4 servings 1x
- Category: Side Dish
- Cuisine: American
Ingredients
- 1 medium delicata squash (about 1 to 1.5 pounds)
- 2 tablespoons olive oil, plus more for the baking sheet
- 1 teaspoon fine sea salt
- ½ teaspoon freshly ground black pepper
- ½ teaspoon garlic powder (optional but recommended)
- ½ teaspoon paprika (optional)
Instructions
- Preheat your oven to 425°F (220°C). Line a baking sheet with parchment paper or a silicone mat.
- Wash the delicata squash thoroughly and pat dry.
- Trim both ends off the squash (about ¼ inch from each end).
- Slice the squash crosswise into ½-inch thick rings.
- Scoop out the seeds and stringy pulp from the center of each ring.
- Place the rings in a mixing bowl. Add 2 tablespoons olive oil, 1 teaspoon salt, ½ teaspoon pepper, and optional garlic powder and paprika. Toss with your hands until evenly coated.
- Arrange the rings in a single layer on the prepared baking sheet, leaving space between each ring.
- Roast for 10 minutes. Do not open the oven door.
- Remove the baking sheet from the oven and flip each ring using tongs.
- Return to the oven and roast for another 8 to 10 minutes, until golden brown and crispy on both sides.
- Let the rings rest on the baking sheet for 2 minutes.
- Serve immediately.
Notes
For best results, slice rings exactly ½ inch thick. Do not overcrowd the baking sheet. High heat (425°F) is essential for crispiness. Let rings rest on the hot baking sheet for 2 minutes after roasting to maintain texture. Season generously with salt to balance the squash’s natural sweetness.
Nutrition
- Serving Size: 6 rings (¼ of recipe
- Calories: 120
- Sugar: 6
- Sodium: 580
- Fat: 7
- Saturated Fat: 1
- Carbohydrates: 15
- Fiber: 3
- Protein: 2
Keywords: delicata squash, roasted squash, crispy squash rings, kid-friendly, easy side dish, fall recipe, vegetarian, gluten-free



