Love this? Save it for later!
Share the inspiration with your friends
My sister had sworn off Halloween baking for years. A solid decade, at least. Said it was all sugar and food coloring and absolutely nothing worth the mess. Every October, she’d watch me get excited about spooky treats with this amused, slightly judgmental look — like I was a kid who hadn’t learned any better. Then last year, I made these lightened-up spider cookies just for myself on a random Tuesday afternoon. I left them cooling on the counter while I ran to pick up my son from school, and when I got back, there she was. Standing in my kitchen, mid-bite, chocolate legs dangling from her fingers. She didn’t even try to hide it.
“Okay,” she said, crumbs falling everywhere. “These are actually good.”
That’s the thing about this recipe, honestly. It doesn’t scream “healthy” or try to convince you it’s something it’s not. It’s just a really good chocolate cookie that happens to be lighter than the usual version, with these cute little chocolate legs that make everyone smile. My sister has since made them for her office party, her book club, and two separate Halloween get-togethers. She still won’t admit she was wrong about Halloween baking, but the proof is in the cookie jar, you know?
These spider cookies have become my go-to for fall gatherings, classroom parties, and honestly, random weeknights when I want something sweet without the heavy feeling that comes after. They’re the kind of recipe that makes you forget you’re eating something lighter — you’re just enjoying a good cookie with a fun twist. And maybe you’ve been in that same spot, wanting to join the festive baking fun but not wanting to undo all your good habits. I get it completely.
Why You’ll Love This Recipe
Let me tell you why these spider cookies have earned a permanent spot in my fall rotation. I’ve tested this recipe more times than I can count, tweaking and adjusting until every single element worked perfectly together.
- Quick & Easy: From start to finish, you’re looking at about 30 minutes. Perfect for last-minute Halloween treats or when the kids suddenly announce they need something for the school party tomorrow morning. Trust me, I’ve been there.
- Simple Ingredients: Nothing weird or hard to find here. You probably have most of these in your pantry right now. No specialty flours or obscure sweeteners — just real, straightforward ingredients that work.
- Perfect for Halloween: These are the life of any spooky gathering. Kids love the chocolate legs, adults appreciate the lighter approach, and everyone gets a kick out of how cute they look on the dessert table.
- Crowd-Pleaser: I’ve served these to everyone from picky toddlers to health-conscious friends, and they disappear every single time. The chocolate cookie base is rich and satisfying, and the legs add that extra fun factor.
- Unbelievably Delicious: Here’s the thing — these don’t taste “light.” They taste like real, honest chocolate cookies with a soft, cakey texture and just the right amount of sweetness. The cocoa powder does heavy lifting here, giving you that deep chocolate flavor without needing tons of butter or sugar.
What makes this version different from other spider cookies you might have seen? It’s the balance. I spent weeks figuring out how to cut the fat and sugar without losing the texture or flavor that makes a chocolate cookie worth eating. The secret is in using a combination of whole wheat pastry flour and a touch of applesauce — it keeps them tender and moist without being dense or dry. Plus, using dark cocoa powder gives you that rich, almost fudgy taste with less sugar needed.
This recipe isn’t just good for a lightened-up cookie — it’s good for any cookie. Period. It’s the kind that makes you close your eyes after the first bite, surprised and delighted that something this satisfying can also fit into your everyday eating habits.
What Ingredients You Will Need
This recipe uses simple, wholesome ingredients to deliver big chocolate flavor and that perfect soft cookie texture. Most of these are pantry staples, which makes these spider cookies perfect for spontaneous baking sessions.
- Whole wheat pastry flour, 1 ¼ cups (150g) — This is my secret weapon for lighter baking. It gives you the nutrition of whole wheat with a texture closer to all-purpose flour. Regular whole wheat flour works too, but the cookies will be slightly denser.
- Unsweetened cocoa powder, ½ cup (45g) — I prefer dark cocoa powder here for that rich, intense chocolate flavor. It lets you use less sugar while still getting a deeply chocolatey cookie. Ghirardelli or Hershey’s Special Dark are my go-to brands.
- Baking soda, ½ teaspoon (3g) — Helps the cookies spread just enough and gives them a tender crumb.
- Salt, ¼ teaspoon (1.5g) — Don’t skip this! Salt enhances the chocolate flavor and balances the sweetness.
- Unsalted butter, 4 tablespoons (56g), softened — We’re using less butter than traditional recipes, so make sure it’s properly softened for the best texture.
- Granulated sugar, ½ cup (100g) — Just enough to sweeten without going overboard. You could reduce this to ⅓ cup if you prefer less sweet cookies.
- Large egg, 1 — Room temperature is best for even incorporation.
- Unsweetened applesauce, ¼ cup (60g) — This replaces some of the fat and keeps the cookies incredibly moist. Make sure it’s unsweetened so you control the sugar content.
- Vanilla extract, 1 teaspoon (5ml) — Pure vanilla makes a difference here. Skip the imitation stuff for this recipe.
- Mini chocolate chips, ⅓ cup (60g) — Optional but wonderful. They add little pockets of melted chocolate throughout the cookies.
- Chocolate wafer cookies, 24 (for the legs) — These are the “spider legs.” I use chocolate wafers like Famous Chocolate Wafers or even thin chocolate cookies. You’ll break each one in half to create 48 legs total.
- Candy eyes, 24 pairs — The classic spider look. You can find these at craft stores or online. If you can’t find them, use tiny white chocolate chips with a dot of melted dark chocolate for the pupil.
- Melted dark chocolate, ¼ cup (60g) — For attaching the legs and eyes. Use good quality chocolate chips or a chocolate bar chopped fine.
Ingredient Tips: For the best results, use room temperature ingredients — it makes a real difference in how the dough comes together. If you don’t have whole wheat pastry flour, you can substitute with ¾ cup all-purpose flour plus ½ cup whole wheat flour. The texture will be slightly different but still delicious. For a gluten-free version, use a good 1:1 gluten-free baking flour blend.
Equipment Needed
You don’t need anything fancy to make these spider cookies. Here’s what you’ll need:
- Mixing bowls — One medium, one large. I use glass or stainless steel.
- Electric hand mixer or stand mixer — A hand mixer works perfectly. You could mix by hand if needed, but the butter and sugar cream better with some mechanical help.
- Baking sheets — Two standard baking sheets, preferably light-colored for even baking. Dark sheets can cause the bottoms to brown too quickly.
- Parchment paper or silicone baking mats — Parchment paper is my preference. It prevents sticking and makes cleanup a breeze.
- Cookie scoop or tablespoon — A 1.5-tablespoon cookie scoop gives you consistent cookies every time. If you don’t have one, use a regular tablespoon and shape them with your hands.
- Small offset spatula or butter knife — For spreading the melted chocolate to attach the legs and eyes.
- Wire cooling rack — Essential for cooling the cookies properly so they don’t get soggy on the bottom.
- Small microwave-safe bowl — For melting the chocolate. You can also use a double boiler if you prefer.
Budget-Friendly Tips: If you don’t have a cookie scoop, two spoons work fine. No offset spatula? A butter knife does the job. I’ve made these in a tiny apartment kitchen with minimal equipment, and they turned out great. Don’t let missing tools stop you.
Preparation Method
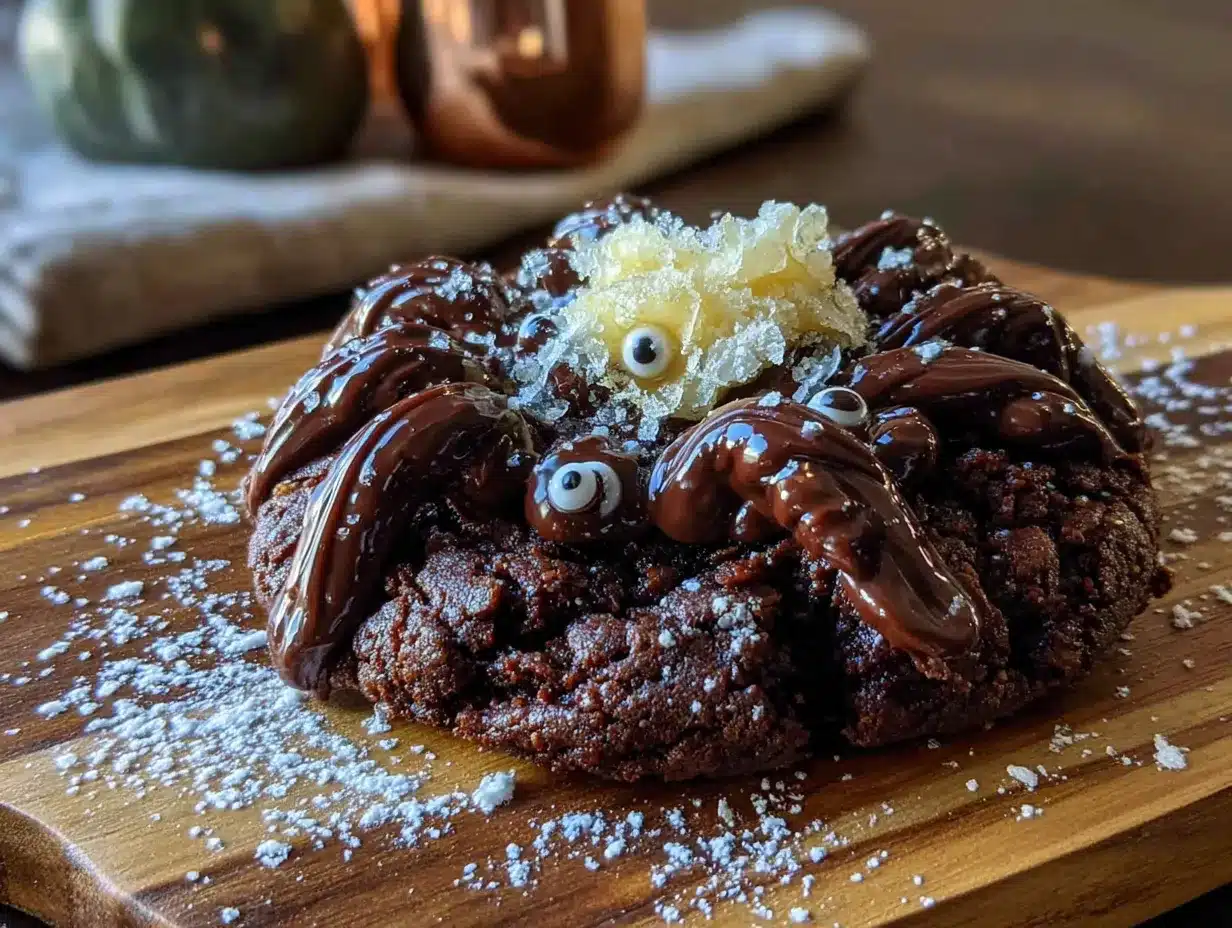
Let’s walk through this step by step. I’ve made these spider cookies so many times that I’ve worked out all the little details that make the process smooth and the results perfect.
- Preheat your oven to 350°F (175°C). Line two baking sheets with parchment paper. This gives the cookies a non-stick surface and helps them bake evenly.
- Whisk the dry ingredients together. In a medium bowl, combine the whole wheat pastry flour, cocoa powder, baking soda, and salt. Whisk thoroughly until everything is evenly distributed. This takes about 30 seconds. Set aside.
- Cream the butter and sugar. In a large bowl, beat the softened butter and granulated sugar together with an electric mixer on medium speed until light and fluffy — about 2 to 3 minutes. You’ll see the mixture become paler in color and increase slightly in volume. Scrape down the sides of the bowl with a spatula halfway through.
- Add the wet ingredients. Beat in the egg, applesauce, and vanilla extract until everything is well combined. The mixture might look a little separated at this point — that’s totally normal. It will come together when you add the flour mixture.
- Mix in the dry ingredients. Gradually add the flour mixture to the wet ingredients, mixing on low speed or folding with a spatula. Mix just until you no longer see streaks of flour. Overmixing will make the cookies tough, so stop as soon as it comes together. If you’re using mini chocolate chips, fold them in now.
- Chill the dough. This step is important! Cover the bowl with plastic wrap and refrigerate for at least 20 minutes. Chilling prevents the cookies from spreading too much in the oven and gives you a thicker, softer cookie. I’ve skipped this step when I was in a hurry, and the cookies spread into flat, sad little discs. Learn from my mistake.
- Scoop and shape. Using a 1.5-tablespoon cookie scoop, portion the dough onto the prepared baking sheets, spacing them about 2 inches apart. You should get about 24 cookies. Gently press each dough ball down slightly with your palm to flatten it just a bit — this helps them bake evenly.
- Bake the cookies. Bake one sheet at a time for 8 to 10 minutes. The cookies should look set around the edges but still soft in the center. They will continue to set as they cool. For softer, fudgier cookies, bake for 8 minutes. For slightly firmer cookies, go to 10 minutes. I prefer 9 minutes — it’s the sweet spot.
- Cool completely. Let the cookies cool on the baking sheet for 5 minutes, then transfer them to a wire cooling rack. They need to be completely cool before you add the spider legs — warm cookies will melt the chocolate and make everything messy.
- Prepare the chocolate legs. While the cookies cool, take your chocolate wafer cookies and carefully break each one in half. You’ll need 48 half-cookies total — two for each spider. They break pretty easily, but go slowly to get clean breaks.
- Melt the chocolate. Place the dark chocolate in a small microwave-safe bowl. Microwave in 20-second intervals, stirring between each, until smooth and fully melted. Be careful not to overheat — chocolate can seize up quickly.
- Assemble the spiders. Working with one cookie at a time, use a small offset spatula or butter knife to spread a thin layer of melted chocolate on the back of the cookie where the legs will go. Press two chocolate wafer halves into the chocolate on each side — these are the spider legs. Then add a small dot of melted chocolate for each candy eye and press them into place. Hold gently for a few seconds until the chocolate sets enough to hold everything.
- Let the chocolate set. Place the assembled spider cookies on a parchment-lined tray and let them sit until the chocolate is fully set — about 15 to 20 minutes at room temperature, or 5 to 10 minutes in the refrigerator.
Sensory Cues: When you cream the butter and sugar, you’re looking for a mixture that looks like pale, fluffy sand. When you add the dry ingredients, the dough should be soft but not sticky — it should hold together when pressed but not feel wet. The baked cookies should smell deeply chocolatey and feel slightly firm on the edges but soft in the center when you gently touch them.
Cooking Tips & Techniques
After making these spider cookies more times than I can count, I’ve collected a few tricks that make a real difference.
Don’t skip the chilling step. I know it’s tempting to rush, especially when you’re excited about the cute spider legs. But warm dough spreads like crazy in the oven. I learned this the hard way when I made a batch for my son’s Halloween party and ended up with giant, flat cookies that looked more like blobs than spiders. Chilling for just 20 minutes makes the dough firm enough to hold its shape while still baking up soft and tender.
Watch your baking time closely. These cookies go from perfectly done to overbaked in about 60 seconds. Start checking at 8 minutes. The edges should look set and slightly darker, but the center should still look soft and a little underdone. They’ll continue cooking on the hot baking sheet after you pull them out. If you wait until the centers look fully set, you’ll end up with dry cookies.
Let cookies cool completely before decorating. I cannot stress this enough. Warm cookies + melted chocolate = a sticky, frustrating mess. I once tried to speed things up by decorating while the cookies were still slightly warm, and the chocolate just slid right off. Give them a full 30 minutes on the cooling rack. Use that time to break your wafer cookies and melt your chocolate.
Use a light touch with the chocolate. You don’t need a thick layer of melted chocolate to attach the legs. A thin, even coating is enough. Too much chocolate will drip down the sides and make the cookies look messy. Plus, it adds unnecessary calories — and we’re keeping these lightened up, remember?
Work in an assembly line. Once you start decorating, work through all the cookies in a systematic way. Spread chocolate on one cookie, add legs, then eyes, then move to the next. By the time you finish the last cookie, the first one should be set enough to handle. This keeps the process smooth and prevents the chocolate from hardening before you can use it.
Variations & Adaptations
One of the best things about these spider cookies is how easily they adapt to different tastes and dietary needs.
Gluten-Free Version: Substitute the whole wheat pastry flour with a good 1:1 gluten-free baking flour blend. I’ve had great results with King Arthur Measure for Measure and Bob’s Red Mill 1-to-1. Make sure your chocolate wafer cookies are also gluten-free — there are several brands available now. The texture will be slightly more delicate, but the flavor is just as good.
Vegan Spider Cookies: Replace the butter with coconut oil or vegan butter (I like Miyoko’s). Use a flax egg — 1 tablespoon ground flaxseed mixed with 3 tablespoons water, let sit for 5 minutes. The applesauce already helps with moisture, so the flax egg works beautifully here. Use dairy-free chocolate chips and vegan candy eyes or make your own with white chocolate alternatives.
Peanut Butter Spider Cookies: This is my personal favorite variation. Reduce the butter to 2 tablespoons and add 3 tablespoons of natural peanut butter. The peanut butter adds richness and a subtle savory note that pairs perfectly with the chocolate. You might need to add an extra tablespoon of applesauce if the dough seems too dry.
Spice It Up: Add ½ teaspoon of cinnamon and a pinch of cayenne pepper to the dry ingredients. The warmth of the cinnamon and the subtle heat from the cayenne make these spider cookies feel extra special for adult gatherings. It’s subtle enough that kids won’t notice but adds a lovely complexity.
Mint Chocolate Version: Add ½ teaspoon of peppermint extract along with the vanilla. Use dark chocolate for the legs and eyes instead of milk chocolate. The mint and chocolate combination is a classic for a reason, and it feels particularly festive for Halloween.
Serving & Storage Suggestions
These spider cookies are best served at room temperature, which is when the chocolate legs have the perfect snap and the cookie itself is soft and tender. Arrange them on a platter with the legs facing outward for maximum spooky effect — they really do look like little spiders crawling across the plate.
What to Serve With Them: A glass of cold milk is the classic pairing, but they’re also wonderful with hot apple cider or a warm mug of spiced tea. For adult gatherings, they pair surprisingly well with a dark stout beer or a rich red wine like Zinfandel. The chocolate notes complement each other beautifully.
Storage Instructions: Store the assembled spider cookies in an airtight container at room temperature for up to 5 days. Place them in a single layer with parchment paper between layers to prevent the legs from breaking. Do not refrigerate — the cookies will dry out and the chocolate may develop white bloom (which is harmless but doesn’t look great).
Freezer Instructions: You can freeze the undecorated cookies for up to 3 months. Place them in a freezer-safe container with parchment paper between layers. When you’re ready to serve, thaw them at room temperature for about 30 minutes, then add the chocolate legs and eyes. The cookies taste freshly baked this way. I often make a double batch of the cookie dough and freeze half for later.
Flavor Development: Here’s a little secret — these cookies actually taste better the day after baking. The flavors meld together, and the texture becomes even softer and more fudge-like. If you have the patience, make them a day ahead and let them rest in an airtight container before decorating. The chocolate legs should be added the day you plan to serve them for the best presentation.
Nutritional Information & Benefits
Each spider cookie (with legs and eyes) contains approximately 110 calories, 5g fat, 16g carbohydrates, 2g protein, and 8g sugar. These values will vary slightly based on your specific ingredients and portion sizes.
Health Highlights: Using whole wheat pastry flour adds fiber and nutrients compared to all-purpose flour. The applesauce replaces some of the butter, reducing saturated fat while keeping the cookies incredibly moist. Dark cocoa powder is rich in antioxidants called flavonoids, which have been linked to heart health benefits. Plus, portion control is built right in — each cookie is a perfect single serving, making it easier to enjoy a treat without overindulging.
Dietary Considerations: This recipe is vegetarian. For gluten-free, vegan, or nut-free versions, see the variations section above. The cookies contain dairy (butter) and eggs, so they’re not suitable for those with related allergies unless modified.
I love that these spider cookies let me participate in all the Halloween fun without derailing my healthy eating habits. They satisfy that chocolate craving completely, and I never feel heavy or sluggish after eating one. It’s a small win, but it matters.
Conclusion
These lightened-up spider cookies have become more than just a Halloween treat in my house — they’re a reminder that you don’t have to choose between eating well and having fun. You can have both, and it can be delicious.
What I love most about this recipe is how it brings people together. My sister, who swore off Halloween baking for years, now makes these every October without fail. My son’s classroom teachers request them for every party. Even my husband, who claims he can’t tell the difference between “healthy” and regular cookies (and he’s a tough critic), reaches for these first.
I encourage you to make these your own. Maybe you’ll add a pinch of cinnamon, swap the chocolate wafers for pretzel sticks, or use white chocolate for the eyes. The base recipe is forgiving and adaptable, so play around with it. That’s the joy of baking — making something that’s uniquely yours.
I’d love to hear how your spider cookies turn out! Drop a comment below and let me know if you tried any variations, or share a photo of your spooky creations. Happy Halloween baking, friends. You’ve got this.
Frequently Asked Questions
Can I use all-purpose flour instead of whole wheat pastry flour?
Absolutely. Substitute with 1 cup all-purpose flour plus ¼ cup whole wheat flour for the closest texture. If you only have all-purpose, use 1 ¼ cups total — the cookies will be slightly less tender but still delicious.
Why did my cookies spread too much?
This usually happens for one of three reasons: the dough wasn’t chilled long enough, the butter was too soft, or the baking sheet was still warm from a previous batch. Make sure to chill the dough for at least 20 minutes and let your baking sheets cool completely between batches.
Can I make the dough ahead of time?
Yes! The cookie dough can be refrigerated for up to 3 days or frozen for up to 3 months. If freezing, portion the dough into balls first, freeze on a baking sheet, then transfer to a freezer bag. Bake directly from frozen, adding 1 to 2 minutes to the baking time.
What can I use instead of candy eyes?
If you can’t find candy eyes, use small white chocolate chips with a tiny dot of melted dark chocolate for the pupil. You can also use black gel icing to draw simple eyes directly onto the cookies. Both options work great and look adorable.
How do I keep the spider legs from falling off?
Make sure the cookies are completely cool before decorating, and use enough melted chocolate to create a good bond. Let the chocolate set fully — about 15 to 20 minutes at room temperature — before moving the cookies. For extra security, you can refrigerate them for 5 minutes after decorating.
Pin This Recipe!

Lightened-Up Spider Cookies with Easy Chocolate Legs

These lightened-up spider cookies are rich, chocolatey, and fun to make for Halloween. With a soft, cakey texture and cute chocolate legs, they’re a crowd-pleaser that doesn’t taste like a ‘healthy’ treat.
- Prep Time: 20 minutes
- Cook Time: 9 minutes
- Total Time: 30 minutes
- Yield: 24 cookies 1x
- Category: Dessert
- Cuisine: American
Ingredients
- 1 ¼ cups (150g) whole wheat pastry flour
- ½ cup (45g) unsweetened cocoa powder (preferably dark)
- ½ teaspoon (3g) baking soda
- ¼ teaspoon (1.5g) salt
- 4 tablespoons (56g) unsalted butter, softened
- ½ cup (100g) granulated sugar
- 1 large egg, room temperature
- ¼ cup (60g) unsweetened applesauce
- 1 teaspoon (5ml) vanilla extract
- ⅓ cup (60g) mini chocolate chips (optional)
- 24 chocolate wafer cookies (for legs, broken in half to make 48)
- 24 pairs candy eyes
- ¼ cup (60g) melted dark chocolate (for attaching legs and eyes)
Instructions
- Preheat your oven to 350°F (175°C). Line two baking sheets with parchment paper.
- In a medium bowl, whisk together the whole wheat pastry flour, cocoa powder, baking soda, and salt until evenly distributed. Set aside.
- In a large bowl, beat the softened butter and granulated sugar with an electric mixer on medium speed until light and fluffy, about 2 to 3 minutes. Scrape down the sides of the bowl halfway through.
- Beat in the egg, applesauce, and vanilla extract until well combined. The mixture may look slightly separated; this is normal.
- Gradually add the dry ingredients to the wet ingredients, mixing on low speed or folding with a spatula until just combined. Do not overmix. If using mini chocolate chips, fold them in now.
- Cover the bowl with plastic wrap and refrigerate the dough for at least 20 minutes. This prevents excessive spreading.
- Using a 1.5-tablespoon cookie scoop, portion the dough onto the prepared baking sheets, spacing them about 2 inches apart. You should get about 24 cookies. Gently press each dough ball down slightly with your palm.
- Bake one sheet at a time for 8 to 10 minutes. The cookies should look set around the edges but still soft in the center. For softer cookies, bake for 8 minutes; for firmer, 10 minutes.
- Let the cookies cool on the baking sheet for 5 minutes, then transfer to a wire cooling rack. Cool completely before decorating.
- While the cookies cool, carefully break each chocolate wafer cookie in half to create 48 legs.
- Melt the dark chocolate in a small microwave-safe bowl in 20-second intervals, stirring between each, until smooth.
- Working with one cookie at a time, spread a thin layer of melted chocolate on the back of the cookie where the legs will go. Press two chocolate wafer halves into the chocolate on each side. Add a small dot of melted chocolate for each candy eye and press into place. Hold gently for a few seconds until set.
- Place the assembled spider cookies on a parchment-lined tray and let the chocolate set for 15 to 20 minutes at room temperature, or 5 to 10 minutes in the refrigerator.
Notes
Chill the dough for at least 20 minutes to prevent spreading. Let cookies cool completely before decorating to avoid melting the chocolate. For best results, use room temperature ingredients. Cookies taste even better the day after baking. Store in an airtight container at room temperature for up to 5 days. Freeze undecorated cookies for up to 3 months.
Nutrition
- Serving Size: 1 cookie
- Calories: 110
- Sugar: 8
- Sodium: 85
- Fat: 5
- Saturated Fat: 2.5
- Carbohydrates: 16
- Fiber: 2
- Protein: 2
Keywords: spider cookies, Halloween cookies, lightened-up cookies, chocolate cookies, healthy Halloween treats, whole wheat cookies, spider cookies with chocolate legs



