Love this? Save it for later!
Share the inspiration with your friends
My neighbor knocked on my door at 8 PM on a Tuesday holding a half-empty can of pumpkin puree. “I bought this for a pie and now I have three tablespoons left,” she said, looking desperate. “Please take it before I make another batch of those cookies I shouldn’t eat.”
Honestly, I almost said no. It was late, I was tired, and my kitchen counters were covered in mail and a sad-looking basil plant. But something about that random Tuesday night felt like the perfect time to experiment. I had flour, butter, and a sudden craving for something warm with my tea. So I took the pumpkin, promised her scones in return, and closed the door feeling slightly panicked because I’d never made pumpkin scones before.
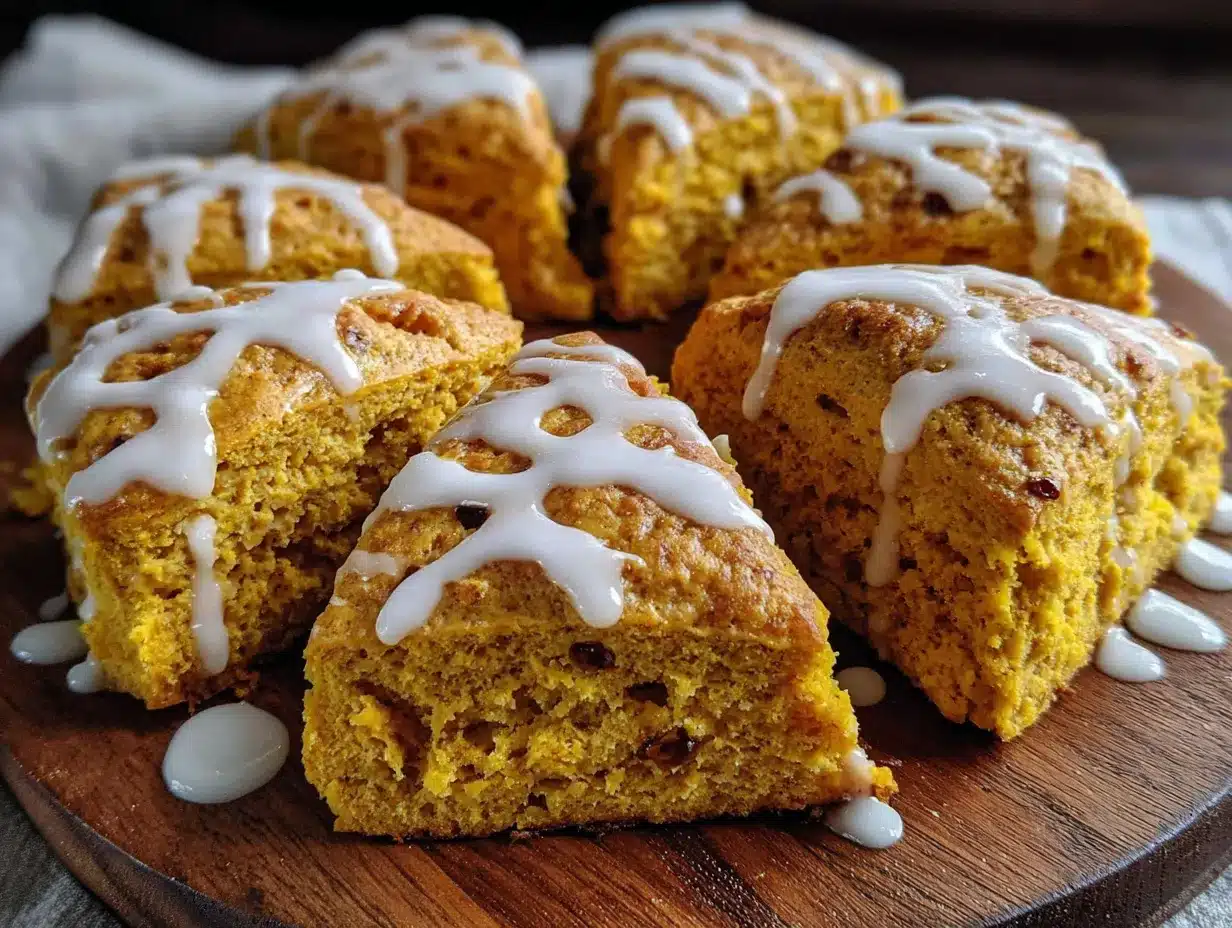
Three failed attempts later (too dry, too flat, too sweet), I finally cracked the code. These perfect small-batch pumpkin scones with vanilla glaze are what came out of that chaotic evening. They’re not the towering bakery-style scones you might be imagining. They’re humble, slightly rustic, and absolutely drenched in a simple vanilla glaze that seeps into every crack and cranny.
Maybe you’ve been there too—staring at leftover pumpkin puree wondering what to do that isn’t another loaf of pumpkin bread. These scones are the answer. They come together in under 30 minutes, use ingredients you probably already have, and make exactly six scones. No leftovers to tempt you, no massive batch that goes stale before you finish it. Just six perfect little triangles of fall flavor.
I’ve been making these every week since that Tuesday night, and I honestly don’t see myself stopping anytime soon. They’ve become my little ritual—a way to slow down and enjoy the season without committing to a full day of baking.
Why You’ll Love This Recipe
Let me tell you why these scones have earned a permanent spot in my weekly rotation. I’ve tested this recipe at least a dozen times, tweaking the flour ratio, adjusting the butter temperature, and even experimenting with different pumpkin brands. What I landed on is genuinely foolproof.
- Small Batch Perfection : This recipe makes exactly six scones. No more staring at a dozen scones going stale on your counter. It’s the perfect amount for two people to enjoy over a few days, or for one person to eat in a very indulgent weekend.
- Quick & Easy : From start to finish, you’re looking at about 25 minutes. Mix the dough, shape it, bake it, glaze it. That’s it. No chilling required (though it helps if you have the time).
- Simple Ingredients : You probably have everything in your kitchen right now. Flour, butter, sugar, pumpkin puree, and basic spices. No trips to specialty stores or hunting down obscure ingredients.
- Perfect for Fall Mornings : These scones pair beautifully with coffee, tea, or a glass of cold milk. They’re cozy without being heavy, sweet without being cloying.
- Unbelievably Tender : The secret is in how you handle the butter. I’ll show you exactly what to do so your scones turn out flaky and soft, not tough and dense.
The first time I made these, I honestly didn’t expect much. Pumpkin scones have always felt like a bakery item—something you buy, not something you make at home. But after that first bite, with the glaze still warm and the scone practically melting in my mouth, I knew I had something special. The texture is what gets me every time. The outside has this slight crispness, but the inside is tender and almost creamy from the pumpkin. And that vanilla glaze? It’s not optional. It’s the part that makes these scones feel like a treat rather than just a breakfast item.
These scones are different from the dry, crumbly ones you might have tried before. The pumpkin keeps them moist without making them heavy, and the cold butter creates those little pockets of flakiness that make scones so satisfying. Plus, they come together so quickly that you can make them on a weekday morning without feeling rushed.
What Ingredients You Will Need
This recipe uses simple, everyday ingredients to create something that tastes anything but ordinary. The magic happens when these basic staples come together with the right technique.
For the Scones
- All-purpose flour , 1 ½ cups (180g) – Spoon and level it into your measuring cup. Don’t scoop directly from the bag or you’ll end up with dense scones.
- Granulated sugar , 3 tablespoons (36g) – Just enough to sweeten without overwhelming the pumpkin flavor.
- Baking powder , 2 teaspoons – Make sure it’s fresh. Old baking powder is the number one reason scones don’t rise properly.
- Pumpkin pie spice , 1 teaspoon – I use store-bought for convenience, but you can make your own with cinnamon, nutmeg, ginger, and cloves.
- Ground cinnamon , ½ teaspoon – For that extra warmth.
- Salt , ¼ teaspoon – Don’t skip this. It balances the sweetness and enhances the pumpkin flavor.
- Cold unsalted butter , 4 tablespoons (56g), cut into small cubes – This is crucial. The butter needs to be straight from the fridge. I like using Kerrygold for its richness, but any good quality butter works.
- Pumpkin puree , ¼ cup (60g) – Not pumpkin pie filling. Make sure you’re getting 100% pure pumpkin. Libby’s is my go-to brand because it’s consistently thick and not watery.
- Heavy cream , 3 tablespoons (45ml) – Plus a little extra for brushing the tops. The cream adds richness and helps create that golden crust.
- Vanilla extract , 1 teaspoon – Pure vanilla extract makes a difference here. The imitation stuff has a chemical aftertaste that you’ll notice in such a simple recipe.
For the Vanilla Glaze
- Powdered sugar , ¾ cup (90g) – Sift it if it’s lumpy. Nobody wants lumpy glaze.
- Heavy cream , 2 to 3 tablespoons (30-45ml) – Start with less and add more until you reach the right consistency.
- Vanilla extract , ½ teaspoon – This is where the vanilla flavor really shines.
- Pinch of salt – It sounds weird, but trust me. A tiny pinch of salt makes the glaze taste more vanilla-y.
One thing I’ve learned from making these scones over and over is that ingredient temperature matters more than you might think. The butter should be cold, the cream should be cold, and even the pumpkin puree benefits from being chilled. I actually pop my pumpkin in the fridge for about 15 minutes before I start. It helps the dough stay cold, which means flakier scones.
If you don’t have heavy cream, you can substitute whole milk. The scones won’t be quite as rich, but they’ll still be delicious. For the glaze, though, I really recommend sticking with cream. It gives the glaze a silky texture that milk just can’t replicate.
Equipment Needed
You don’t need fancy equipment to make these scones. Here’s what I use and what you can substitute if you don’t have the exact tool.
- Mixing bowls – One large bowl for the dry ingredients, one small bowl for the wet ingredients. I use ceramic bowls because they don’t conduct heat, but glass or metal work fine too.
- Pastry cutter or two forks – A pastry cutter is ideal for cutting butter into flour, but two forks work in a pinch. You can even use your fingertips if you work quickly so the butter doesn’t warm up.
- Baking sheet – A light-colored baking sheet works best. Dark sheets can cause the bottoms to brown too quickly. I line mine with parchment paper for easy cleanup.
- Bench scraper or sharp knife – For cutting the dough into triangles. A bench scraper is my favorite tool for this because it cuts cleanly without squishing the dough.
- Pastry brush – For brushing cream on top of the scones before baking. If you don’t have one, you can use a paper towel or even your finger.
- Whisk – For making the glaze. A small whisk works perfectly, but a fork will do the job.
- Cooling rack – Essential for letting the scones cool properly. If you leave them on the hot baking sheet, they’ll continue cooking and might dry out.
I’ll be honest, I used to make scones without a pastry cutter, using two butter knives to cut the butter into the flour. It takes a little longer, but it works. The key is to work quickly so the butter stays cold. If your hands are warm (like mine always are), run them under cold water before handling the dough.
Preparation Method
Let me walk you through this step by step. I’ve included all the little details I wish someone had told me when I first started making scones.
- Preheat your oven to 400°F (200°C) and line a baking sheet with parchment paper. Getting the oven hot before you start mixing is important. The scones need that initial blast of heat to rise properly.
- Mix the dry ingredients : In a large bowl, whisk together the flour, sugar, baking powder, pumpkin pie spice, cinnamon, and salt. Make sure the baking powder is evenly distributed. I usually whisk for about 15 seconds to make sure everything is combined.
- Cut in the butter : Add the cold butter cubes to the flour mixture. Using a pastry cutter or two forks, cut the butter into the flour until the mixture resembles coarse meal with some pea-sized butter pieces remaining. This should take about 2 minutes. Don’t overdo it—those little butter pieces are what create flaky layers. I like to freeze my butter for 10 minutes before grating it into the flour. It’s a game-changer for flakiness.
- Combine the wet ingredients : In a small bowl, whisk together the pumpkin puree, heavy cream, and vanilla extract until smooth. The mixture should be a uniform orange color with no streaks of cream.
- Bring the dough together : Pour the wet ingredients into the dry ingredients. Stir with a fork until the dough just comes together. It will look shaggy and there might be some dry bits at the bottom of the bowl. That’s exactly what you want. If it looks too dry, add a teaspoon more cream. If it looks wet, add a tablespoon of flour.
- Shape the dough : Turn the dough out onto a lightly floured surface. Gently bring it together with your hands, handling it as little as possible. Pat it into a 6-inch circle that’s about ¾ inch thick. Don’t use a rolling pin—your hands give you better control and prevent overworking the dough.
- Cut the scones : Using a sharp knife or bench scraper, cut the circle into 6 wedges like you’re cutting a pizza. Dip your cutter in flour between cuts to prevent sticking. Try to cut straight down without dragging the knife through the dough. Dragging seals the edges and prevents the scones from rising properly.
- Arrange on baking sheet : Place the scones on the prepared baking sheet, spacing them about 2 inches apart. They won’t spread much, but giving them room helps with even browning.
- Brush with cream : Brush the tops of the scones with a little heavy cream. This helps them develop that beautiful golden crust. Don’t let the cream drip down the sides—it can prevent the scones from rising evenly.
- Bake : Bake for 12 to 15 minutes, until the scones are golden brown on the bottom and lightly golden on top. The tops should feel firm to the touch. I always check at the 12-minute mark because ovens vary so much.
- Cool : Transfer the scones to a cooling rack and let them cool for about 10 minutes before glazing. If you glaze them while they’re too hot, the glaze will melt right off. If you wait too long, the glaze won’t stick as well.
- Make the glaze : While the scones are cooling, whisk together the powdered sugar, 2 tablespoons of heavy cream, vanilla extract, and salt. Add more cream 1 teaspoon at a time until the glaze is thick but pourable. It should coat the back of a spoon and slowly drip off.
- Glaze the scones : Drizzle the glaze over the warm scones using a spoon or a small whisk. Let it cascade naturally over the tops and down the sides. Don’t try to make it perfect—the imperfections are what make them look homemade and inviting.
- Let the glaze set : Allow the glaze to set for about 5 minutes before serving. This gives it time to form a thin, crackly shell that contrasts beautifully with the tender scone underneath.
The first time I made these, I was so impatient that I ate one while it was still hot, and the glaze just dripped everywhere. It was a mess, but honestly, it was also delicious. So if you can’t wait, I completely understand. Just have a napkin ready.
Cooking Tips & Techniques
I’ve made plenty of mistakes with scones so you don’t have to. Here are the things I’ve learned the hard way.
The butter must be cold. I cannot stress this enough. Warm butter will be absorbed into the flour instead of creating those flaky layers. If your kitchen is warm, pop the butter in the freezer for 15 minutes before you start. I’ve even frozen the entire bowl of flour and butter mixture for 10 minutes before adding the wet ingredients on particularly hot days.
Don’t overmix the dough. This is the most common mistake people make with scones. Mix until the dough just comes together, then stop. Overmixing develops gluten, which makes scones tough and dense instead of tender and flaky. The dough should look a little rough and shaggy. That’s a good sign.
Handle the dough gently. When you’re shaping the dough, use your fingertips rather than the palms of your hands. Your palms are warmer and can melt the butter. Work quickly and confidently. The less you handle the dough, the better your scones will be.
Use a sharp cutter. When cutting the scones, press straight down without twisting. Twisting seals the edges and prevents the scones from rising evenly. I learned this after making a batch of lopsided scones that looked like they’d been through a fight.
Chill the shaped scones. If you have time, pop the shaped scones in the freezer for 10 minutes before baking. This firms up the butter even more, which leads to taller, flakier scones. I do this whenever I’m not in a rush, and the difference is noticeable.
Watch the bake time carefully. Scones go from perfectly golden to overbaked very quickly. Start checking at the 12-minute mark. The bottoms should be golden brown, and the tops should look dry and lightly colored. If you’re unsure, it’s better to underbake slightly than overbake. Underbaked scones can go back in the oven, but overbaked ones are dry forever.
One time I got distracted by a phone call and left the scones in for 17 minutes. They came out looking fine on top, but the bottoms were almost burnt, and the scones were dry and crumbly. I was so disappointed. Now I set a timer and actually pay attention to it.
Variations & Adaptations
One of the best things about this recipe is how easily it adapts to different tastes and dietary needs. Here are some variations I’ve tried and loved.
Gluten-Free Version : Substitute the all-purpose flour with a 1:1 gluten-free baking flour blend. I’ve had good results with King Arthur’s Measure for Measure flour. The texture will be slightly more tender and less flaky, but the flavor is still wonderful. Add an extra tablespoon of cream since gluten-free flours tend to absorb more liquid.
Dairy-Free Version : Use cold vegan butter (I like Miyoko’s) and substitute the heavy cream with full-fat coconut cream or a barista-style oat milk. The scones won’t be quite as rich, but they’re still delicious. For the glaze, use coconut cream and a dairy-free milk alternative.
Spiced Apple Variation : Replace the pumpkin puree with unsweetened applesauce and add ½ teaspoon more cinnamon. Fold in ¼ cup of finely diced apple (peeled) before shaping the dough. The apple adds little pockets of soft fruit that are lovely.
Chocolate Chip Pumpkin Scones : Fold in ⅓ cup of mini chocolate chips after combining the wet and dry ingredients. The chocolate pairs surprisingly well with the pumpkin and spices. Use dark chocolate chips for a less sweet option.
Savory Pumpkin Scones : Reduce the sugar to 1 tablespoon, omit the pumpkin pie spice and cinnamon, and add ½ teaspoon of black pepper, ½ teaspoon of garlic powder, and ¼ cup of shredded sharp cheddar cheese. These are incredible with soup or chili.
Maple Glaze Variation : Replace the vanilla extract in the glaze with ¼ teaspoon of maple extract, or use 2 tablespoons of real maple syrup and reduce the cream by 1 tablespoon. The maple flavor is a natural partner for pumpkin.
I tried the chocolate chip version when I was craving something sweet but didn’t want to make a whole batch of cookies. Honestly, it might be my favorite variation now. The chocolate gets all melty and combines with the pumpkin spice in a way that feels like a warm hug.
Serving & Storage Suggestions
These scones are best enjoyed the day they’re made, but they still hold up well for a day or two if stored properly.
Serving Suggestions : Serve the scones warm or at room temperature. If you want to reheat them, pop them in a 300°F oven for 5 minutes. The microwave will make them rubbery, so avoid that if you can. They’re wonderful with a pat of butter melting into the warm scone, or with a dollop of clotted cream if you’re feeling fancy.
Perfect Pairings : These scones were made for a cup of hot coffee or chai tea. The spices in the scones complement the warmth of the chai beautifully. For a cozy afternoon treat, serve them with a mug of spiced apple cider. In the morning, they’re lovely with a glass of cold milk or a latte.
Breakfast Spread : Arrange the scones on a platter with fresh fruit, yogurt, and maybe some scrambled eggs for a complete breakfast. They’re also perfect for brunch alongside a frittata or quiche.
Storage Instructions : Store leftover scones in an airtight container at room temperature for up to 2 days. If you glaze them, let the glaze set completely before storing, or place a piece of parchment paper between layers to prevent sticking. Do not refrigerate them—the fridge dries out baked goods faster than anything.
Freezing Instructions : You can freeze the unbaked scones for up to 3 months. Shape them, place them on a baking sheet, and freeze until solid. Then transfer to a freezer bag. When you’re ready to bake, place them on a lined baking sheet and bake straight from frozen, adding 2 to 3 minutes to the baking time. You can also freeze baked, unglazed scones for up to 1 month. Thaw at room temperature and reheat in the oven before glazing.
Flavor Development : These scones are actually pretty good the next day. The flavors have a chance to meld together, and the texture softens slightly. If you’re planning to serve them the next day, I recommend glazing them right before serving so the glaze stays fresh and crackly.
Nutritional Information & Benefits
Here’s a rough estimate of the nutritional content per scone (based on 6 scones with glaze):
| Nutrient | Amount per Scone |
|---|---|
| Calories | 290 |
| Total Fat | 12g |
| Saturated Fat | 7g |
| Cholesterol | 35mg |
| Sodium | 210mg |
| Total Carbohydrates | 42g |
| Dietary Fiber | 1g |
| Sugars | 22g |
| Protein | 3g |
These numbers are estimates and will vary based on the specific ingredients you use. The pumpkin in these scones is a good source of vitamin A and fiber, which is more than most breakfast pastries can claim. The butter and cream provide some calcium and vitamin D, though let’s be honest—these are a treat, not a health food.
If you’re watching your sugar intake, you can reduce the sugar in the scones to 2 tablespoons and make a thinner glaze with less powdered sugar. The scones will be less sweet but still flavorful from the spices and pumpkin.
These scones are not gluten-free, dairy-free, or vegan in their standard form, but as I mentioned in the variations section, they adapt well to different dietary needs. The recipe contains gluten, dairy, and potentially traces of nuts depending on your vanilla extract source.
I personally love that these scones feel indulgent without being over-the-top. They satisfy my craving for something sweet and baked without sending me into a sugar coma. The pumpkin adds a little nutritional value, which makes me feel slightly better about eating one for breakfast.
Conclusion
These perfect small-batch pumpkin scones with vanilla glaze have become my little fall tradition. They’re the recipe I turn to when I want something cozy without spending hours in the kitchen. They’re forgiving enough for beginners but rewarding enough for experienced bakers. And honestly, they just make me happy.
I love that this recipe doesn’t require a trip to the store or a special occasion. It’s just six scones, made with love, that taste like autumn in every bite. The pumpkin keeps them moist, the spices warm you from the inside, and that vanilla glaze is the perfect finishing touch.
I hope you give these scones a try and make them your own. Maybe you’ll add chocolate chips like I sometimes do, or go savory with cheese and pepper. Maybe you’ll double the glaze because you’re like me and believe there’s no such thing as too much glaze. Whatever you do, I’d love to hear about it.
Leave a comment below and let me know how your scones turned out. Did you try a variation? Did you eat all six in one day? (No judgment here.) Share your experience and tag me in your photos. Happy baking, friends!
Frequently Asked Questions
Can I use pumpkin pie filling instead of pumpkin puree?
No, please don’t. Pumpkin pie filling is already sweetened and spiced, so it will throw off the balance of this recipe. You’ll end up with scones that are too sweet and have an odd texture. Stick with 100% pure pumpkin puree for the best results.
Why did my scones turn out dry?
Dry scones usually come from one of three issues: too much flour, overmixing the dough, or overbaking. Make sure you’re measuring your flour correctly (spoon and level, don’t scoop) and stop mixing as soon as the dough comes together. Also, check your scones at the 12-minute mark to avoid overbaking.
Can I make the dough ahead of time?
Absolutely. You can shape the scones, place them on a baking sheet, cover them with plastic wrap, and refrigerate them for up to 24 hours before baking. You might need to add a minute or two to the baking time since the dough will be cold. You can also freeze the shaped scones for up to 3 months.
How do I get my scones to rise higher?
Make sure your baking powder is fresh (test it by dropping a little in hot water—it should bubble vigorously). Keep your butter and cream very cold. Don’t twist when cutting the scones. And if you have time, chill the shaped scones for 10 to 15 minutes before baking. These small steps make a big difference.
Can I make these without a pastry cutter?
Yes! You can use two forks, a food processor (pulse the butter into the dry ingredients in short bursts), or even a box grater. If using a grater, freeze the butter first and grate it directly into the flour, then toss to combine. This method actually distributes the butter beautifully and creates very flaky scones.
Pin This Recipe!

Perfect Small-Batch Pumpkin Scones with Vanilla Glaze

These tender, flaky pumpkin scones are made in a small batch of six, perfect for fall mornings. Topped with a simple vanilla glaze, they come together in under 30 minutes with basic ingredients.
- Prep Time: 15 minutes
- Cook Time: 15 minutes
- Total Time: 30 minutes
- Yield: 6 scones 1x
- Category: Breakfast
- Cuisine: American
Ingredients
- 1 ½ cups (180g) all-purpose flour
- 3 tablespoons (36g) granulated sugar
- 2 teaspoons baking powder
- 1 teaspoon pumpkin pie spice
- ½ teaspoon ground cinnamon
- ¼ teaspoon salt
- 4 tablespoons (56g) cold unsalted butter, cut into small cubes
- ¼ cup (60g) pumpkin puree (not pumpkin pie filling)
- 3 tablespoons (45ml) heavy cream, plus extra for brushing
- 1 teaspoon vanilla extract
- ¾ cup (90g) powdered sugar
- 2 to 3 tablespoons (30-45ml) heavy cream (for glaze)
- ½ teaspoon vanilla extract (for glaze)
- Pinch of salt (for glaze)
Instructions
- Preheat oven to 400°F (200°C) and line a baking sheet with parchment paper.
- In a large bowl, whisk together flour, sugar, baking powder, pumpkin pie spice, cinnamon, and salt.
- Cut cold butter into the flour mixture using a pastry cutter or two forks until it resembles coarse meal with pea-sized butter pieces.
- In a small bowl, whisk together pumpkin puree, 3 tablespoons heavy cream, and 1 teaspoon vanilla extract until smooth.
- Pour wet ingredients into dry ingredients and stir with a fork until dough just comes together (it will look shaggy).
- Turn dough onto a lightly floured surface and gently bring together with hands. Pat into a 6-inch circle about ¾ inch thick.
- Cut the circle into 6 wedges using a sharp knife or bench scraper (cut straight down without twisting).
- Place scones on prepared baking sheet about 2 inches apart. Brush tops with additional heavy cream.
- Bake for 12 to 15 minutes until golden brown on bottom and lightly golden on top. Cool on a wire rack for 10 minutes.
- While scones cool, make glaze: whisk together powdered sugar, 2 tablespoons heavy cream, ½ teaspoon vanilla extract, and a pinch of salt. Add more cream 1 teaspoon at a time until thick but pourable.
- Drizzle glaze over warm scones. Let set for 5 minutes before serving.
Notes
Butter must be very cold for flaky layers. Do not overmix dough. For taller scones, chill shaped scones for 10 minutes before baking. Glaze sets best on warm (not hot) scones.
Nutrition
- Serving Size: 1 scone
- Calories: 290
- Sugar: 22
- Sodium: 210
- Fat: 12
- Saturated Fat: 7
- Carbohydrates: 42
- Fiber: 1
- Protein: 3
Keywords: pumpkin scones, small batch scones, pumpkin breakfast, fall scones, vanilla glaze scones